Wocha bin doin on your MG this week then?
Replied by G0RSQ on topic Wocha bin doin on your MG this week then?
Posted 8 years 3 months ago #184755Came across this on another forum, which is interesting, and suprised me!
DOT line on retrofitting DLR's
Please Log in or Create an account to join the conversation.
- mgtfbluestreak
-
 Offline
- Master MGer
-

Registered
- mgtf 135 2004 trophy blue jfv
- Posts: 3058
- Thanks: 1365
Replied by mgtfbluestreak on topic Wocha bin doin on your MG this week then?
Posted 8 years 3 months ago #184756Please Log in or Create an account to join the conversation.
- SundanceUK
-
 Offline
- Senior MGer
-

Registered
- MG TF 160 owner in Staffordshire
- Posts: 1098
- Thanks: 596
Replied by SundanceUK on topic Wocha bin doin on your MG this week then?
Posted 8 years 3 months ago #184757To open the lights up before fitting the DRL's cook for 7 mins in a preheated oven at 130 degrees Celsius. This allows you to break the seal and prise the lens away from the case. Be careful not to warp or distort the case as you lever the lens off, if it does distort, try to push it back before it cools too much.mgtfbluestreak wrote: Sundance recommended 50 degrees for a few minutes graham...
When refitting I was not happy at cooking the new LED's at such a high temperature, and seeing that the butyl was nice and tacky anyway, I lowered the temp in the oven to 50 degrees and cooked for five mins just to allow the rubber to be a bit more pliable.
It easily accepted the lens when pushed in.
I fixed the Halo's to the bezels with small blobs of sikoflex sealant, which I also used to seal the hole I drilled to allow the wiring into the rear of the light case.
Sundance
Please Log in or Create an account to join the conversation.
- mgtfbluestreak
-
Offline
- Master MGer
-
Registered
- mgtf 135 2004 trophy blue jfv
- Posts: 3058
- Thanks: 1365
Replied by mgtfbluestreak on topic Wocha bin doin on your MG this week then?
Posted 8 years 3 months ago #184764
.....Meanwhile at the bake off finals...

Please Log in or Create an account to join the conversation.
- SundanceUK
-
Offline
- Senior MGer
-
Registered
- MG TF 160 owner in Staffordshire
- Posts: 1098
- Thanks: 596
Replied by SundanceUK on topic Wocha bin doin on your MG this week then?
Posted 8 years 3 months ago #184766Anyway, some pictures of the controller for Graham.
Sundance
Here is where I put the controller. Perfect fit and just enough length on all of the wires to reach everywhere they have to go, with the exception of the wire that connected to the radio power...this needs to be lengthened.

This is where that wire to the radio is routed through the front bulkhead on the passenger side. I used the blank grommet on the right of the picture.

The fuse to the controller was cable tied neatly to the battery lifting handle....and the red and black supply wires go directly to the battery.

This is the wire that is surplus to requirements. Connect this and you will give people coming the other way an epileptic fit! Its the strobe function wire!

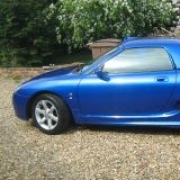
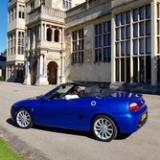
Finally a picture of the slightly tinted headlights and how the DRL's look with the illumination off. Also cos I like the look of the underbonnet area on my TF!

Please Log in or Create an account to join the conversation.
Replied by graham1 on topic Wocha bin doin on your MG this week then?
Posted 8 years 3 months ago #184768 Graham.
 Please Log in or Create an account to join the conversation.
- BruceTF135
-
 Online
- Qualified MGer
-

Site Supporter
- Posts: 686
- Thanks: 199
Replied by BruceTF135 on topic Wocha bin doin on your MG this week then?
Posted 8 years 3 months ago #184770SundanceUK wrote:
I fitted the controller next to my fusebox under the bonnet. The wire to the offside light was fed behind the radiator - you need to remove the slam panel to access this. The feed for the light dimming signal was taken from the nearside sidelight supply, the signal to turn the lights on from the ignition was taken from the radio feed - I fed the wire through the blind grommet next to the large grommet that the wires from the bonnet fusebox enter into the front bulkhead.
The other connections are the indicators, taken from the indicator wire on each lamp.
The controller also has one extra wire that is not used. This is a strobe signal that makes the lights rapid flash. I still have to tuck this away somewhere.
The wiring diagram available on the forums is really useful and shows you which colour wire and plug connections you need to tap into.
Note you do have to cut into the wiring loom that feeds the headlight plugs. Be careful as I pilled one of the crimped wires out and had to replace the connector completely, as I could not get the pin out to re-solder it on.
Sundance
Hi Sundance.
You say that you connected the 'lights on signal' (blue wire) to the radio feed inside the car. Is there any reason why one shouldn't connect to one of the fuses in the box under the bonnet? Using a piggy back fuse holder, for example? It looks like it would be easier.
Please Log in or Create an account to join the conversation.
- SundanceUK
-
Offline
- Senior MGer
-
Registered
- MG TF 160 owner in Staffordshire
- Posts: 1098
- Thanks: 596
Replied by SundanceUK on topic Wocha bin doin on your MG this week then?
Posted 8 years 3 months ago #184773Hi Sundance.
You say that you connected the 'lights on signal' (blue wire) to the radio feed inside the car. Is there any reason why one shouldn't connect to one of the fuses in the box under the bonnet? Using a piggy back fuse holder, for example? It looks like it would be easier.
I wished it wold have been that simple too.
The lights need a signal to switch them on when the ignition key is turned. I checked the fuses under the bonnet, and referenced them back to the wiring diagram. I could not find one that was switched, they are all permanently fed directly from the battery. They are linked on a busbar connector directly from the battery terminal wire.
The only switched supply I could find in the area was on the ABS modulator, and I did not really want to break into the wiring for it. It was actually easier to pop the wire through the bulkhead, remove the dashboard cubby and slide my radio out and connect to the switched 12v wire. Took about 30 mins.
Sundance
Please Log in or Create an account to join the conversation.
- SundanceUK
-
Offline
- Senior MGer
-
Registered
- MG TF 160 owner in Staffordshire
- Posts: 1098
- Thanks: 596
Replied by SundanceUK on topic Wocha bin doin on your MG this week then?
Posted 8 years 3 months ago #184775graham1 wrote: thank you, is it the green wire that you have to blank off, IE the strobe light, thanks,
Yes the green wire is not connected. The white wire goes to the side light switched wire, the blue to the ignition (any switched circuit) the yellow wire on each final connector goes to the indicator on the relevant side and the red and black to the battery.
Sundance.
Please Log in or Create an account to join the conversation.
- mgtfbluestreak
-
Offline
- Master MGer
-
Registered
- mgtf 135 2004 trophy blue jfv
- Posts: 3058
- Thanks: 1365
Replied by mgtfbluestreak on topic Wocha bin doin on your MG this week then?
Posted 8 years 3 months ago #184777
Please Log in or Create an account to join the conversation.
Replied by graham1 on topic Wocha bin doin on your MG this week then?
Posted 8 years 3 months ago #184778 Please Log in or Create an account to join the conversation.
- mgtfbluestreak
-
Offline
- Master MGer
-
Registered
- mgtf 135 2004 trophy blue jfv
- Posts: 3058
- Thanks: 1365
Replied by mgtfbluestreak on topic Wocha bin doin on your MG this week then?
Posted 8 years 3 months ago #184779

Please Log in or Create an account to join the conversation.