Hi all,
I hope this guide is useful, please be aware this will take considerable time to write up so it'll come piecemeal over the next couple of weeks. Gee me up if I go missing in this thread!
***
I DO NOT FOLLOW THE MG-ROVER RECOMMENDED METHODS EXACTLY IN THIS GUIDE, THIS IS FOR ENTERTAINMENT VALUE AND IS OFFERED PRO BONO. PLEASE CONSULT A SUITABLY QUALIFIED INDIVIDUAL IF YOU ARE UNCLEAR AT ANY POINT IN THIS GUIDE. ANY STEPS MARKED IN
RED ARE EXPRESSLY FOLLOWED AT YOUR OWN RISK.
***
Firstly, ammas a decent selection of hand tools, a comprehensive 1/2" socket set, 3/8" socket set, breaker bars, axle stands, special sockets (please read guide first,) and a decent trolley jack.
1) Firstly, remove the rear road wheels and jack the vehicle comfortably high. No point ending up with back-ache, so find a position that's safely high enough to work for you.
2)
As my head gasket has failed, I'm going to break a washing powder tablet in to my cooling system, a dishwasher tablet works equally well. Start the engine and allow it to reach operating temperature, I let my engine idle for half-an-hour.
This will get rid of an awful lot of "crap" that's built up in the system, along with any emulsified oil. Turn the heater on to "hot" too to allow the detergent to do its job around the heater matrix. Use a proprietary cooling system flush if you prefer.
3) Whilst the engine is hot, drain the chestnut coloured "snot" from the sump, if you're just renewing your timing belt of course this should be black.
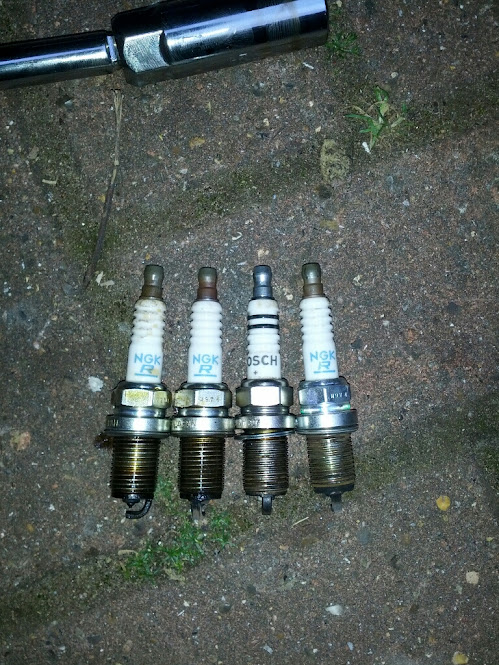
4) Remove the two cross headed screws to reveal the HT leads, mark the order of these then pull them from their wells. Remove the spark-plugs
That's hardly reassuring.......
Throw away anything worn that isn't an NGK plug and replace with a suitable NGK plug. Replace the plugs in sets of four (

) unlike the previous owner of my car.
5) Remove the alternator belt, firstly slacken the two bolts shown:
Annoying to photograph, but in the same plane as the front of the car you will find a 8mm adjuster screw, undo this CAREFULLY (they sheer very easily) and withdraw the belt by easing the alternator out of tension with the belt.
6a) Use a 1/2" 22mm socket and a bar, fit this as shown belt and "crack" the starter motor using the key, the camshaft pulley will magically fall on the floor. MAKE SURE nobody is standing near-by when you do this......
This "unconventional" method will normally remove even the most stubborn or awkard belt pulleys easily - BUT- not without risk........ This is how I did it anyway.
6b)
Alternative method, engage 5th gear, using two stout bars as show here, lock the roadwheels against the floor to prevent the engine rotating and undo the bolt.
6c) Buy special tool (around £30) and fart about removing the starter motor and fitting it to lock the flywheel, very safe method but....... lot of messing about if you 'catch my drift'

7) Set the pulley aside with its bolt, remove the 3x 8mm headed screws on the lower cambelt cover.
Third bolt is difficult to photograph, but its easy to see, it's a bit higher up than the other two, use a spanner to undo this one.
DO NOT attempt to remove the cover yet, although it will feel loose.
8) Remove the 5x 8mm screws on the top timing belt cover, one screw is about twice the length of the others, it goes in this hole on reassembly (as you'll forget)
Release the slacken the larger screw in the bottom most part of the top belt, the covers should then slide away with a bit of wiggling. Set them aside SAFELY as if ANYTHING in my experience will be trodden on and broken during an engine overhaul it's a timing belt cover.....
Shows location of five top cover screws, three lower cover screws and the stud that locates both that needs slackening (cut out on bottom left of upper cover.)
8) Support the engine under the sump with a study jack and a "decent" lump of wood.
9) Remove the two impossibly sized 18mm screws that hold the engine mount to the engine, USE A BREAKER BAR to break the tension then finish off with a ratchet.
Remember that the engine may move about slightly.....
TAKE A BREAK....
10) Now it's time to time the engine!! Hazzah! Firstly some TipEx or
your partners favourite nail varnish can be employed, firstly around the crankshaft pulley you'll find (afer wiping with a bit of rag and some WD40) two dots, the camshafts should have two small "slits" on the faces of them.
Lock the pasenger roadwheel as shown in step 6b), engage 5th gear and using a bar rotate the rear drivers wheel (bar on the studs) until the two dots align betwen the web on the oil pump housing.
(no light, won't post picture until I'm 100% sure it's clear!)
11) The two "slits" in the camshafts should point towards the FRONT of the car, if they are facing rearward rotate the engine another 360 degrees. Remember the cams and crank are geared 2:1 in a four-stroke engine.
Fit the timing belt tool.
(Picture to follow.)
MORE TOMORROW.