Sign In   Register

Topic

Andy's Back-to-front Project 11 years 3 months ago #100463

THIS IS A COPY AND PASTE FROM THE MAIN FORUM I USE (FORD), HENCE SOME SLIGHTLY CURIOUS WORDINGS OR DESCRIPTIONS, DISPARAGING REMARKS ETC....

Please Log in to join the conversation.

Andy's Back-to-front Project 11 years 3 months ago #100464

3rd January 2013

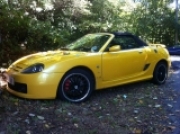
So here we are, Benham's MGF (stop laughing at the back....)


I picked the car up at the start of December for "pocket money" in car terms, costing me £200 after the tax that was left in the window.


It sat out in the cold for a few weeks and covered about 30 miles, then I thought I better bring it in, whipped the tax out the window (it'll be laid up for a few months) and put it away snugly in the garage.


The MOT ran out over Christmas, and a quick flick through last years advisory items, along with a play with my pry-bar told me this thing was going to need quite a bit of work for the next MOT. I'm not really interested in driving it until the sun comes out again, so it's been SORN'd and here starts the major spanner work!

I've been told THE BEST modification to an MGF is to fit some polybushes, as if by sheer fluke it turned out the the gentleman braking an MGF I'd been messaging from an MGF forum with a complete front-and-rear set of bushes lived well within walking distance of my house! Small world or what!??

Picked this lot up yesterday, this is not my normal "bodge and bin" project, so the lovely polybushed bits I'd acquired are in various stages of being stripped, sanded down and zinc-pruimed, they'll be hammerited WHITE in the next few weeks before they're fitted


The replacement hub is due to the NSR wheel bearing being absolutely shot, so much I thought the wheel nuts were loose when I drove the car back here from London! These are a huge press-in jobbie, I've taken a chance on a decent used hub, at least for the time being, it was cheaper than a bearing set without all the aggravation!

I've also purchased a complete set of rod-ends and ball-joints for the car as they are all in various stages of wear, but none of them really acceptable for the MOT; along with new rear callipers as this car has no handbrake of note!

Anyway, todays work!

Firstly, I thought the engine better have some sunlight, this is a complete pig of a job, it involves some magic positioning of the hood, removing some carpet and sound deadening and then removing TEN bolts, the cover than wiggles free:


Ta da! Yes, this is a K-Series, common fault on these, but I can't remember what it is.....


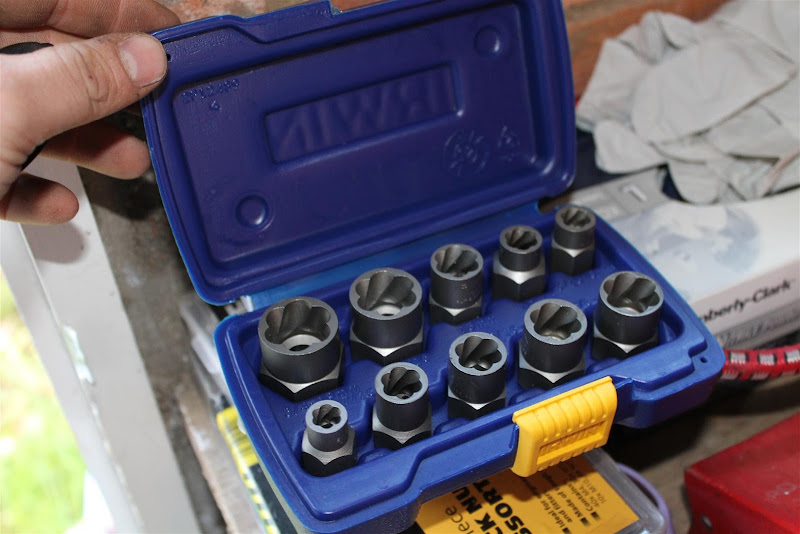
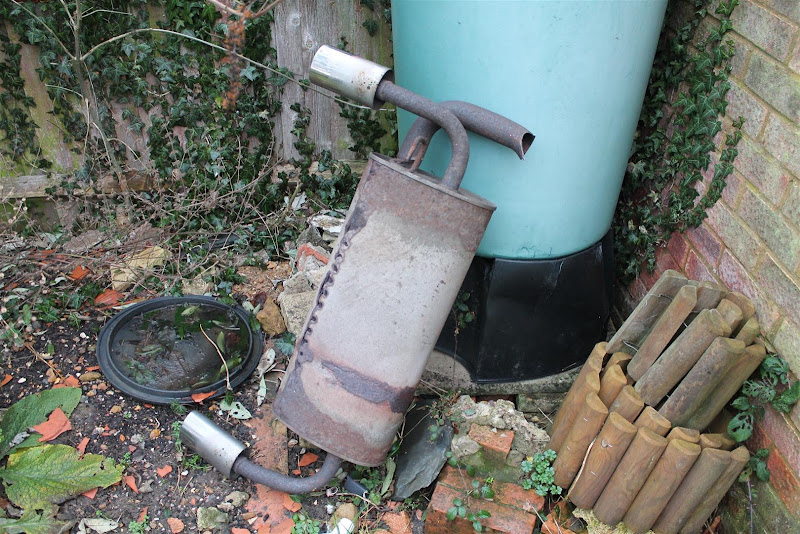
As I've mentioned I'm planning this to be a "soft restoration" so off comes the knackered and holed rear backbox, I've never come across such corroded bolts in my life, so out came these wonderful little bits of kit:


However, these even were beaten by one bolt made out of cheese, so there was nothing for it, the exhaust had to come out the "less pleasant" way:


The heat shield also crumbed and came away in pieces, so thankfully I'd bought one from the gent who'd sold me the polybushed bits, along with a backbox.

Then I got to work, I cleaned the underside of the exhaust/boot area, then set about applying a mist-coat, then a thicker coat of zinc-primer, I'll waxoyl this at a later date, along with injecting all the box work.


***

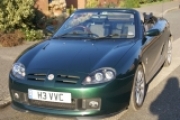
And now for some general photographs!


Lots of work to come here, comments and criticism welcome!

Regards,
Andy

Please Log in to join the conversation.

Andy's Back-to-front Project 11 years 3 months ago #100466

13th January

Little mod I picked up for a bargain last night!


Regards,
Andy
The following user(s) said Thank You: jac114, KentJohn

Please Log in to join the conversation.

Andy's Back-to-front Project 11 years 3 months ago #100470

i have a complete set of those bolt removers too, the come really handy in removing a rounded bolt on the caliper carrier of the TF and even better i got them free from the IRWIN Rep lol

nice work on the car by the way


Freestyle and TF for Sale Mk1 work in progress, well it never stops does it lol

Please Log in to join the conversation.

Andy's Back-to-front Project 11 years 3 months ago #100490

Cheers mate, just finding time to get on with it is the problem!

At the moment all of the rear suspension has been removed and the car is still being rust-proofed thoroughly, got to do a smidge of welding on the floor/inner sill but I think I'll leave that until next weekend when hopefully it'll be a degree or two warmer!

Basically I'm working from the back of the car to the front, hence the name of the project!

Thanks for your encouraging words!

Regards,
Andy

Please Log in to join the conversation.

Andy's Back-to-front Project 11 years 3 months ago #100493

Good job so far and the car looks pretty tidy.

Looks like you're doing very similar stuff to the bits and pieces I've already done or got planned. Will be watching this thread...
stevecrx
'98 'F, BRG Poverty Spec Edition
Build Thread

Please Log in to join the conversation.

Andy's Back-to-front Project 11 years 3 months ago #100497

  • John and Sue's Avatar
  • John and Sue
  • Offline
  • Master MGer
  • Master MGer
  • 06 TF 135. One of the last from Longbridge.
  • Posts: 4732
  • Thanks: 1138
Admire the work so far. How I used to do stuff back in the day. Keep it up!


Erm..... A FORD forum?
It will be all right in the end. If it isn't all right yet, then it is not yet the end..

Please Log in to join the conversation.

Andy's Back-to-front Project 11 years 3 months ago #100508

Never mind the car.... how cute is that kittie!! :lol:

Please Log in to join the conversation.

Andy's Back-to-front Project 11 years 3 months ago #100526

Cheers guys, yes I've been involved with one of the big Ford forums for around ten years now, I am a Ford man at heart - but the problem with modern Fords is that they're pretty damn reliable......... Not a lot of fun to be had there, hence an MGF as well.... bit of ying and yang.

Going out this morning to start taking more stuff off the car, and get rust proofing. I also have two new rear-callipers, new rear discs and pads, a new OSR hub and all of the rear polybushed stuff to go on.

Then it's hopefully new rear wheels (want 11 spokes but can't afford an entire set at the moment so will have to buy piecemeal) and stainless backbox, and possibly a stainless manifold.

Then I'll move forward to the engine!

Regards,
Andy

Please Log in to join the conversation.

Andy's Back-to-front Project 11 years 2 months ago #102688

02/02/2013

How things get broken

This afternoon it was time to whip the sump off, to do this the exhaust downpipe requires removal, so it was obvious as I have the new manifold to remove that all at the same time.


I started removing the manifold bolts, these are hidden behind a heatshield with bolts made of cheese, so I got angry and with the strength of ten just tore the damn thing off, the of course four out of five manifold studs came out, one thought it'd hold on, leaving the stud in the head, and the bolt in my hand.


The time honoured method for removing exhaust studs.

Then I wrestled and wrestled trying to get the manifold out, I used a 3' prybar and swore a lot, eventually the hole thing moved, and freed itself from the connection to the downpipe!


Out comes the rusty old mild manifold! The downpipe (that I'd attacked with the grinder) along with the cat was able to be wiggled and twisted free from under the car.


Spot the difference.

Then I realised why the thing wouldn't get go of the cylinder head, I'd forgotten to unplug the lambda probe..... I've actually managed to rip the innards out of it, whoops! A new one of those will be required I think!

All for now, have a heater in the garage now so back out there for part II of today's work!

Regards,
Andy

Please Log in to join the conversation.

Andy's Back-to-front Project 11 years 2 months ago #102689


Off came the sump, this is what's different about a K-series compared to any other engine on the road you see.....


Anyway, enough about BL engineering madness...

Removing an unholy number of bolts the sump was free and covered in gunk.

I degreased the sump (oven cleaner) and got as much crap off that'd come off, then in a low oven for 15 minutes to dry out


On goes a coat of "Hammerite Special Metal Primer", "Benham you're mad" you all cry, "why paint an ALLOY sump". Well, I'm painting it white, reason being that from kit-car building escapades white things are much easier to locate leaks on compared to steel, rust or black coloured things! Also means it can be wiped clean after oil changes etc.

The "Special Metal Primer" is required as Hammerite on aluminium is like trying to paint with water, it doesn't adhere at all well and leaves a patchy coat at best (that'll just flake off). This rather expensive primer smells, acts and looks very much like good ol' fashioned red-oxide to me........ Not impressed.

Here endeth the lesson.

Regards,
Andy

Please Log in to join the conversation.

Andy's Back-to-front Project 11 years 2 months ago #102696

Keep up the good work [another mgf saved from the crusher ]

PS you say you only took 10 bolts off the engine cover mine has 13 or is it 15 ?
BILSTIEN DAMPERS, 4-2-1 MANIFOLD, HEAD WORK BY SABRE.

Please Log in to join the conversation.

Last edit: Post by helsbyman.
Time to create page: 0.171 seconds
© 2024 The-T-Bar.com All Rights Reserved. Hosted By SEBS IT