Sign In   Register

Topic

My mods so far: stage 2 9 years 2 months ago #155680

Gad to hear that your feeling more like your self once more. Stress is evil as it creeps up on you and builds up un noticed a lot of the time then hits hard.

Onwards to the warmer weather and we can get more things done to the cars :broon: . Oh yes a nice lottery win would help too! :P
The following user(s) said Thank You: Denial

Please Log in to join the conversation.

My mods so far: stage 2 9 years 2 months ago #156168

BONNET UPDATE (work in progress)

Ok, so i mentioned in my last post that I had a design in mind for a carbon fibre bonnet. Finances being what they are I am attempting to make this myself. I have never attempted anything like this before, and I don't have any real engineering skills. So if I can't pull it off to my satisfaction then i'll try and come up with something else. I wanted a vented bonnet and I wanted something different, an alternative to the MR2 border or the Lotus Elise vent. So I started looking vented bonnets online, I have always been a fan of TVR design and it didn't take me long to decide. The plan is to use the existing bonnet with the vents added as a MOLD from which i will make a fibreglass copy, and then use this fibreglass copy to hopefully reproduce a Carbon Fibre one.


Decision made, and i'm trying for a TVR Chimaera bonnet. Next step was to do a photoshop mock up


I really like the lines and the shape, so gave myself the greenlight. Next step was to get my hands on a TVR Chimaera bonnet. I wasn't interested in the condition of the bonnet just the vents, so after a quick search on Ebay i found this:


It cost me £60 and that included delivery, 1st step was to cut out those vents, the TVR bonnet is made of fibre glass so it wasn't that hard. The obvious problem of course is:


The vents are to big to fit an MGF/TF bonnet, So I did the obvious and cut it down to fit:


fibre glass the pieces back together:


Please Log in to join the conversation.

My mods so far: stage 2 9 years 2 months ago #156169

then fill in the gaps with normal body filler. Once the vent is back to looking like normal i then plan to use modeling clay to sculpt/blend it into the existing bonnet. However before i can do that, i needed to do this:


It's a work in progress, it may not work, but i'm giving it a go! More updates to follow as and when.
Attachments:

Please Log in to join the conversation.

Last edit: Post by Denial.

My mods so far: stage 2 9 years 2 months ago #156186

You are far more talanted than you give yourself credit for.

Home to black Alfa Romeo 159 3.2 V6 Q4 ,green MGF VVC and red MG Maestro T16.

MG - the friendly marque.
The following user(s) said Thank You: Denial

Please Log in to join the conversation.

My mods so far: stage 2 9 years 2 months ago #156189

i love your ambition, mate! Good luck with it! :yesnod:
David
:shrug:
The following user(s) said Thank You: Denial

Please Log in to join the conversation.

My mods so far: stage 2 9 years 2 months ago #156212

So some more progress today which will hopefully give you a better idea of what the final could look like:


After filling the joins on the vent with normal car body filler and with a lot of sandpaper:


Now everything is back in one piece it slots into the holes cut in the bonnet yesterday and looks like:


the next step involves using 5kg (it was on sale and was playing safe) modeling clay:


This will be one of the most time consuming parts, but i'll post another pic after it's done. There are plans to vent air from the front out through these vents so its not totally cosmetic, but one step at a time.

Please Log in to join the conversation.

Re:My mods so far: stage 2 9 years 2 months ago #156223

That bonnet mod will look stunning when finished, and a different slant on the over pressure issue and light steering.
Good on you.
Ken


Sent from my iPad using Tapatalk HD
The following user(s) said Thank You: Denial

Please Log in to join the conversation.

My mods so far: stage 2 9 years 2 months ago #156275

rinse and repeat for the other side:


Then carry everything back down to the bodyshop, first job was to trim both sides of vents for a better fit, then fix the vents in place with a couple of bolts top and bottom through the bonnet, mark up some lines with masking tape and then the work of clay molding can begin:


Bad light stopped play (that and the bodyshop was closing) the clay molding is a long way from being finished but its coming along.

Please Log in to join the conversation.

My mods so far: stage 2 9 years 2 months ago #156337

I do like where your going with this, nice to see a bit of TVR inspiration being used as they DID make some spectacular looking cars - Sad day when they closed.
The following user(s) said Thank You: Denial

Please Log in to join the conversation.

My mods so far: stage 2 9 years 2 months ago #156443

Any progress being good progress a quick update, i've been busy putting the hours in and it's getting there, the main design is now done in clay. You can see that I have now added a front lip as well, for no other reason than I could and i liked it:


work has now begun on the most labour intensive bit, sanding down/refilling where required, to get everything smooth and level. the clay takes around 4 days to dry naturally. That's also another reason why progress is slow, but it helps me to pass the time and gets me out of the house. This week was also pay day and after making another payment, i am now 1/10th of the way to paying for the respray and some of the other bodywork changes the guys at the bodyshop will be doing for me. For those interested or just wondering how i am hoping to pull this off in carbon fibre, I plan on following the tutorial below:


and after all that its time for a beer, enjoy the weekend!
Attachments:

Please Log in to join the conversation.

Last edit: Post by Denial.

My mods so far: stage 2 9 years 1 month ago #157093

Apologies in advance, to those of you who were hoping to see a finished carbon fibre bonnet. Work on that is currently on hold until pay day, however knowing that 
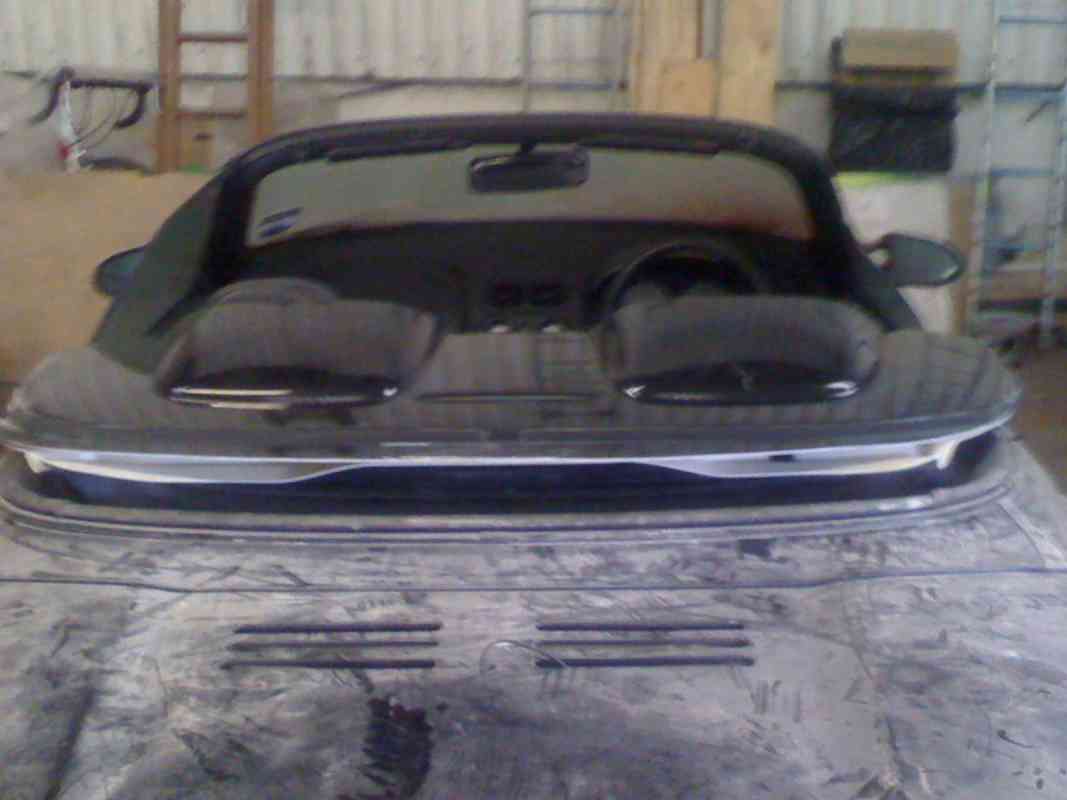
"the devil makes work for idle hands" (if you believe in that kind of thing) I have started work on the 2nd of the 3 exterior mods i have planned. Some of you with long memories, might recall a post did many months ago about a Renault Meganne tonneaux cover/lid/thing that I purchased from Ebay for £28.00:


Size wise, it's to wide to fit directly onto an MG, The white masking tape you can see on the pics above marks how wide it needs to be. First job was to put the roof down on my TF and make a template out of cardboard of the shape and size I needed. I then put the template on top of the Renault Meganne bit, and marked out what needed cutting off. The Meganne top is made from 2 pieces of plastic laminated together, so it didn't take me long using an pneumatic air saw to cut it down to size.


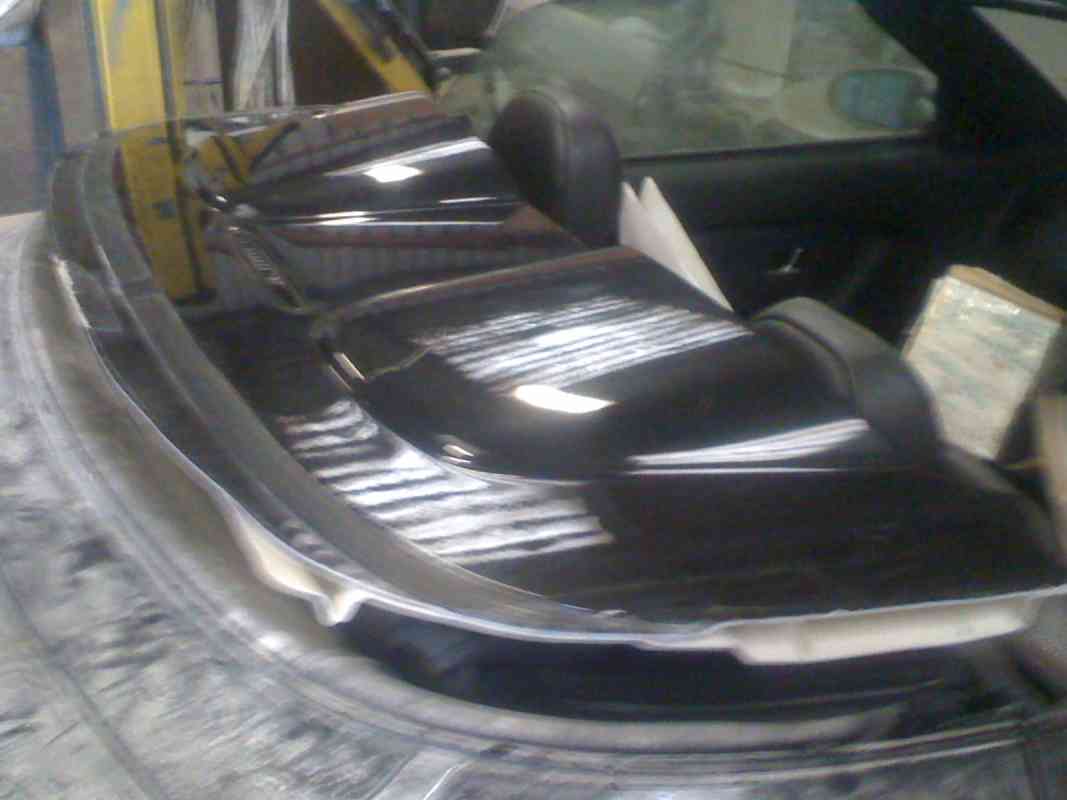
Hopefully you can see the 2 laminated plastic bits in the pics. I can't separate them and that's one of the reason's why it sits so high on the back of the car in the pics. However it doesn't matter because all I am really interested in is the shape on top. Which means I needed to make a mold of it, so i carried it back to my workshop/conservatory. As this won't be the mold I will use to make the finished item, I was able to cut a few corners and use the materials I had to hand (i just wanted to see the fit and gauge how much work will be needed) . The correct process would probably use release agents and layers of fibre glass, I used Kitchen tin foil, fibre glass resin, and the carbon fibre material I had left over from experimenting with previously.


Once it was dry, the carbon fibre just lifted straight off, I trimmed off the kitchen foil it was stuck to, and it was then back down to the garage


Please Log in to join the conversation.

Last edit: Post by Denial.

My mods so far: stage 2 9 years 1 month ago #157095


As you can see the fit at the back is now a lot better, the alignment of the pods with the seats isn't spot on so i'll need to do some cutting. However i'm now beginning to think i can make it work. The hardest work will be bringing the sides down, but i already knew that and that's also why i only took a rough mold of the top. The finnished version hopefully won't need the cup either :P
Attachments:

Please Log in to join the conversation.

Last edit: Post by Denial.
Time to create page: 0.304 seconds
© 2024 The-T-Bar.com All Rights Reserved. Hosted By SEBS IT