
TF Air intake on an F - How to upgrade.
- adamelphick
-
 Offline
Topic Author
Offline
Topic Author
- Moderator
-

- Posts: 3162
- Thanks: 572
TF Air intake on an F - How to upgrade. was created by adamelphick
Posted 13 years 8 months ago #190411. Remove the plastic screw and fastener that holds the plastic shield to the old air box:
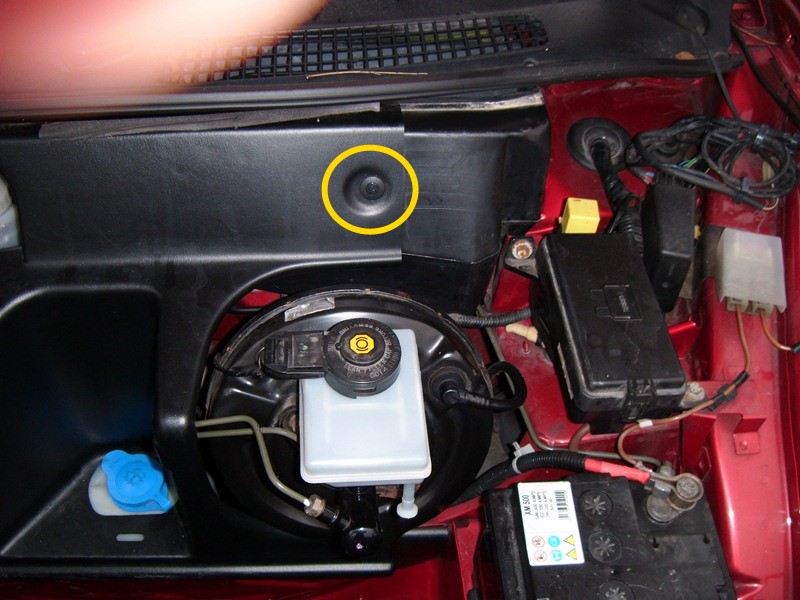

2. Also remove the two plastic 'nuts' from the left side of the shield. Then lift it away from the atatched threaded pins. Reach to the bottom of the shield and lift it off the threaded lugs (no nuts though!). You should find at this point you can lift and manoeuvre it out of the bonnet area now, leaving the area bare:
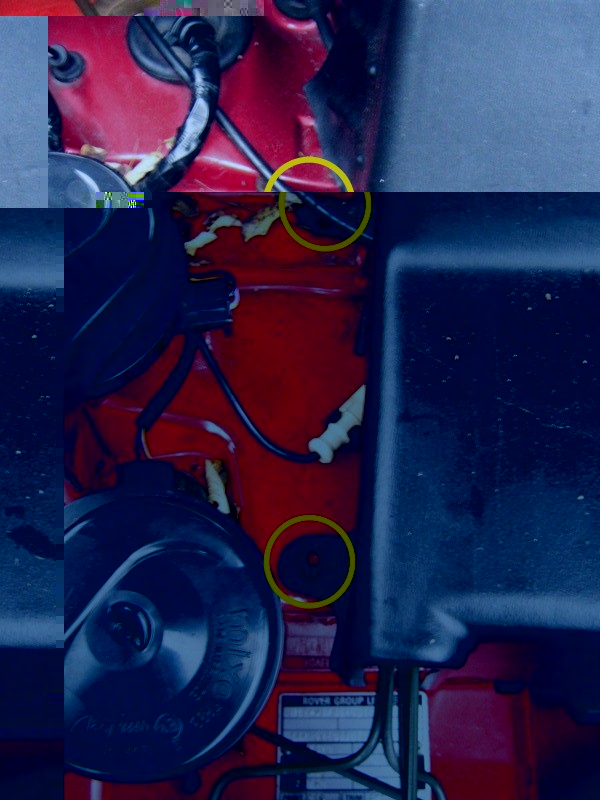
3. Now you can access the front, easiest to get at nut of the air box (it has a screw head on it or at least mine did!). I used a handy little tool I got from Lidl:
4. Unfortunately the F was either put together by miniature people, or there was no thought whatsoever on how the box would be removed to replace the seal!. You therefore have to move the brake servo and master unit out of the way. So first REMOVE the top nuts:
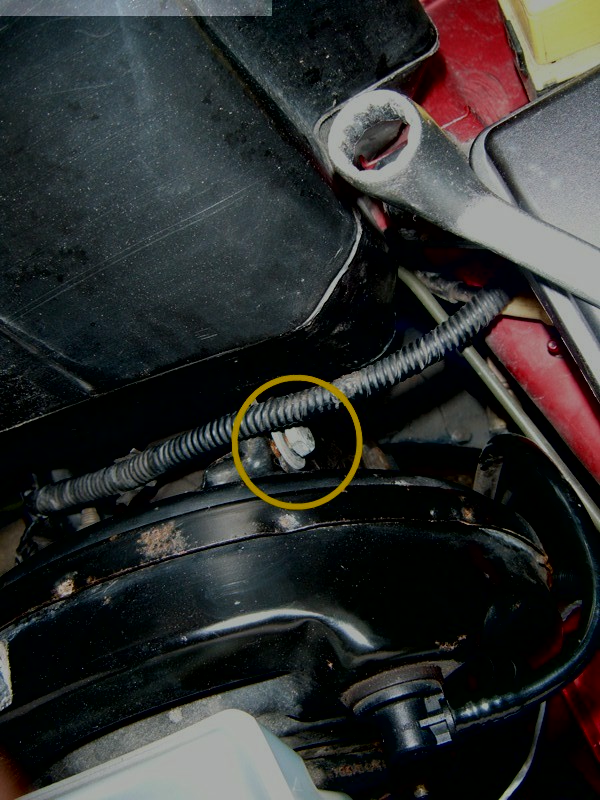
5. Just LOOSEN the lower nuts very slightly and then pull the whole servo unit towards you (watch the brake pipes - they should be fine with a small flexing):
6. You can then get normal sized hands into the unbelievably awkward area of the other front nut:
7. Next on the inside of the car remove the glove-box. It is done by loosening the two screws at the bottom of the glove-box door, and then removing the two upper screws found by opening it (they are black and at either side of the plastic edge). Remove the switch and bulb wires (label them too just in case!).
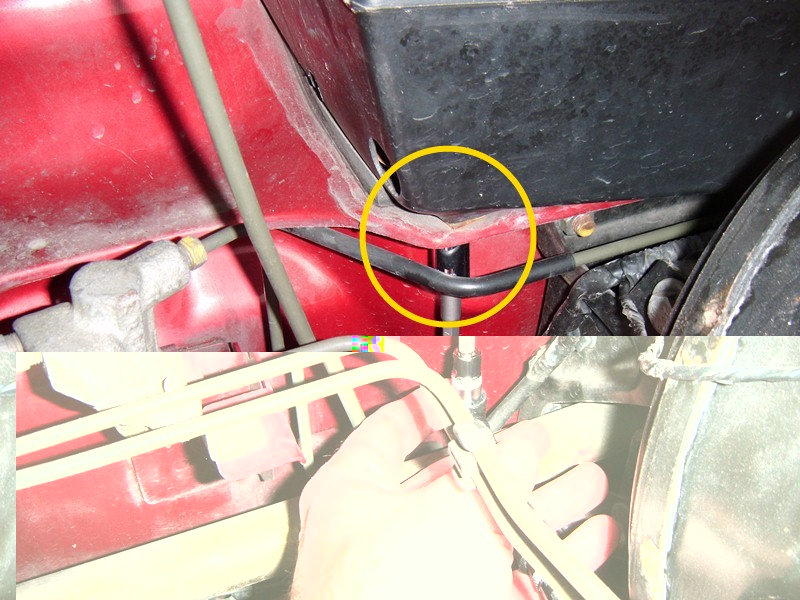
8. You can now access the underneath of the air intake box. I have a half installed air-con unit but luckily even with this in place you can just about get to the 2 screws that hold the rear of the box (I replaced one of mine with a normal screw previously as you can see circled):
9. Theoretically you can then go back under the bonnet and simply pull the air box off the seal and move it away. I however had a box that had previously been 'fixed' with gallons of silicone sealant! I used a cake spatula to slide under it and finally get it off:

10. Next clear up the area where your new seal will sit (the wooden bit you can see is there to hold the air-con box in shape as it is so cheap and nasty it flexes inwards!):

11. Once its all nice and clean and dry put an even bead of silicone (or frame sealant) around the edge of the hold in the bulkhead, and also on the air intake box seal (I used white so you can see it better but I would suggest clear or black!):


12. Place the air intake gently on the bulkhead area, and then use some nice new bolts, or threaded screws, and washers to secure the box in place:


13. Finally push the servo back in place and tighten the lower nuts, then replace the top ones. Put the plastic shield back in place and secure with the two plastic nuts and the top plastic screw and fastener (this is a bit further back than it was so make sure it seats in the sir intake box properly:

EH VOILÀ!

Please Log in or Create an account to join the conversation.
Replied by rayb on topic Re: TF Fresh intake box upgrade for an F
Posted 13 years 8 months ago #19047[img]i54.tinypic.com/2hdto4p.jpg[/img]

Please Log in or Create an account to join the conversation.
- adamelphick
-
Offline
Topic Author
- Moderator
-
- Posts: 3162
- Thanks: 572
Replied by adamelphick on topic Re: TF Fresh intake box upgrade for an F
Posted 13 years 8 months ago #19048
Please Log in or Create an account to join the conversation.
- David Aiketgate
-
 Offline
- David
-

- mgf mk2 freestyle mpi 16" wheels, in Anthracite.
- Posts: 20218
- Thanks: 4407
Replied by David Aiketgate on topic Re: TF Fresh intake box upgrade for an F
Posted 13 years 8 months ago #19050David
:shrug:
Please Log in or Create an account to join the conversation.
Replied by Laz1957 on topic Re: TF Fresh intake box upgrade for an F
Posted 13 years 8 months ago #19056")

Please Log in or Create an account to join the conversation.

Replied by swerving on topic Re: TF Air intake on an F - How to upgrade.
Posted 13 years 8 months ago #19074Incidentally a lot of people make the mistake that a leak is caused by the foam seal failing. This may be the case, but mine, and others I have seen recorded, was caused by the metal guard fitted to stop rain falling inside the original box, rusting and moving. Water then leaks down the inside of the air trunking towards the heater, but doesn't make it that far and seeps out onto the carpet in the passenger footwell.
Peter
Older but certainly not wiser!
Please Log in or Create an account to join the conversation.
- talkingcars
-
 Offline
- Moderator
-
- Posts: 6871
- Thanks: 1294
Replied by talkingcars on topic Re: TF Air intake on an F - How to upgrade.
Posted 13 years 8 months ago #19075
Home to black Alfa Romeo 159 3.2 V6 Q4 ,green MGF VVC and red MG Maestro T16.
MG - the friendly marque.
Please Log in or Create an account to join the conversation.
- adamelphick
-
Offline
Topic Author
- Moderator
-
- Posts: 3162
- Thanks: 572
Replied by adamelphick on topic Re: TF Air intake on an F - How to upgrade.
Posted 13 years 8 months ago #19080Now I have the recirculated air working the heater is hot much quicker, and the air is not smelly in traffic.... do people think that a 'recirculation only' mod would be useful? For those who don't want to suck in the fumes from the car in front, but who don't need air con?
Please Log in or Create an account to join the conversation.
- bryan young
-
 Offline
- Master MGer
-

- Posts: 3631
- Thanks: 772
Replied by bryan young on topic Re: TF Air intake on an F - How to upgrade.
Posted 13 years 8 months ago #19081")
Please Log in or Create an account to join the conversation.
- David Aiketgate
-
Offline
- David
-
- mgf mk2 freestyle mpi 16" wheels, in Anthracite.
- Posts: 20218
- Thanks: 4407
Replied by David Aiketgate on topic Re: TF Air intake on an F - How to upgrade.
Posted 13 years 8 months ago #19095adamelphick wrote: You could cut it in half - but frankly it would take longer than undoing two bolts and loosening two others to be honest.
Now I have the recirculated air working the heater is hot much quicker, and the air is not smelly in traffic.... do people think that a 'recirculation only' mod would be useful? For those who don't want to suck in the fumes from the car in front, but who don't need air con?
I think it would be a benefit, would it be an easy mod?
David
:shrug:
Please Log in or Create an account to join the conversation.
- adamelphick
-
Offline
Topic Author
- Moderator
-
- Posts: 3162
- Thanks: 572
Replied by adamelphick on topic Re: TF Air intake on an F - How to upgrade.
Posted 13 years 8 months ago #19142bryan young wrote: Adam, that is a mega conversion of the original!!! i think yours is clearer and much more simple to do (remember that RP cut his old one with a bread knife to get it out. Well done, an excellent "How To"....
Hehe thanks Bryan - I love to simplify things if I can!
Please Log in or Create an account to join the conversation.
- adamelphick
-
Offline
Topic Author
- Moderator
-
- Posts: 3162
- Thanks: 572
Replied by adamelphick on topic Re: TF Air intake on an F - How to upgrade.
Posted 13 years 8 months ago #19143david aiketgate wrote:
adamelphick wrote: You could cut it in half - but frankly it would take longer than undoing two bolts and loosening two others to be honest.
Now I have the recirculated air working the heater is hot much quicker, and the air is not smelly in traffic.... do people think that a 'recirculation only' mod would be useful? For those who don't want to suck in the fumes from the car in front, but who don't need air con?
I think it would be a benefit, would it be an easy mod?
Well it would need a smaller box than the Air-Con monster box Meg has - but it is possible... I could do with getting a spare air-con box to see if a smaller version is possible with an air flap... I'll check eBay.
Please Log in or Create an account to join the conversation.