
Glass rear screen - How to fit in a MK2 hood.
- adamelphick
-
 Offline
Topic Author
Offline
Topic Author
- Moderator
-

- Posts: 3162
- Thanks: 572
Glass rear screen - How to fit in a MK2 hood. was created by adamelphick
Posted 14 years 8 months ago #840
Glass Rear Window on a Mk2 MGF/TF hood (the easy way!
).
I am creating this web page to help all those out there who want to get rid of their unsightly plastic rear window panel and add the cool '05' model year glass one instead. You follow these instructions at your own risk. I found the process very easy indeed, especially as I had never done anything to the hood on 'Meg' before - but make sure you read everything before starting and ensure you are confident to do the work!
There has been a lot of things said about how MGR changed things to make the glass panel fit - well the truth is they didn't change very much at all. Certainly it is not beyond the basic DIY car enthusiast to add the glass panel. I added mine to stage 1 in about 3 hours (and that only took that long because the sunny day immediately disappeared in favour of thunder storms as soon as I took the back of the hood up! ).
OK so where do we start? Well the first thing you need is to buy the glass panel itself... the MGR part number you need is DSL000030PDA. IF you are quick you can still pick these up for around £150 from XPart dealers, and also good old eBay!!
The next section will tell you how to get the old panel off and the new panel in place.
1. First thing to do is remove the old panel.
a. Unzip the top of the plastic rear panel and release the Velcro strips form the sides. Gently fold down the panel onto the rear parcel shelf (why do they call it that? there's certainly no room for parcels up there! )
b. Lift the rear of the hood by unclipping the retainer clips from inside the rear of the car and raising the rear panel.
c. You will see a row of rivets along the bottom of the hood panel at the back:

There are also rivets round the curve of the base as per the next two pictures.


Drill out ALL of the rivets from the one round the curve of each side and right across the rear. This will allow the VERY RUSTY metal retainer to be removed. You may also find two rivets UNDER the cloth of the curved side section, if so (assuming it hasn't rusted away like mine! ) drill this out too.
d. remove the metal retainer and then pop off the bottom of the rear hood section and remove the whole screen panel out of the way. Now is a good time to clean out all the years of muck that has accumulated around the hood base.
2. Now you need to free up the rear hood frame bar.
a. Firstly you need to CAREFULLY peel back the velvety covering from the rear frame bar. Its black and furry so you cant miss it. I found that although it's a bit more awkward you are better peeling from the back of the bar and letting it flap down so that the furry side faces forward. All will become apparent as you peel don't worry!
b. This will reveal a row of small nylock nuts which bolt the rear bar to a metal support for the top zip. These are 7mm nuts, however you will need a nice slim socket for them as in their wisdom MGR made the holes at either end in slightly the wrong place, so the nuts are VERY close to the edge of the outer holes.. be warned! Anyway, undo these small nuts and keep them safe (I used the parcel shelf for all the bits I took off as I couldn't lose them then! ).

c. Now EASE the hood off of the rear bar. You will see a row of bolts that the 7mm nuts fastened to. These are fixed to the hood by means of a metal insert in the hood. Basically ease the hood forward and the bar rearward..... its a struggle but it does go! Opening the hood slightly does help with this.

d. Next from the outside ease the rear of the hood forwards over the rear bar as below.


e. Drill out the rivets that you see.
f. Then at each end you will (if you ease back that hood a bit further ) see two cross head screws hiding under some more of that lovely velvety material - undo these screws.


g. You can now remove the whole top zip section as below. You can discard this later.


h. Lay the the NEW panel on the floor and mark the centre of it onto the TOP zip. I used a pencil as this seems to add a mark which fortunately you don't notice when fitted! Notice the new zip is shorter than the old one, no more Velcro needed to stop it flapping about!

I am creating this web page to help all those out there who want to get rid of their unsightly plastic rear window panel and add the cool '05' model year glass one instead. You follow these instructions at your own risk. I found the process very easy indeed, especially as I had never done anything to the hood on 'Meg' before - but make sure you read everything before starting and ensure you are confident to do the work!
There has been a lot of things said about how MGR changed things to make the glass panel fit - well the truth is they didn't change very much at all. Certainly it is not beyond the basic DIY car enthusiast to add the glass panel. I added mine to stage 1 in about 3 hours (and that only took that long because the sunny day immediately disappeared in favour of thunder storms as soon as I took the back of the hood up! ).
OK so where do we start? Well the first thing you need is to buy the glass panel itself... the MGR part number you need is DSL000030PDA. IF you are quick you can still pick these up for around £150 from XPart dealers, and also good old eBay!!
The next section will tell you how to get the old panel off and the new panel in place.
1. First thing to do is remove the old panel.
a. Unzip the top of the plastic rear panel and release the Velcro strips form the sides. Gently fold down the panel onto the rear parcel shelf (why do they call it that? there's certainly no room for parcels up there! )
b. Lift the rear of the hood by unclipping the retainer clips from inside the rear of the car and raising the rear panel.
c. You will see a row of rivets along the bottom of the hood panel at the back:
There are also rivets round the curve of the base as per the next two pictures.
Drill out ALL of the rivets from the one round the curve of each side and right across the rear. This will allow the VERY RUSTY metal retainer to be removed. You may also find two rivets UNDER the cloth of the curved side section, if so (assuming it hasn't rusted away like mine! ) drill this out too.
d. remove the metal retainer and then pop off the bottom of the rear hood section and remove the whole screen panel out of the way. Now is a good time to clean out all the years of muck that has accumulated around the hood base.
2. Now you need to free up the rear hood frame bar.
a. Firstly you need to CAREFULLY peel back the velvety covering from the rear frame bar. Its black and furry so you cant miss it. I found that although it's a bit more awkward you are better peeling from the back of the bar and letting it flap down so that the furry side faces forward. All will become apparent as you peel don't worry!
b. This will reveal a row of small nylock nuts which bolt the rear bar to a metal support for the top zip. These are 7mm nuts, however you will need a nice slim socket for them as in their wisdom MGR made the holes at either end in slightly the wrong place, so the nuts are VERY close to the edge of the outer holes.. be warned! Anyway, undo these small nuts and keep them safe (I used the parcel shelf for all the bits I took off as I couldn't lose them then! ).
c. Now EASE the hood off of the rear bar. You will see a row of bolts that the 7mm nuts fastened to. These are fixed to the hood by means of a metal insert in the hood. Basically ease the hood forward and the bar rearward..... its a struggle but it does go! Opening the hood slightly does help with this.
d. Next from the outside ease the rear of the hood forwards over the rear bar as below.
e. Drill out the rivets that you see.
f. Then at each end you will (if you ease back that hood a bit further ) see two cross head screws hiding under some more of that lovely velvety material - undo these screws.
g. You can now remove the whole top zip section as below. You can discard this later.
h. Lay the the NEW panel on the floor and mark the centre of it onto the TOP zip. I used a pencil as this seems to add a mark which fortunately you don't notice when fitted! Notice the new zip is shorter than the old one, no more Velcro needed to stop it flapping about!

Last Edit:13 years 8 months ago
by adamelphick
Last edit: 13 years 8 months ago by David Aiketgate.
The following user(s) said Thank You: Leigh Ping
Please Log in or Create an account to join the conversation.
- adamelphick
-
Offline
Topic Author
- Moderator
-
- Posts: 3162
- Thanks: 572
Replied by adamelphick on topic Glass rear screen in a standard MK2 hood. (Pt2)
Posted 14 years 8 months ago #844
4. Next you need to go back to the hood.
a. Cut a slot in the Velvety material to release the straps and slide the rear of the hood backwards and the now loose rear bar forwards over the metal bit with the bolts sticking out. You will notice the strap now hangs down in a loop.


b. Peel off the velvety material from the metal cross piece. KEEP this material for later!


c. Now you need to remove the metal cross piece. Undo the bolt at either end.

d. Then gently pry the hood canvas from the cross piece. It is held by contact adhesive but to be honest by the time you are doing this the glue will have long since lost most of its stick! The most difficult bit is manoeuvring it off the bolts!


c.. Now take the new zip and glue it in position on the remaining 'flap' using contact adhesive. Make sure you stick it so that it sits just at the bottom edge of the holes that used to have the bolts from the metal cross piece. Basically you want the actual zipper to JUST be below the flap edge.
VERY IMPORTANT - MAKE SURE YOUR ZIP IS THE RIGHT WAY ROUND! THE HEAD OF THE ZIPPER SHOULD BE ON THE PASSENGER SIDE OF THE CAR WITH THE ZIP FACING INWARDS!


d. Now you need to sew the zip in. I used pale coloured angling line for this so you can see it. I would highly recommend using some kind of fishing line (soft flexible one) as it is super strong, and this part gets a lot of tugging! The actual sewing took me the best part of 2 hours as it is quite a thickness to go through. I cant stress enough how important the quality of your stitches is. This joint takes the FULL FORCE of the hood stretching!!! Take your time with this bit or you'll have problems later!

e. Once the zip is sewn in take the glass rear panel and zip it up to it. Push the rear bar as far rearwards as it will go so the straps are tight.
5. Back outside to the hood rear fixings.


a. Next, with the hood down but not fastened, pull the bottom of the new glass rear section down towards the rear clamping bar of the frame. This will allow you to see which of the pre cut TINY holes marry up with the centre rivet hole. Once you have decided which is the right one you can raise the rear fastening bar up a little and everything becomes easier!
b. Make sure you get the double flap of material at the bottom of the rear glass section INSIDE the car. i.e. when you put the rivets in you are riveting through the rear section, the rubber strip at the bottom AND the flap. It is designed to add strength to the joint!!!
c. Take the old metal strip you removed way back at the beginning and hold it against the rubber strip at the bottom of the rear section. The rubber is designed to go BELOW the metal strip, so it kind of wraps over the bottom edge of the strip very slightly, like a water seal.
d. Use self tapping screws to hold the bottom all together. I found this easier and certainly more useful for future removal of things!
e. Adjust the Velcro seams at the sides of the rear glass panel so that they marry up with the original Velcro on the hood. Don't worry if it seems there is a kind of open flap in this area, this is needed to allow the hood to fold!
6. Now from the inside clamp the rear of the frame back down again.
a. As the new hood will invariably be all tight again (as I found the rear section is what actually gets stretched and then lets your hood go slightly loose fitting) you may find it easier to slightly lift the hood before you continue.
b. Take the velvety strip of material you saved from earlier and use it to cover the loose rear bar. You should find it fits nicely between the straps.


a. Cut a slot in the Velvety material to release the straps and slide the rear of the hood backwards and the now loose rear bar forwards over the metal bit with the bolts sticking out. You will notice the strap now hangs down in a loop.
b. Peel off the velvety material from the metal cross piece. KEEP this material for later!
c. Now you need to remove the metal cross piece. Undo the bolt at either end.
d. Then gently pry the hood canvas from the cross piece. It is held by contact adhesive but to be honest by the time you are doing this the glue will have long since lost most of its stick! The most difficult bit is manoeuvring it off the bolts!
c.. Now take the new zip and glue it in position on the remaining 'flap' using contact adhesive. Make sure you stick it so that it sits just at the bottom edge of the holes that used to have the bolts from the metal cross piece. Basically you want the actual zipper to JUST be below the flap edge.
VERY IMPORTANT - MAKE SURE YOUR ZIP IS THE RIGHT WAY ROUND! THE HEAD OF THE ZIPPER SHOULD BE ON THE PASSENGER SIDE OF THE CAR WITH THE ZIP FACING INWARDS!
d. Now you need to sew the zip in. I used pale coloured angling line for this so you can see it. I would highly recommend using some kind of fishing line (soft flexible one) as it is super strong, and this part gets a lot of tugging! The actual sewing took me the best part of 2 hours as it is quite a thickness to go through. I cant stress enough how important the quality of your stitches is. This joint takes the FULL FORCE of the hood stretching!!! Take your time with this bit or you'll have problems later!
e. Once the zip is sewn in take the glass rear panel and zip it up to it. Push the rear bar as far rearwards as it will go so the straps are tight.
5. Back outside to the hood rear fixings.
a. Next, with the hood down but not fastened, pull the bottom of the new glass rear section down towards the rear clamping bar of the frame. This will allow you to see which of the pre cut TINY holes marry up with the centre rivet hole. Once you have decided which is the right one you can raise the rear fastening bar up a little and everything becomes easier!
b. Make sure you get the double flap of material at the bottom of the rear glass section INSIDE the car. i.e. when you put the rivets in you are riveting through the rear section, the rubber strip at the bottom AND the flap. It is designed to add strength to the joint!!!
c. Take the old metal strip you removed way back at the beginning and hold it against the rubber strip at the bottom of the rear section. The rubber is designed to go BELOW the metal strip, so it kind of wraps over the bottom edge of the strip very slightly, like a water seal.
d. Use self tapping screws to hold the bottom all together. I found this easier and certainly more useful for future removal of things!
e. Adjust the Velcro seams at the sides of the rear glass panel so that they marry up with the original Velcro on the hood. Don't worry if it seems there is a kind of open flap in this area, this is needed to allow the hood to fold!
6. Now from the inside clamp the rear of the frame back down again.
a. As the new hood will invariably be all tight again (as I found the rear section is what actually gets stretched and then lets your hood go slightly loose fitting) you may find it easier to slightly lift the hood before you continue.
b. Take the velvety strip of material you saved from earlier and use it to cover the loose rear bar. You should find it fits nicely between the straps.
by adamelphick
The following user(s) said Thank You: Leigh Ping
Please Log in or Create an account to join the conversation.
- adamelphick
-
Offline
Topic Author
- Moderator
-
- Posts: 3162
- Thanks: 572
Replied by adamelphick on topic Glass rear screen in a standard MK2 hood. (Pt3)
Posted 14 years 8 months ago #847
c. Now you need to fasten the rear clamps that hold the hood back to the rear panel. Again make sure your front hood clamps are undone for this bit, it's going to be REALLY tight otherwise!

d. If you used light coloured thread (or fishing line!) to sew the zip in as I did, which does make it easier to see your stitches, then you need to colour it black at this point so it's not unsightly. I used my trusty indelible pen 'Sharpie'!


e. Now the really fun part. Make sure the rear frame bar is back as far as it will go still. Your hood is going to be very tight indeed (a bit like when it was new!) so you'll need to use the front cross piece of the hood to PULL it downwards to clamp it. Everything is going to creak like mad at this point - don worry, unless your hood is knackered it can hold up to the strain! (I will put another disclaimer at this point to say that you have done all this at your own risk! LOL). I recommend spraying some water on the hood (just a bit!) after you have done this. It will allow the hood to settle properly, and take some of that tightness out. When you open it the next day it will feel like a new hood!
FINISHED GLASS REAR SECTION IN ALL ITS GLORY.

Appendix:
7. Added some small 'filler patches' to the zip end areas to pull the rear section square. This was actually very easy as all I had to do was to loosen the hood, pull the rear bar forward and there was enough flex to easily allow me to sew the patches in place:


8. Also decided to reinforce a few 'wear areas' that are typical to the MGF/TF. I used the spare material that came with the rear section (this was over the entire glass area as a cover so is perfect for patching your roof as its the correct material!). As you can see all I did was to use some 'Evostik' to bind the new patches to the inside of Meg's roof panel. Worked like a treat.... Now I know that if she gets any more wear patches I have enough material to sort them out for years to come!


9. OK the bit I almost forgot!! I got a heated rear window switch kit from eBay and fitted it.
a. The kit came with instructions but basically you pop out a blank in the switch panel in the centre console and attach the switch to the only spare plug there as far as I can see (clearly I have no connector for front fog lights!). In the MGF Mk1 if you use a newer style centre console (like me) you will need to shave the small locating strips off the plug to make it fit the switch (or if you're like me just push a bit harder and it goes on anyway!).
b. Next add the relay to the fuse board under the steering wheel. It's the only spare relay space and is VERY tight to the lower dash panel. I removed the starter relay to get better access.
c. Then the fun part... you can either spend £20 on eBay buying an official rear loom part, or make one for pennies.... guess which I did?! Anyway, there are only two wires on the rear loom plug. You will find this if you lift the passenger side parcel shelf carpet up. Its a white plastic plug. Just use good high ampage spade connectors to attach two pieces of 30amp cable to it. At the heated rear window end use more spades (I used insulated ones). Then wrap the exposed area of cable that shows above the carpet with black tape neatly and voila:

NOTE* Make sure you leave some flex in the cable for the top to fold!!
I have had NO SAGGING of the rear hood at all so far - it looks amazing and a few people with MGF's have stopped me and asked how I did it......
d. If you used light coloured thread (or fishing line!) to sew the zip in as I did, which does make it easier to see your stitches, then you need to colour it black at this point so it's not unsightly. I used my trusty indelible pen 'Sharpie'!
e. Now the really fun part. Make sure the rear frame bar is back as far as it will go still. Your hood is going to be very tight indeed (a bit like when it was new!) so you'll need to use the front cross piece of the hood to PULL it downwards to clamp it. Everything is going to creak like mad at this point - don worry, unless your hood is knackered it can hold up to the strain! (I will put another disclaimer at this point to say that you have done all this at your own risk! LOL). I recommend spraying some water on the hood (just a bit!) after you have done this. It will allow the hood to settle properly, and take some of that tightness out. When you open it the next day it will feel like a new hood!
FINISHED GLASS REAR SECTION IN ALL ITS GLORY.
Appendix:
7. Added some small 'filler patches' to the zip end areas to pull the rear section square. This was actually very easy as all I had to do was to loosen the hood, pull the rear bar forward and there was enough flex to easily allow me to sew the patches in place:
8. Also decided to reinforce a few 'wear areas' that are typical to the MGF/TF. I used the spare material that came with the rear section (this was over the entire glass area as a cover so is perfect for patching your roof as its the correct material!). As you can see all I did was to use some 'Evostik' to bind the new patches to the inside of Meg's roof panel. Worked like a treat.... Now I know that if she gets any more wear patches I have enough material to sort them out for years to come!
9. OK the bit I almost forgot!! I got a heated rear window switch kit from eBay and fitted it.
a. The kit came with instructions but basically you pop out a blank in the switch panel in the centre console and attach the switch to the only spare plug there as far as I can see (clearly I have no connector for front fog lights!). In the MGF Mk1 if you use a newer style centre console (like me) you will need to shave the small locating strips off the plug to make it fit the switch (or if you're like me just push a bit harder and it goes on anyway!).
b. Next add the relay to the fuse board under the steering wheel. It's the only spare relay space and is VERY tight to the lower dash panel. I removed the starter relay to get better access.
c. Then the fun part... you can either spend £20 on eBay buying an official rear loom part, or make one for pennies.... guess which I did?! Anyway, there are only two wires on the rear loom plug. You will find this if you lift the passenger side parcel shelf carpet up. Its a white plastic plug. Just use good high ampage spade connectors to attach two pieces of 30amp cable to it. At the heated rear window end use more spades (I used insulated ones). Then wrap the exposed area of cable that shows above the carpet with black tape neatly and voila:
NOTE* Make sure you leave some flex in the cable for the top to fold!!
I have had NO SAGGING of the rear hood at all so far - it looks amazing and a few people with MGF's have stopped me and asked how I did it......
by adamelphick
The following user(s) said Thank You: Leigh Ping
Please Log in or Create an account to join the conversation.
- adamelphick
-
Offline
Topic Author
- Moderator
-
- Posts: 3162
- Thanks: 572
Replied by adamelphick on topic Glass rear screen in a standard MK2 hood. (Final Part)
Posted 14 years 8 months ago #848
REAR SUPPORT STRAPS
I added some new rear support straps to not only support the glass screen as per OEM, but also to pull the rear bar back as the hood is raised.
Firstly lift the rear of the hood and expose the screws that had secured it previously. Then take a length of old seat belt webbing, seal its end with a flame and feed it between the bottom metal bar and the hood material:

Do this for both sides then clamp the rear webbing in the rear metal strap and put back the screws. I found tucking it in behind the metal strap and then doing the screws up made it very secure. Then from the inside feed the two straps up and over the rear bar, then make sure it it pushed fully backwards:


Marked either side of the straps with correction fluid (nice and bright) so that they just overlap the edge of the plastic surround of the glass panel. Then pull them as tight as you can and mark two blobs aligned with the marks on the rear bar (this will allow you to match it up when you have made the hood slack again):


Unclip the rear of the hood again and unzip the rear screen to let it flop into the rear area. This will allow you to slide the hood material over the rear bar and get to where you need to sew the straps:

The straps should just overlap the original bolt hole in the rear bar and so you can pop a few thread lines through the hole between the top and bottom of the sewn strap to hold it in place and stop it sliding. Then you are able to pull the hood material back over the bar, zip in the rear section and attach the Velcro to sides and top edge, and clip the bottom bar back again. Then reconnect the heated rear element:


I added some new rear support straps to not only support the glass screen as per OEM, but also to pull the rear bar back as the hood is raised.
Firstly lift the rear of the hood and expose the screws that had secured it previously. Then take a length of old seat belt webbing, seal its end with a flame and feed it between the bottom metal bar and the hood material:
Do this for both sides then clamp the rear webbing in the rear metal strap and put back the screws. I found tucking it in behind the metal strap and then doing the screws up made it very secure. Then from the inside feed the two straps up and over the rear bar, then make sure it it pushed fully backwards:
Marked either side of the straps with correction fluid (nice and bright) so that they just overlap the edge of the plastic surround of the glass panel. Then pull them as tight as you can and mark two blobs aligned with the marks on the rear bar (this will allow you to match it up when you have made the hood slack again):
Unclip the rear of the hood again and unzip the rear screen to let it flop into the rear area. This will allow you to slide the hood material over the rear bar and get to where you need to sew the straps:
The straps should just overlap the original bolt hole in the rear bar and so you can pop a few thread lines through the hole between the top and bottom of the sewn strap to hold it in place and stop it sliding. Then you are able to pull the hood material back over the bar, zip in the rear section and attach the Velcro to sides and top edge, and clip the bottom bar back again. Then reconnect the heated rear element:
by adamelphick
The following user(s) said Thank You: Leigh Ping
Please Log in or Create an account to join the conversation.
- Leigh Ping
-
 Online
- Moderator
-
- Posts: 6837
- Thanks: 1630
Replied by Leigh Ping on topic Re: Glass rear screen - How to fit in a MK2 hood.
Posted 11 years 11 months ago #61803
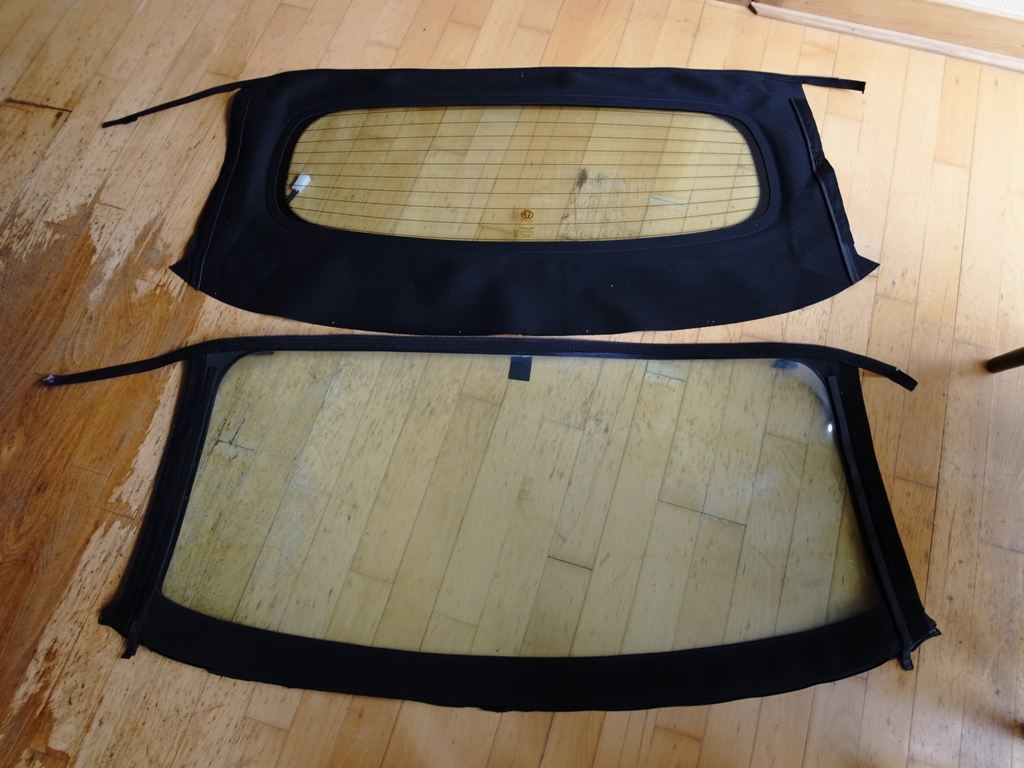
'Before and after' by 'Blow-in' Richard -
The MGF Mania screen arrived around lunch time today. I spent a few hours fitting it mainly because I had a good clean around and also replaced a few corroded machine screws in the hood mechanism with stainless steel.
A few comments on fitting:
1 - I reused the half of the zip attached to the hood as it was in good condition - the new half meshed perfectly (as expected as I'd tested the old screen zip against the new hood part of the zip). Reusing the zip means avoiding what looks like the most difficult part of the job.
2 - I used Peter's recommended method of removing old rivets with a mallet - and in my case - old chisel. I tried drilling one just for comparison and the swarf was mega.
3 - Peter's online 15 minute fitting guide is all you need if reusing the zip half provided you know how to release the 'parcel' shelf.
4 - The final corner rivets (before fitting the covering bit) take some patience as it's all a bit tight (as it needs to be for a good fit).
Results below - I'm happy!!
Richard
by Leigh Ping
The following user(s) said Thank You: mgfmania
Please Log in or Create an account to join the conversation.
Time to create page: 0.556 seconds