
New shock absorber and springs - How to
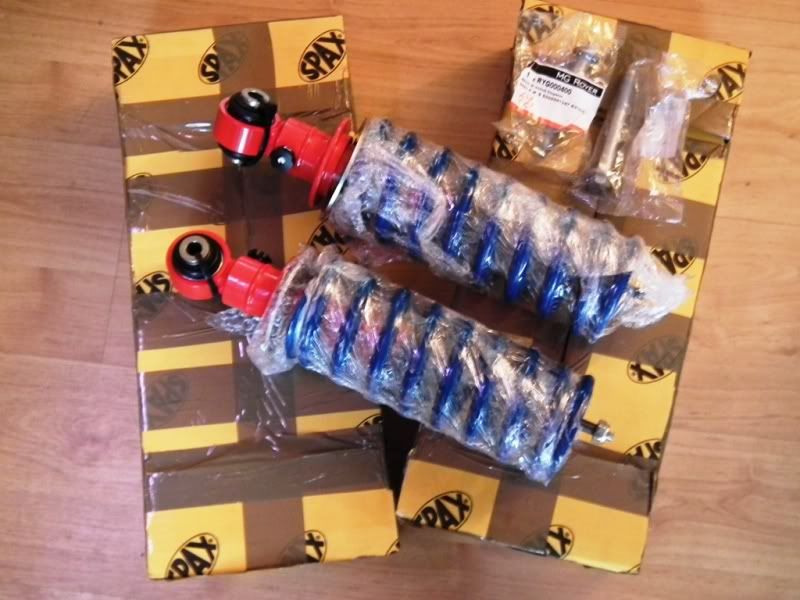
Well, I have just replaced my suspension for the Mike Satur blue kit.
The problem I had was a knocking from the front due to a worn shocker bush. I could have changed the bush but the shockers were looking a bit rusty.
Whether you are changing your suspension due to a faulty part or just because you want to upgrade to better or adjustable suspension, here is how I did mine.
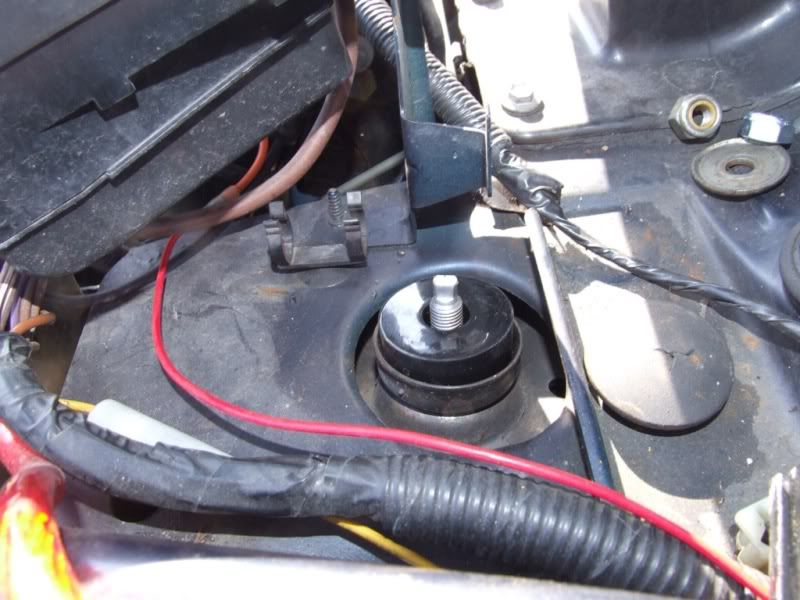
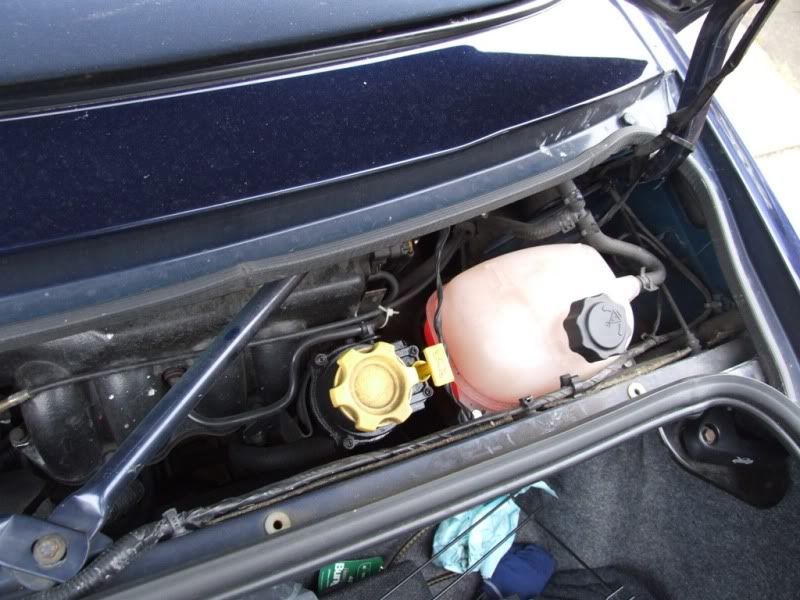
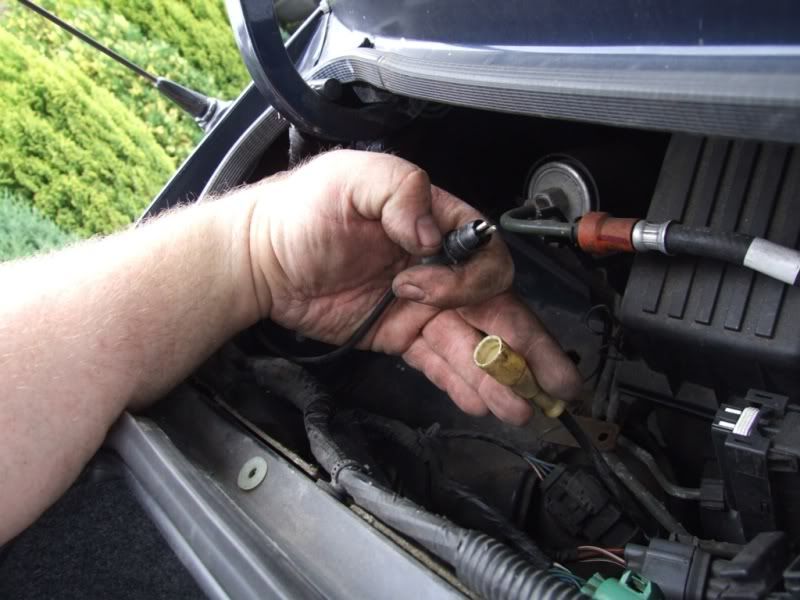
Start by clearing out the under bonnet area.
Unbolt the horn and move it clear of the suspension top nut and move the ABS connector out of the way.
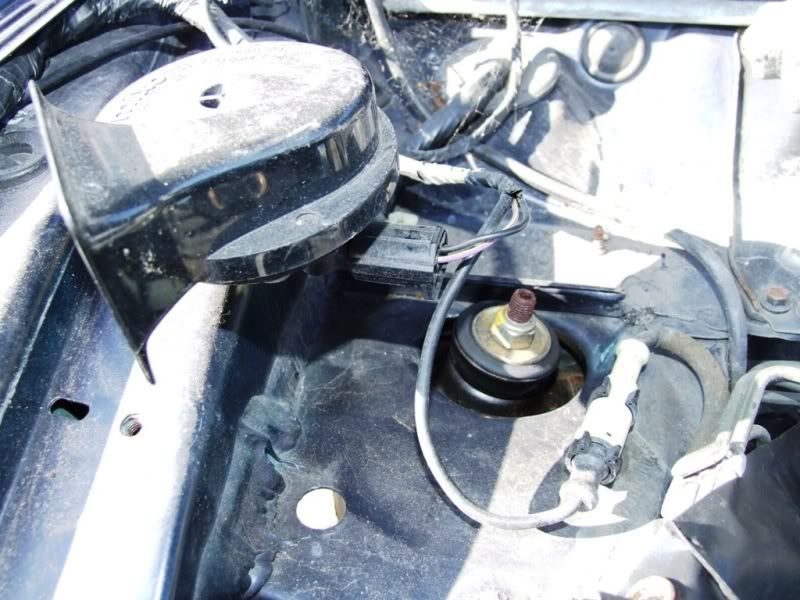
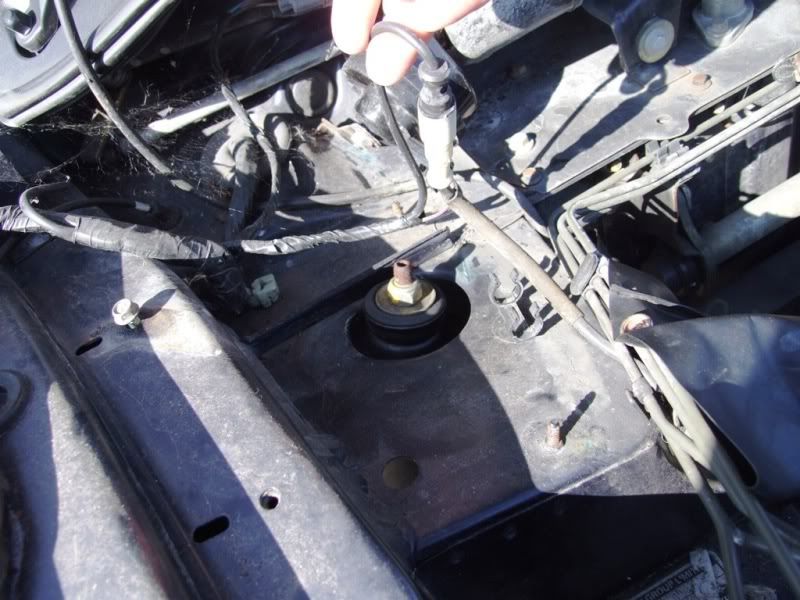
Also, unbolt the under bonnet fuse box moving it clear of the nearside top nut. Also unclip and move the ABS connector.

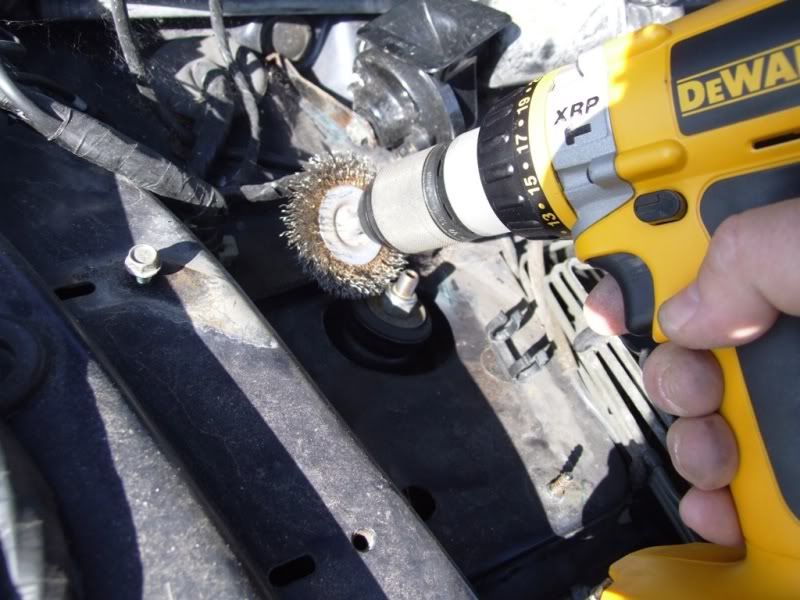
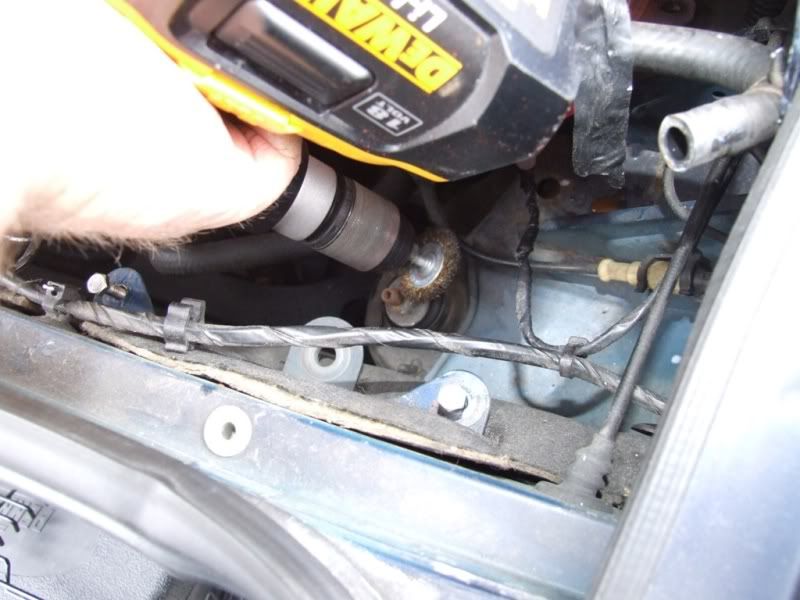
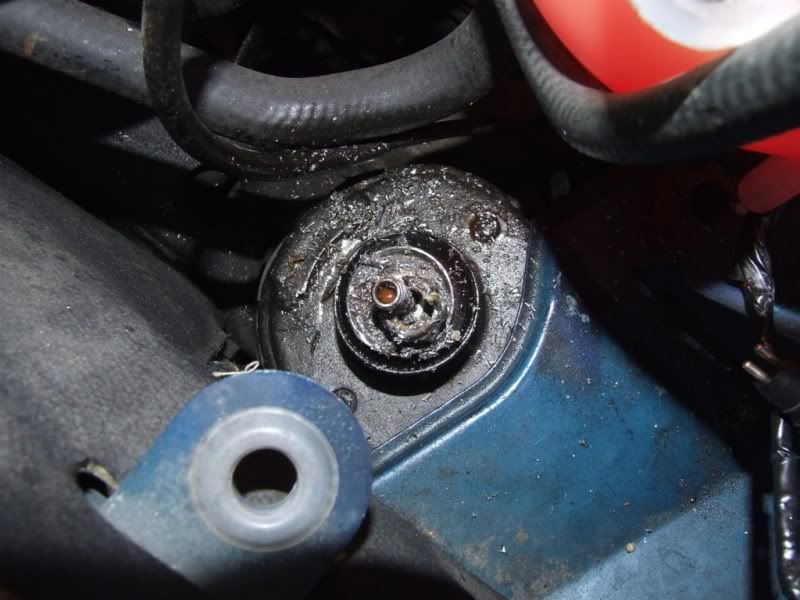
Using a wire brush or wire drill attachment, clean the top nut threads as much as possible to remove any rust etc. This will help when you remove the top nuts.
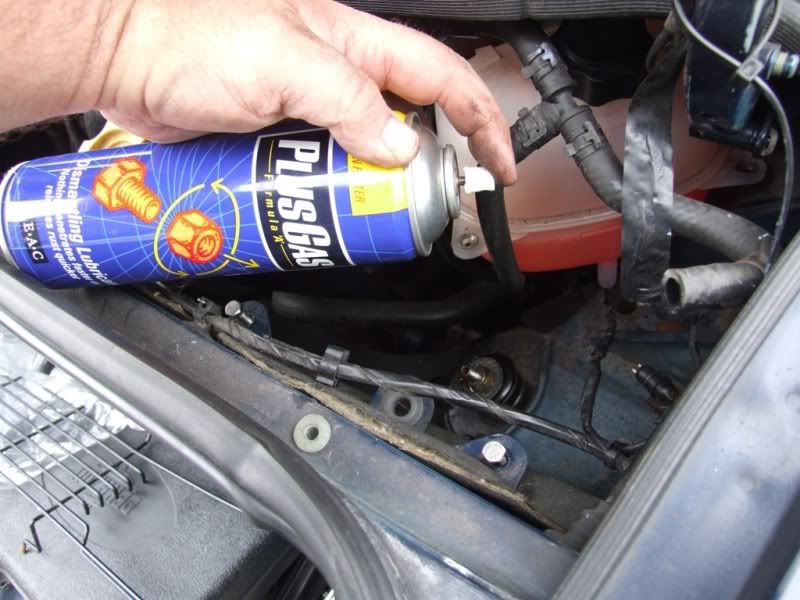
And spray with penetrating oil.
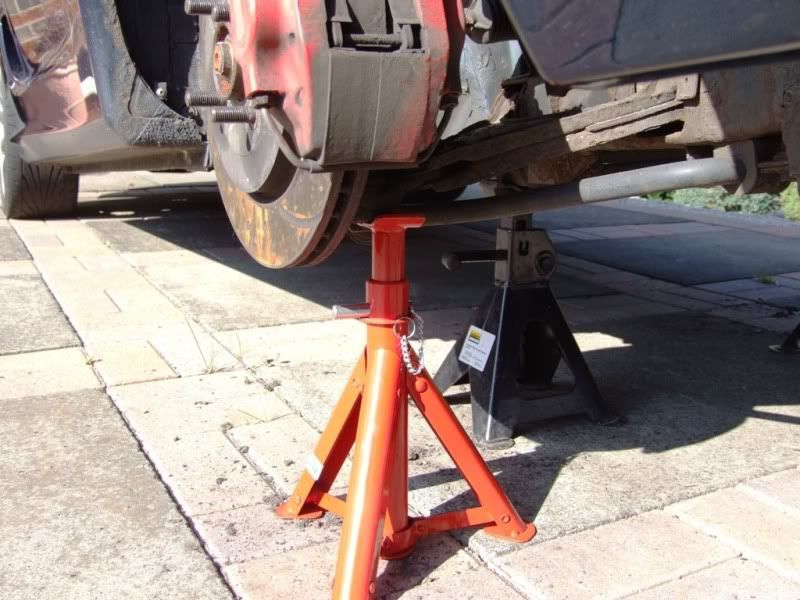
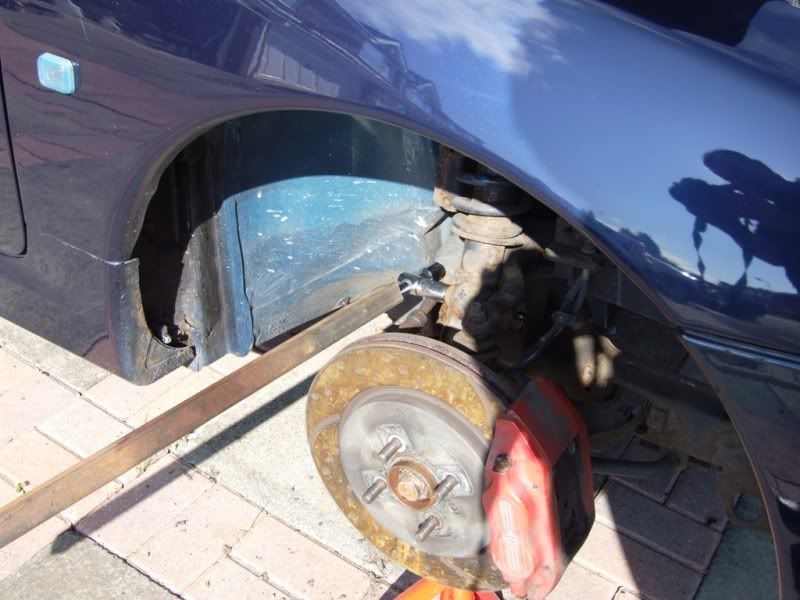
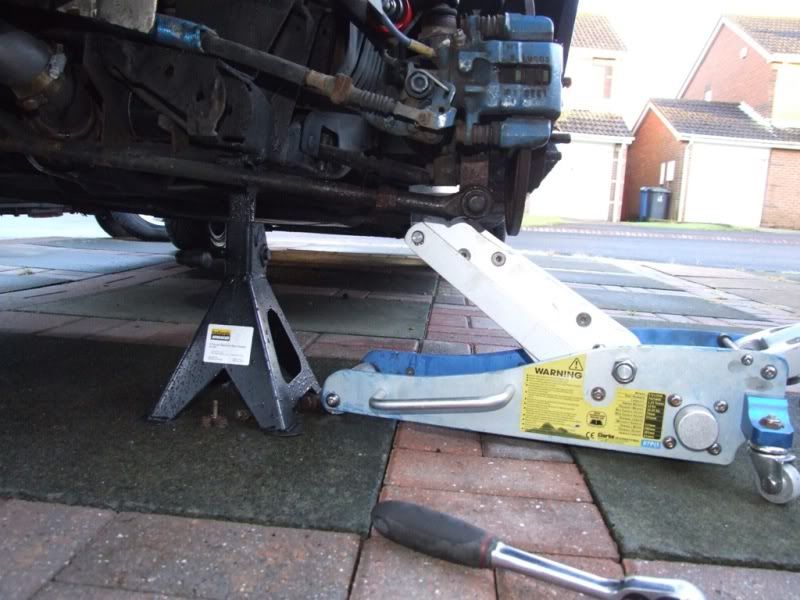
Next, loosen the wheel nuts and jack up the front of the car until the wheels are clear of the ground. Secure with axle stands and remove the wheels.
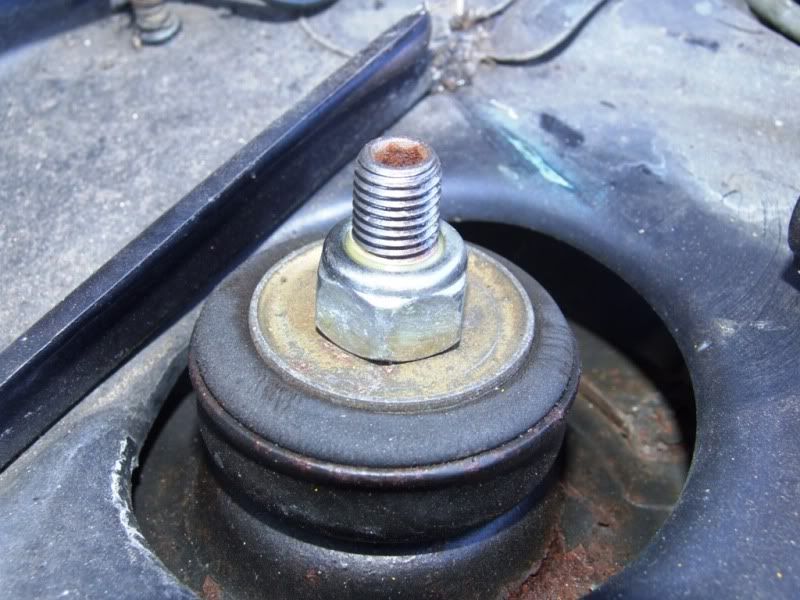
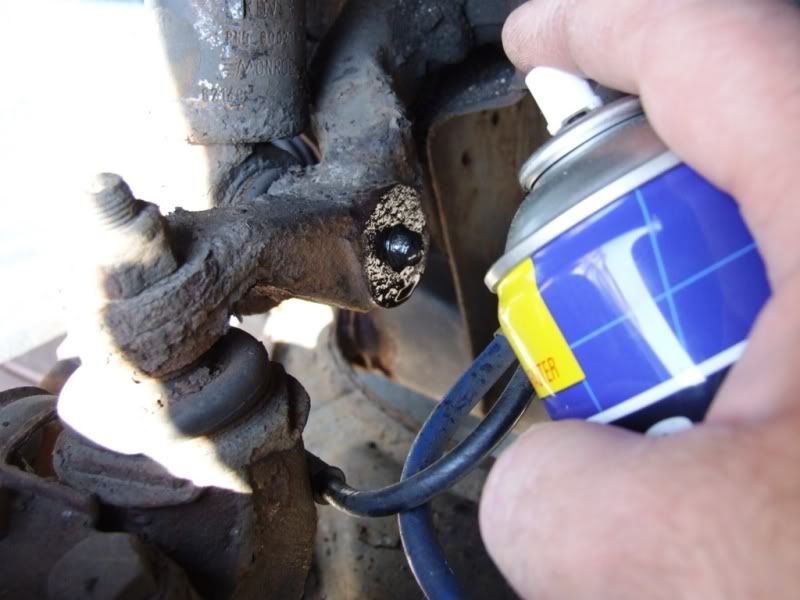
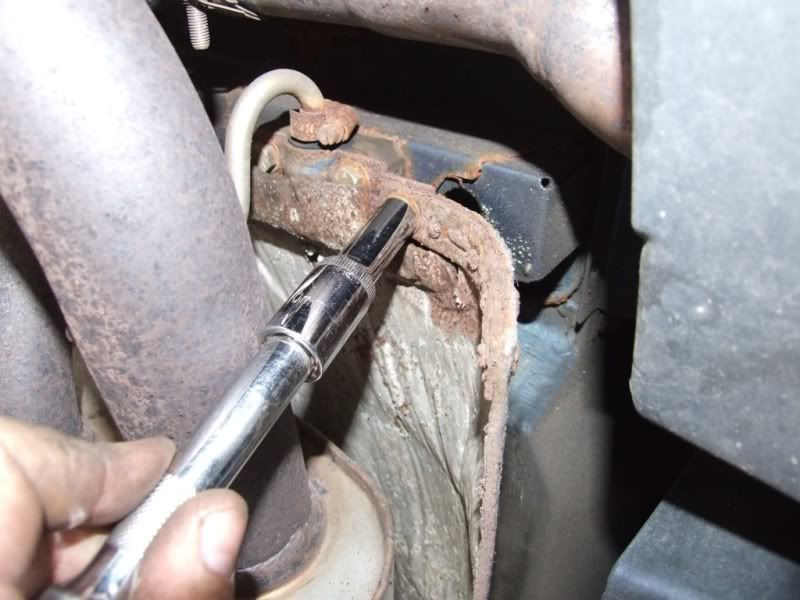
Now clean the threads of the bottom bolt
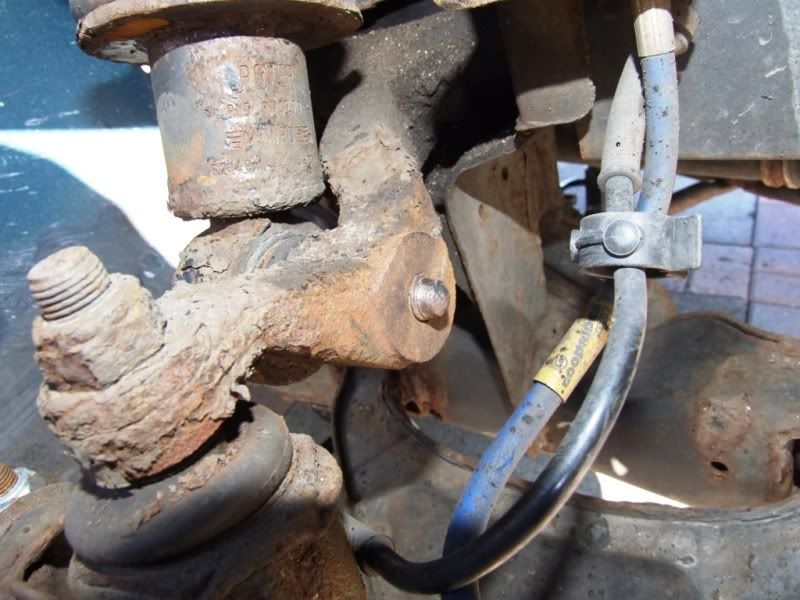
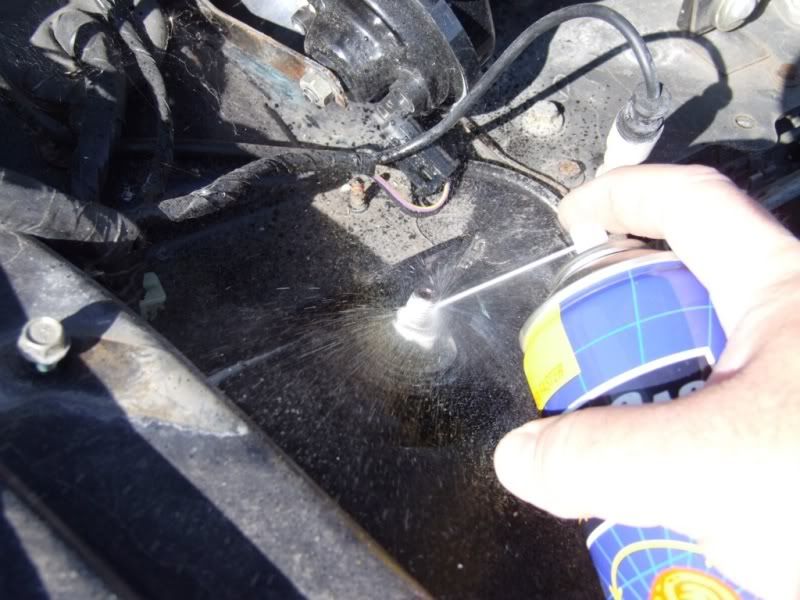
And apply penetrating oil.
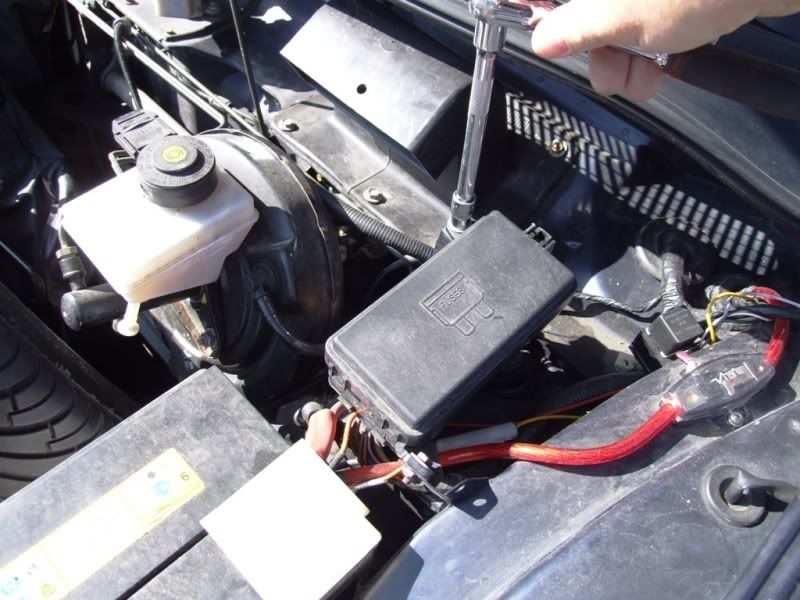
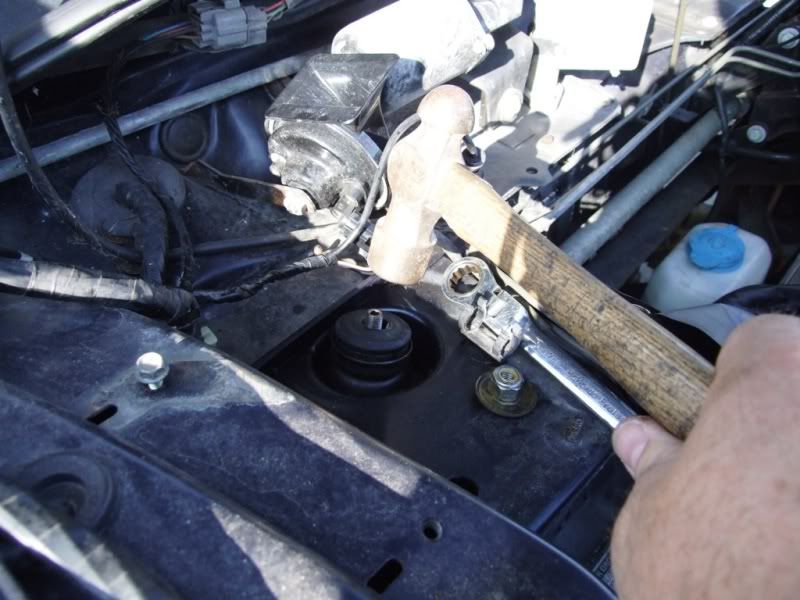
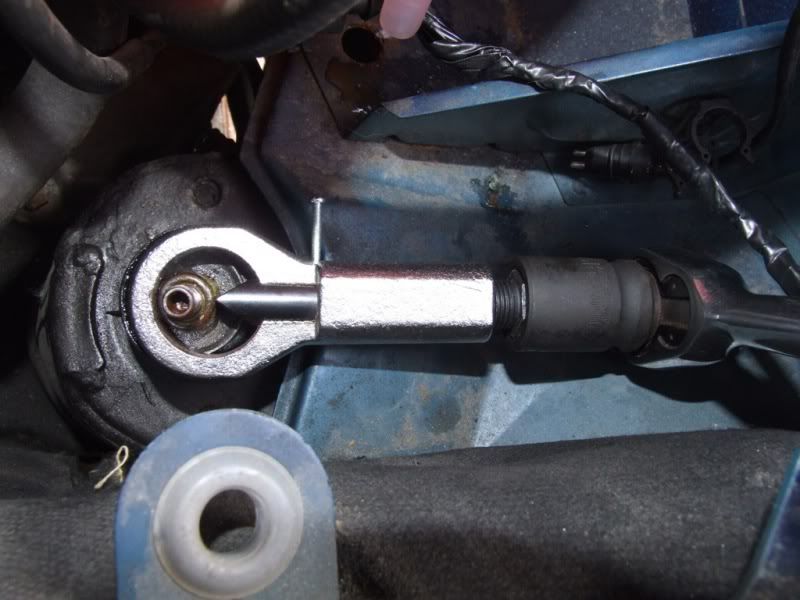
Returning back to the under bonnet area, place a 17mm spanner on the top nut and hammer a 5mm Allen key into the top of the suspension strut. Most standard shock absorbers will have an Allen recess in the top, some may have a square top, in which case you need to use another spanner to hold it.
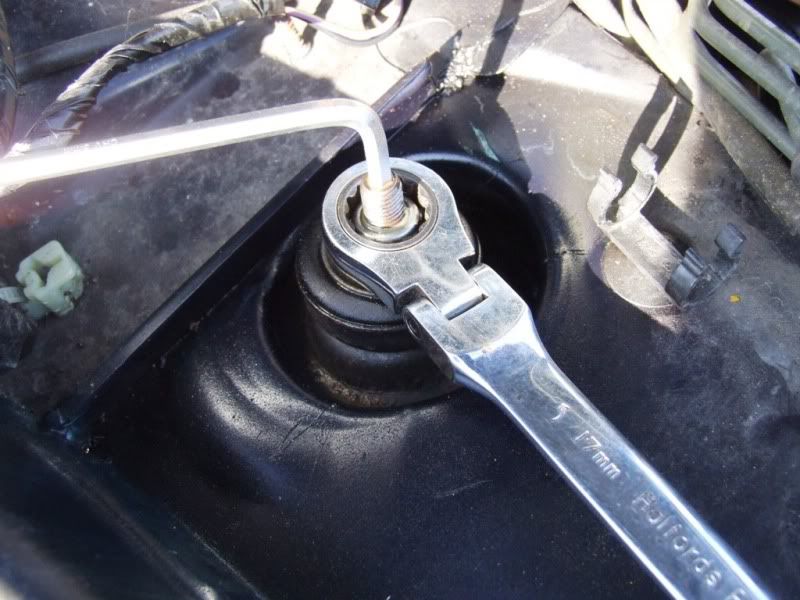
Loosen the top nut, but do not remove at this point.
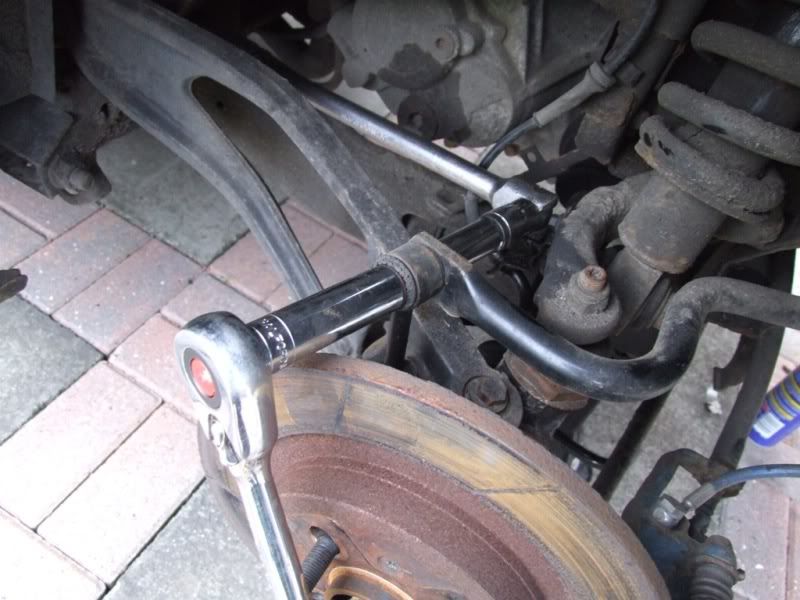
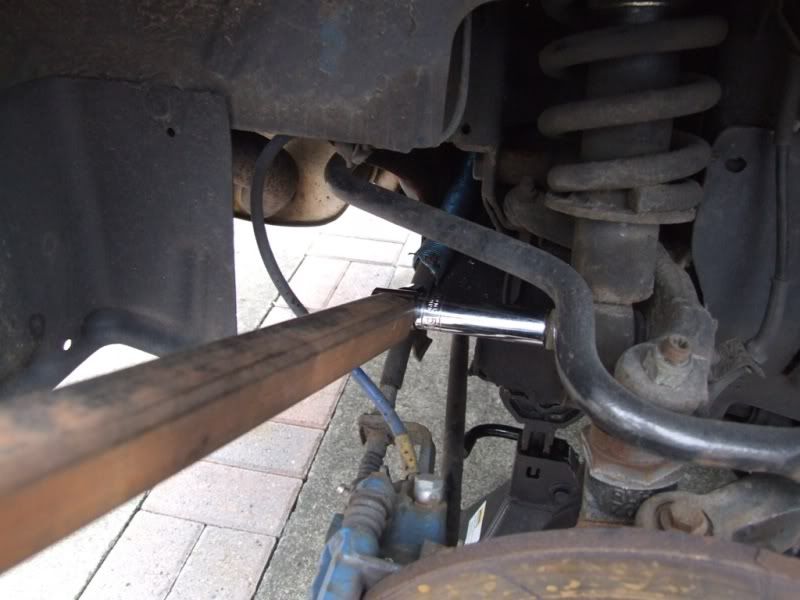
Hammer a 15mm socket onto the lower bolt
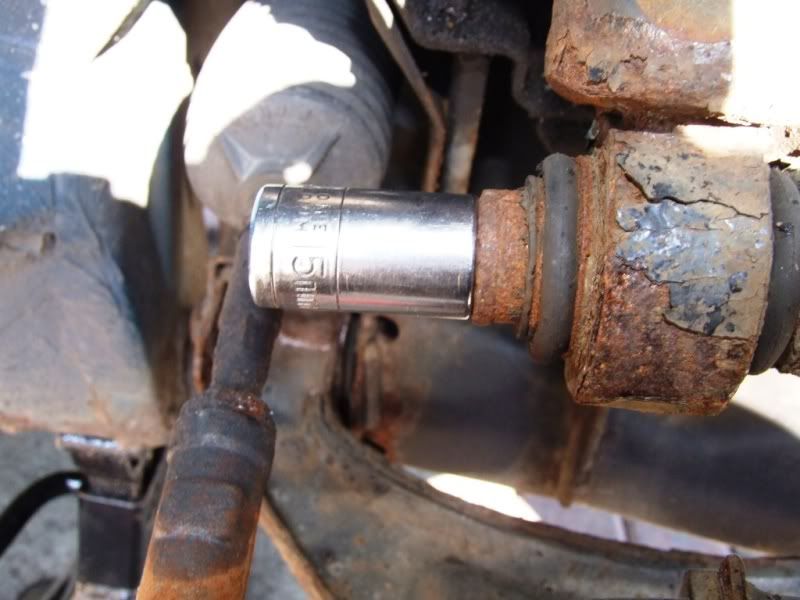
And using a breaker bar and a length of tubing, if you have it, slowly tighten the bolt until you feel it move slightly. Yes, that’s right, tighten it. This breaks the bond with the thread and allows you to loosen the bolt. I have used this method for as long as I can remember and it works 99% of the time.
Once the bolt moves slightly you can use the breaker bar and tube to loosen the bolt. When the bolt is loose enough you can use a ratchet to further undo the bolt.
Do not fully remove the bolt yet.
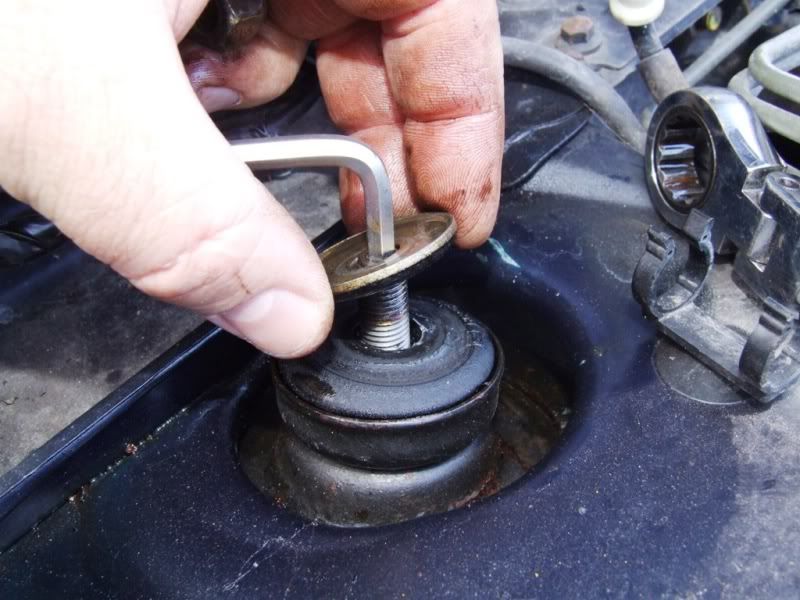
Remove the top nut and washer. Do not lose the washer as they are difficult to get.
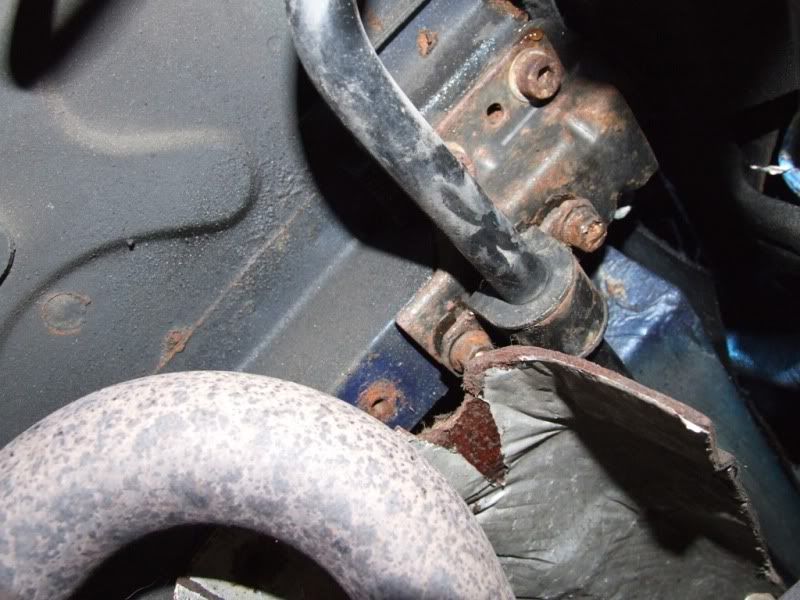
Now fully remove the bottom bolt
And knock the bottom of the shocker sideways to free it from the upper suspension arm.
Beware that the suspension unit may drop now and is quite heavy for its size.
If it doesn’t drop then you may need to tap the top of the unit with a hammer.
Drop the unit down and when the top of the suspension unit clears the tower, pull it out towards you and lift the unit clear.
Repeat at the other side of the car
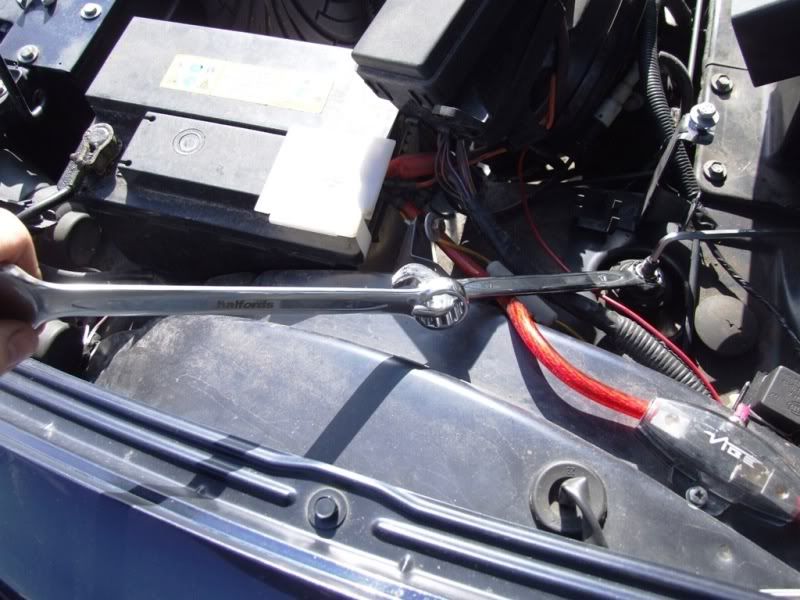
I had to use the old trick of linking 2 spanners to get enough leverage to remove the nearside top nut.
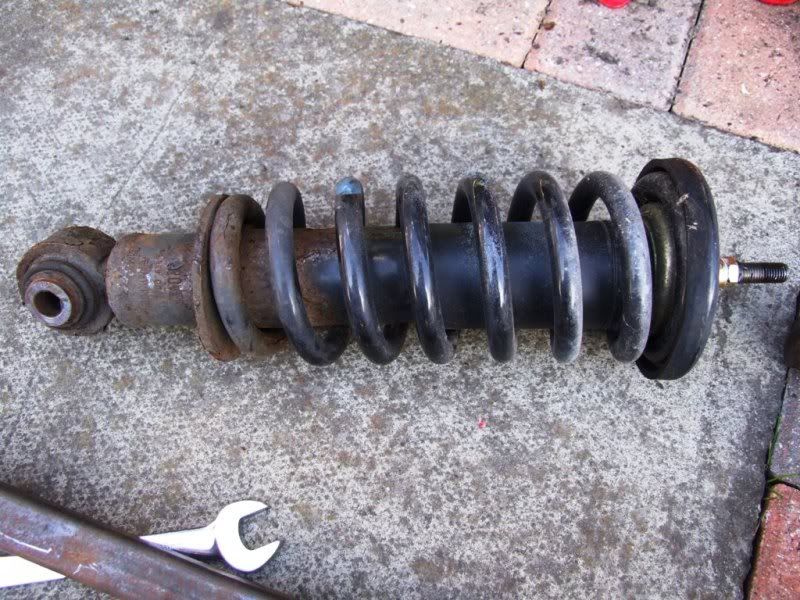
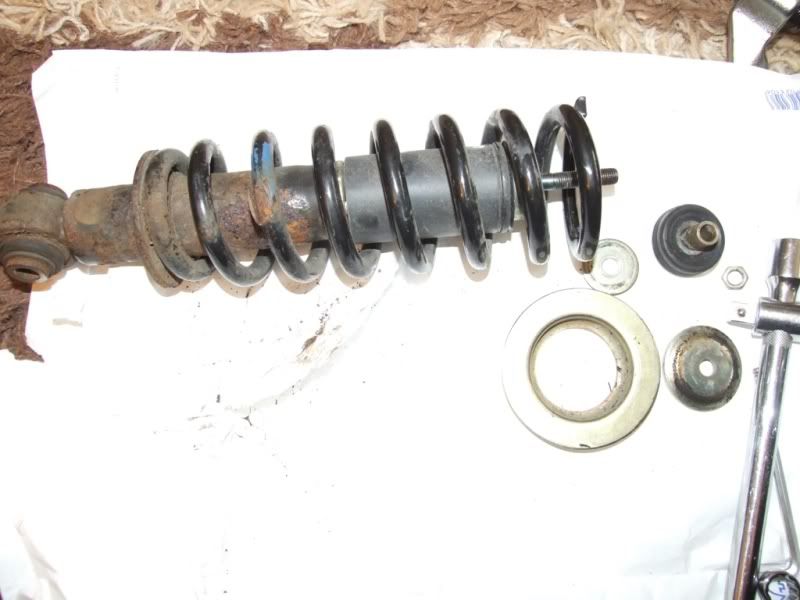
Once both front units are removed you can start to strip them down as there are components that you need to remove and fit to your new struts.
Remove the large rubber cover off the top of the spring.
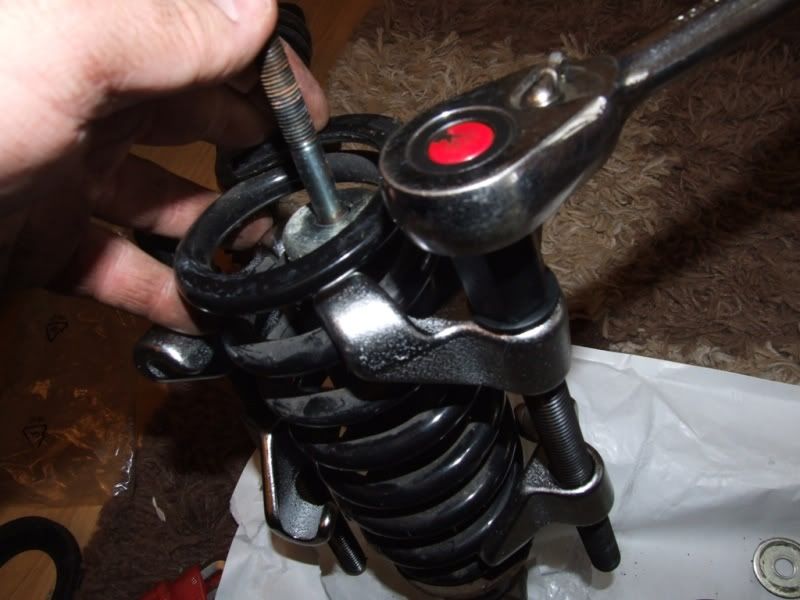
Now fit your spring compressors and wind them on to compress the spring. This will take the tension off the retaining nut.

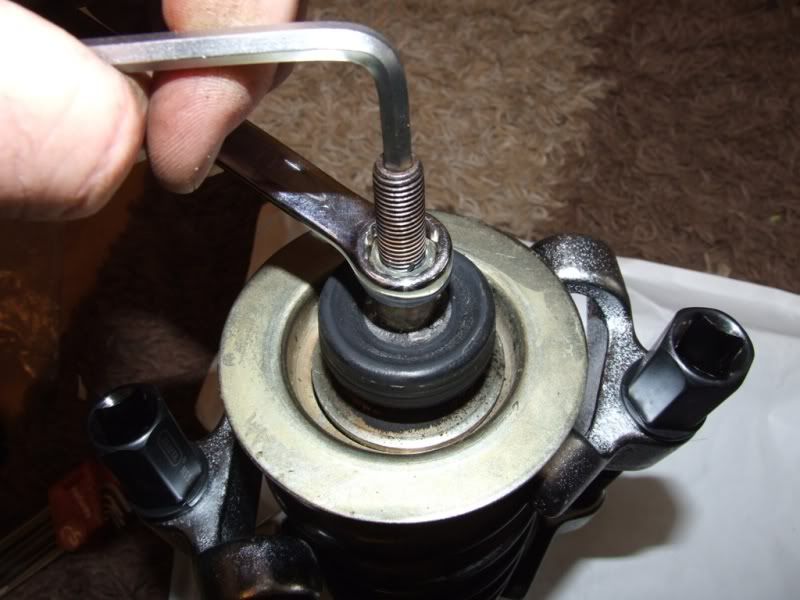
Using the 5mm Allen key and a 14mm spanner, loosen and remove the retaining nut. Do not do this without compressing the spring first as this could cause injury.
Keep the components that you remove in the order you remove them and the correct way up as this will help when fitting them to the new suspension.
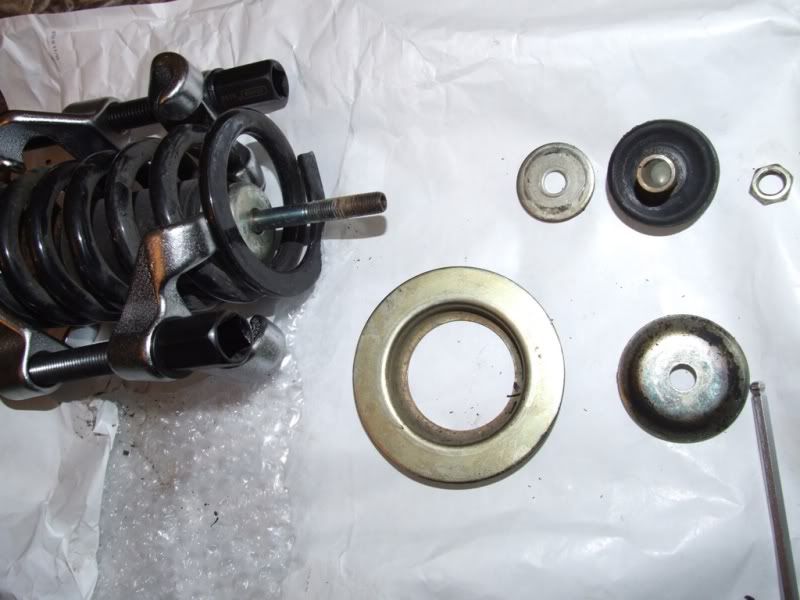
Now remove the spacer and rubber bush.

The washer
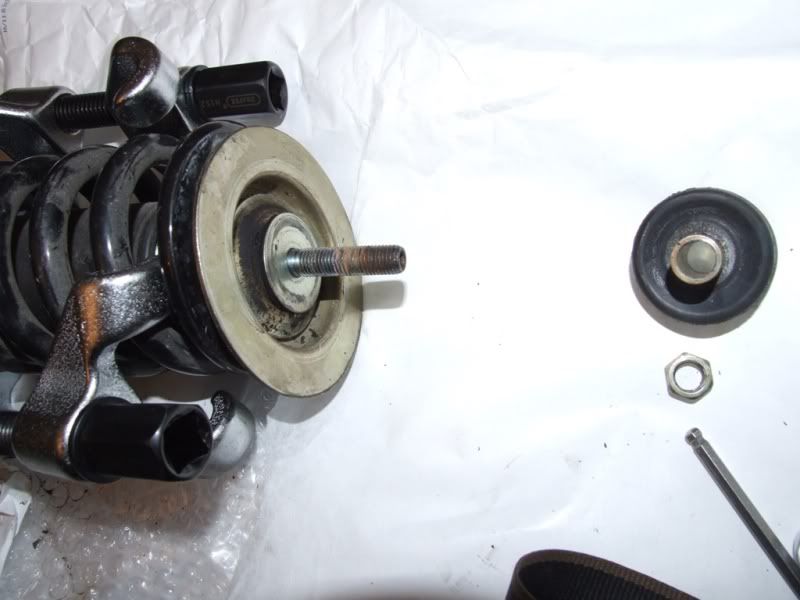
Cupped washer and spring retainer. Make a note of which way up the cupped washer sits for replacement.
Slowly release the tension off the springs a little at a time from each compressor in turn
until you can remove the compressors safely.
Slide the spring off the shock absorber unit
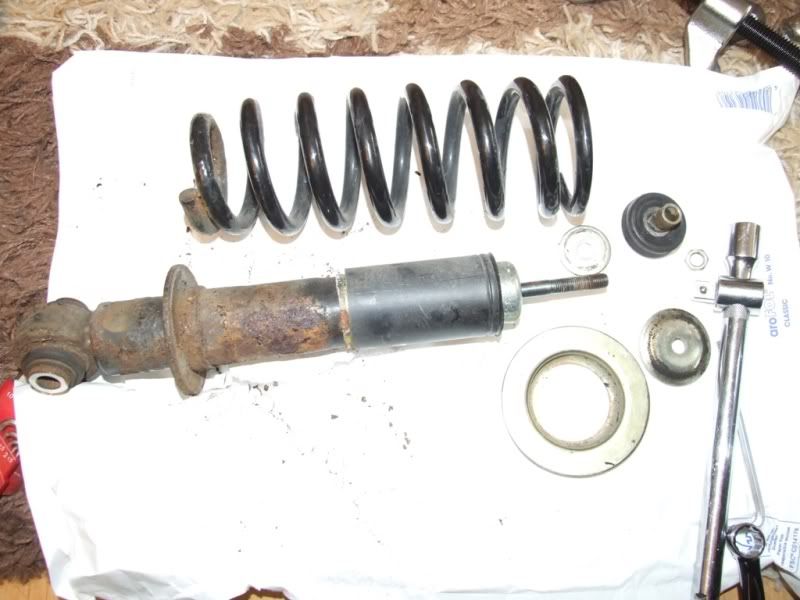
And you will see the dust cover. Slide the dust cover off, complete with the metal cup that has probably become one with the plastic dust cover. Also remove the rubber bump stop by sliding it up the shaft, remembering which way up it sits.
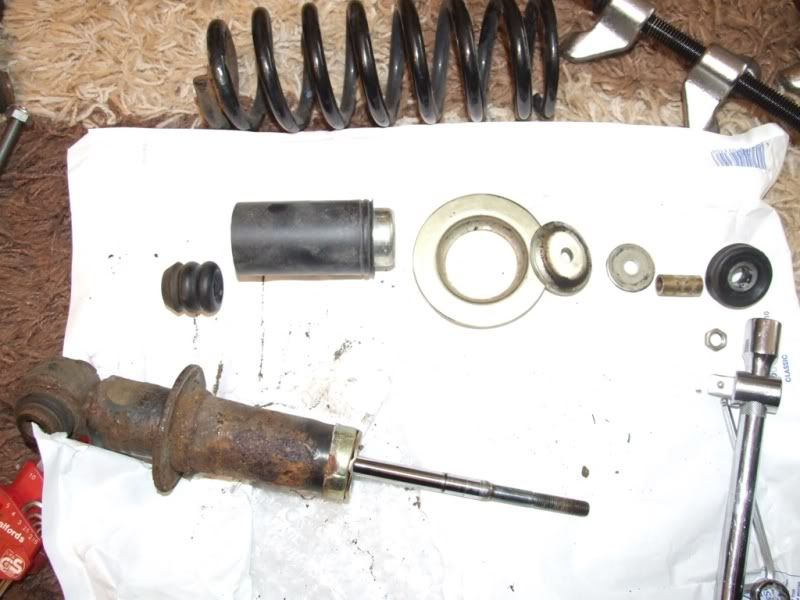
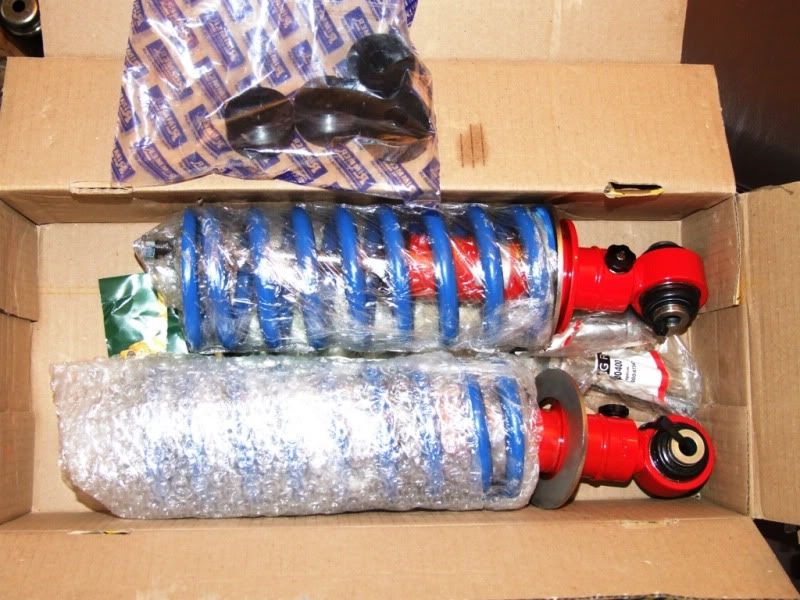
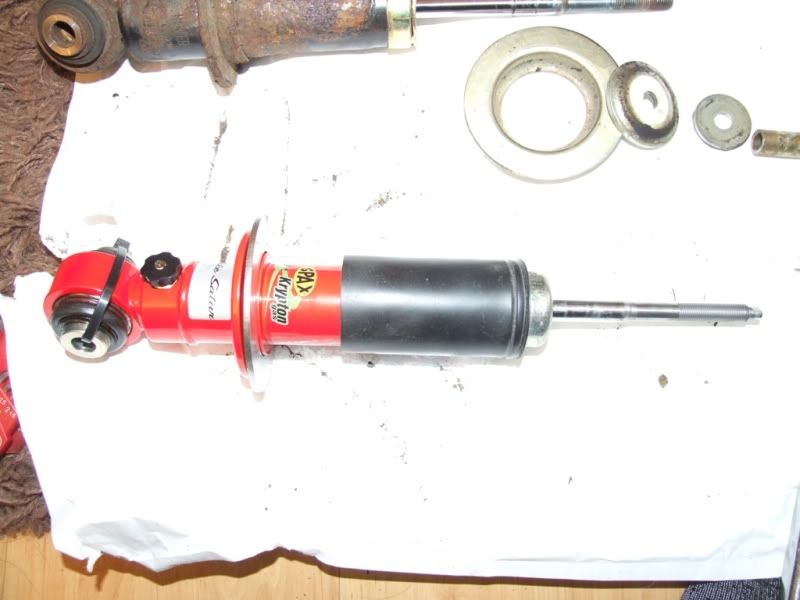
Now pick up a new suspension unit
And remove the spring

Slide the rubber bump stop onto the threaded shaft, tapered end towards the main body

And then, after cleaning, slide the dust cover and metal cup over the bump stop.
Now grab the new spring and fit the spring compressors. One tip I have learned from doing this, is leave the plastic wrapping on the spring (not shown in this shot) when fitting the compressors. This will protect the spring as the compressors tend to dig in and can remove a bit of the blue protective coating. If you do leave the wrapping on, then pull enough off the top and bottom so that it won’t be trapped between the spring and damper when you come to remove it.
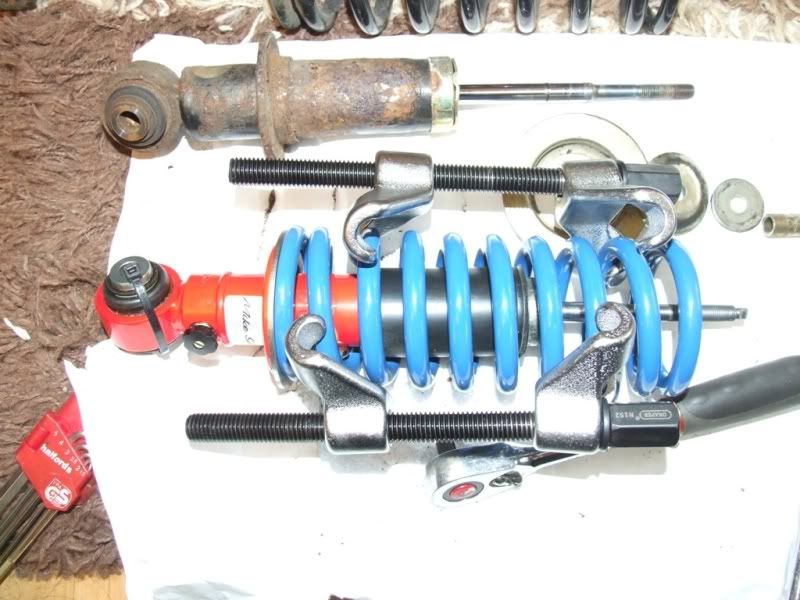
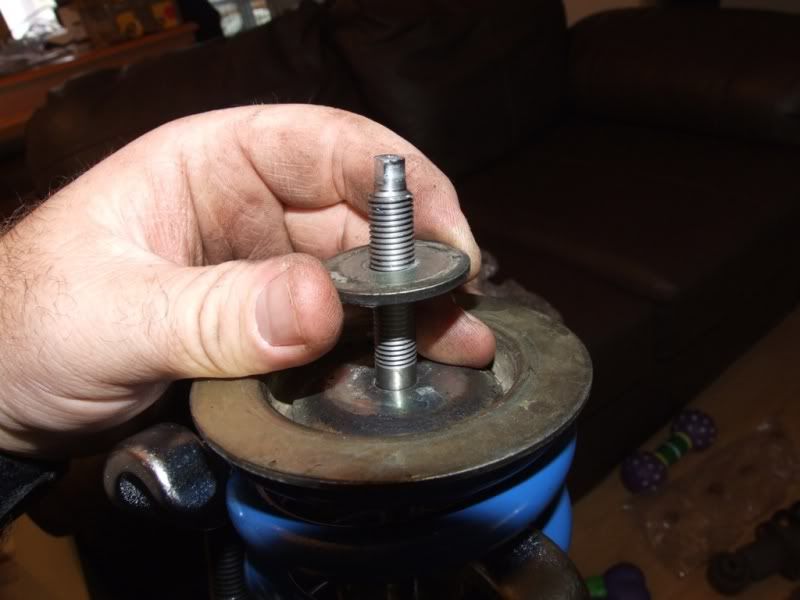
Once the spring has been compressed enough, fit the spring retainer over the top
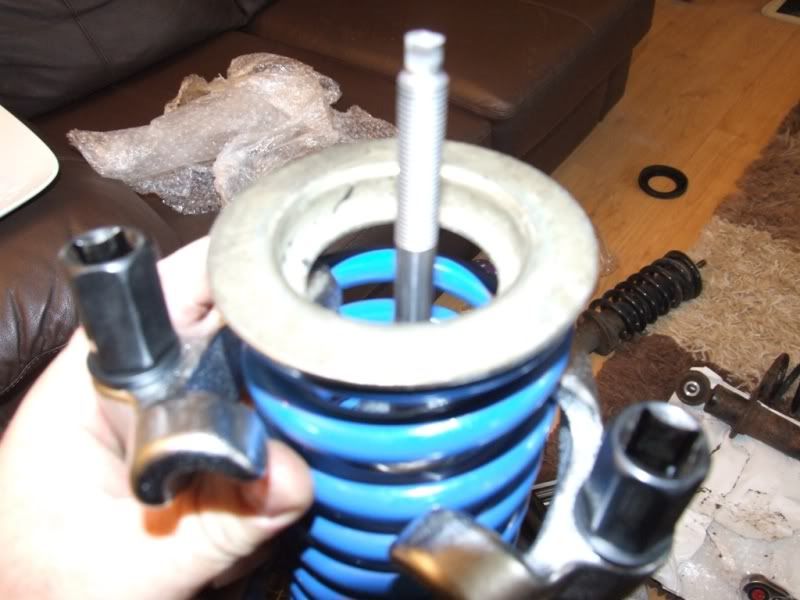
And fit the cupped washer, making sure you fit it the correct way up.
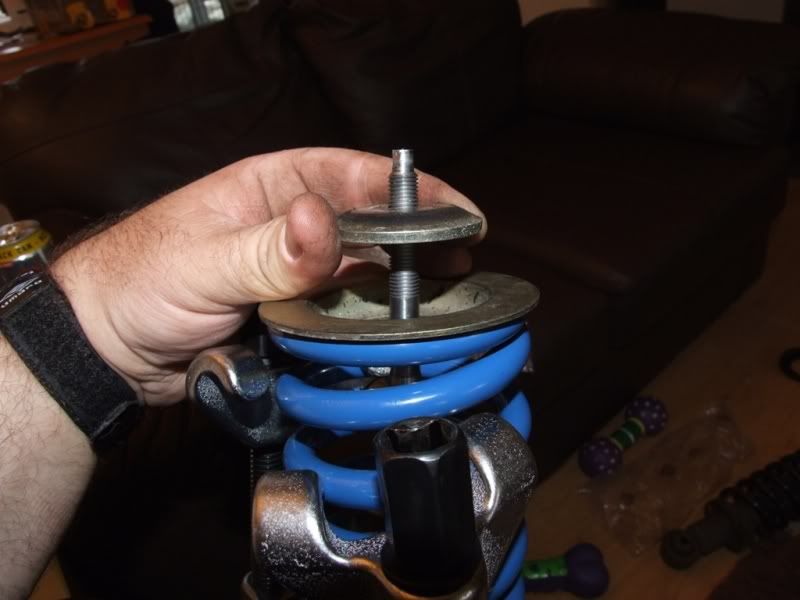
Next fit the washer piece on top of the cupped washer
The next part is one of two identical rubber bushes. I bought new bushes and I bought uprated poly bushes from Rimmer Brothers http://www.rimmerbros.co.uk/Item--i-RNF100090LPOLY . You need two of these per shock absorber, so if you are doing the whole car then you will need 8 in total.
Fit the rubber/poly bush with the tapered end down over
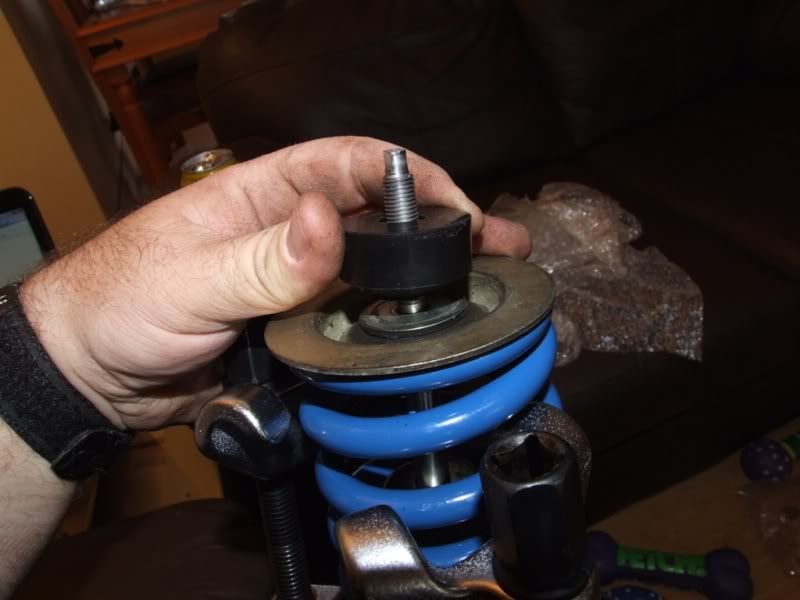
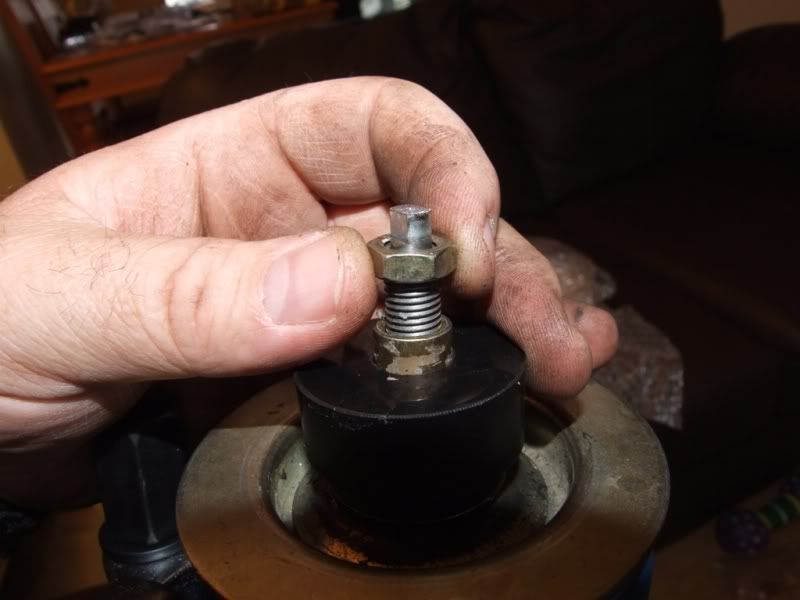
Now fit the metal spacer tube, which should slide into the bush that you have just fitted.
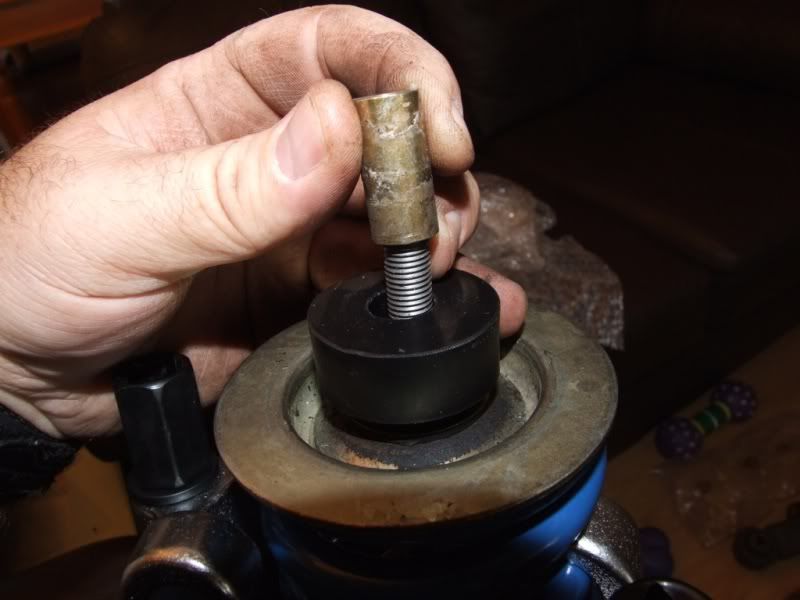
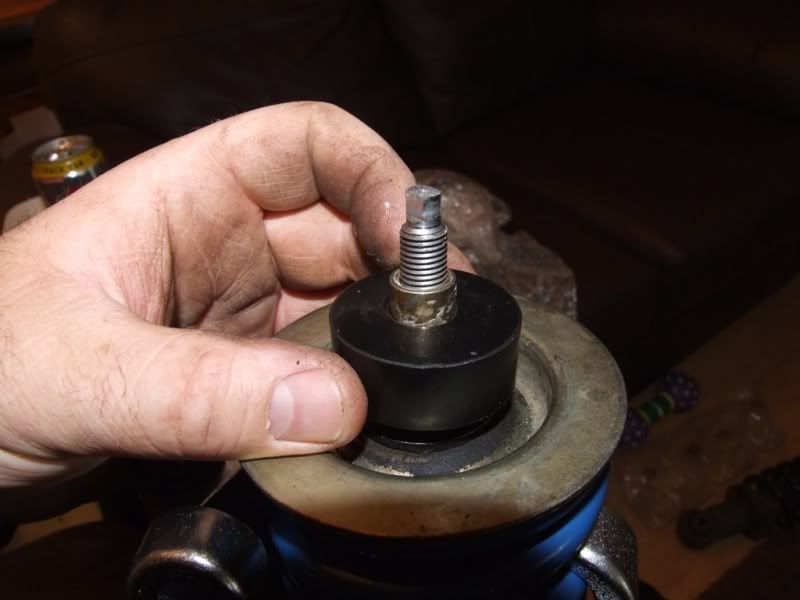
And fit the retaining nut. If you can, torque to 25Nm
Now you can remove the spring compressors and refit the large rubber cover on the top of the spring. Your new unit is ready.
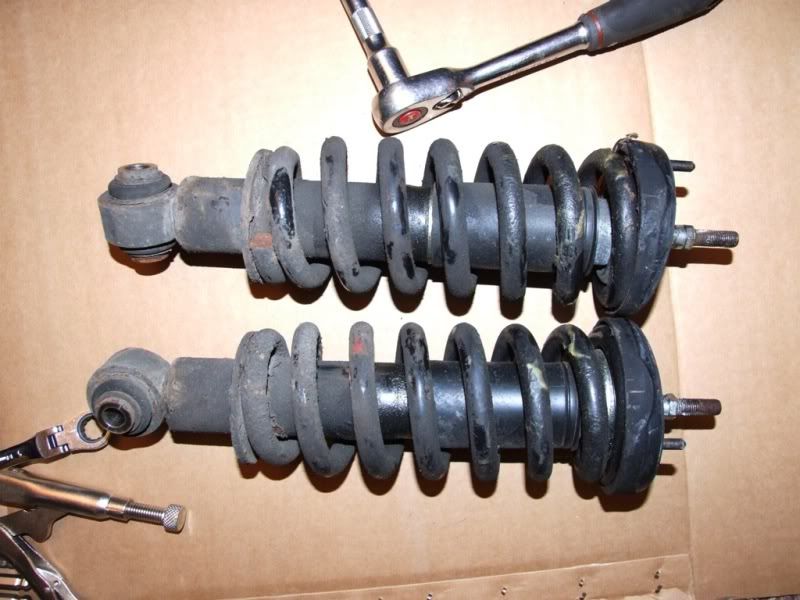
Do the same with the other front unit so you now have a nice shiny looking pair (Oooer missus)

While the shock absorbers and springs were out I also used the space to treat the rust with some stone chip resistant paint.
Before
After
Now comes the fitting bit.
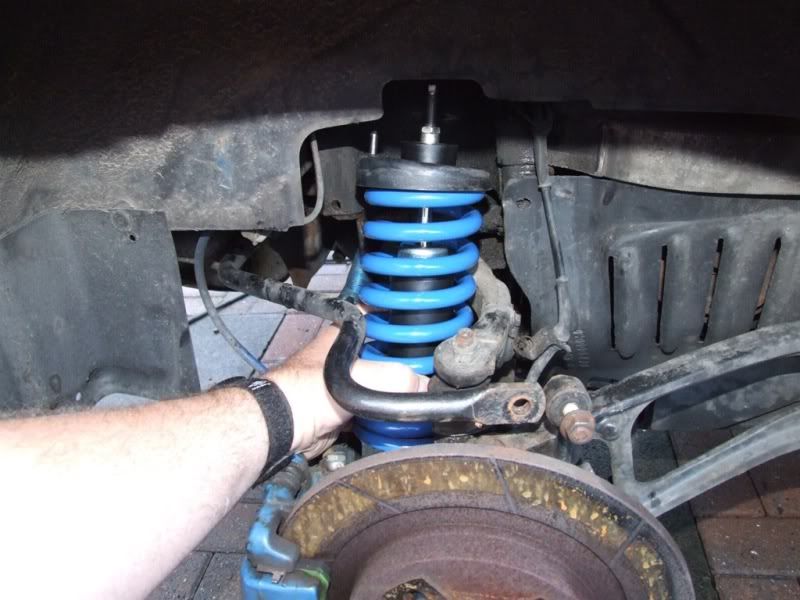
Carefully lower the bottom of the unit down behind the hub
And feed the top of the unit into the suspension turret

So that the top of the unit feeds through the hole into the under bonnet area.
Fit the rubber/poly bush over the top, with the tapered side down over
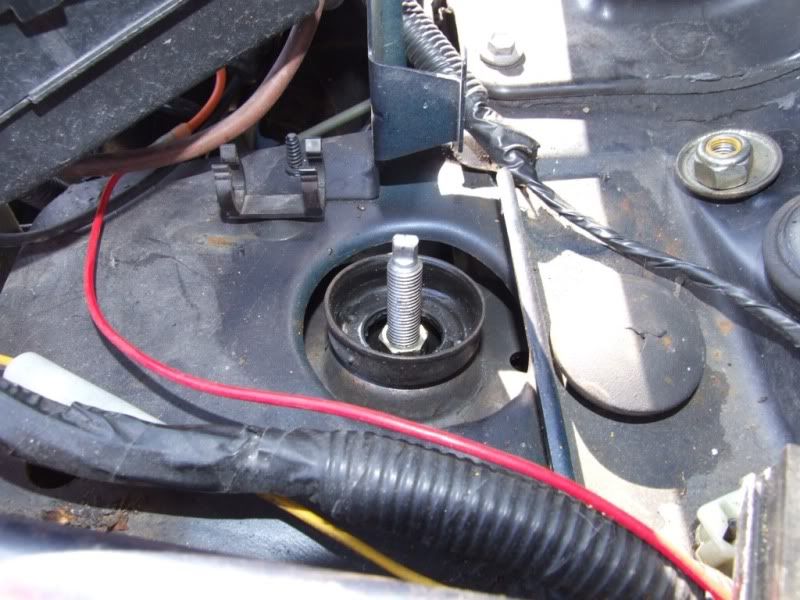
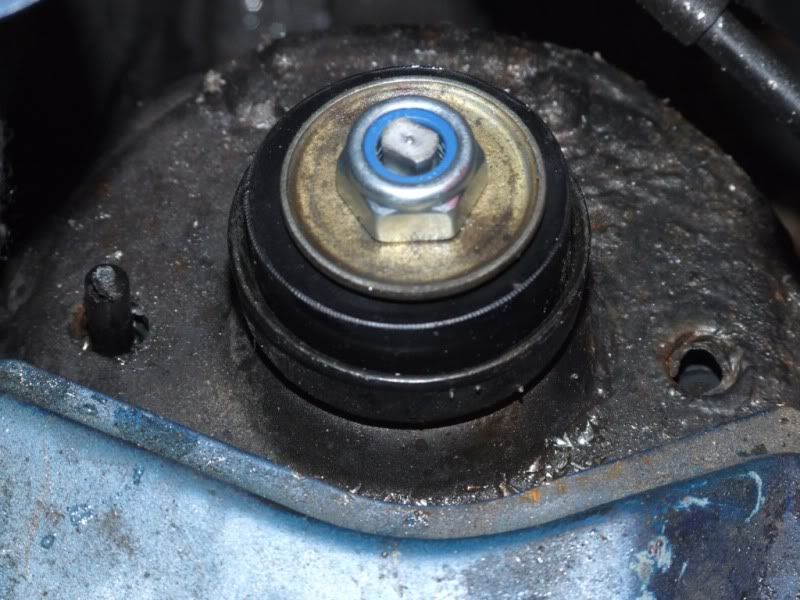
Fit the top washer and top nut. Tighten a couple of threads by hand to take the weight of the unit.

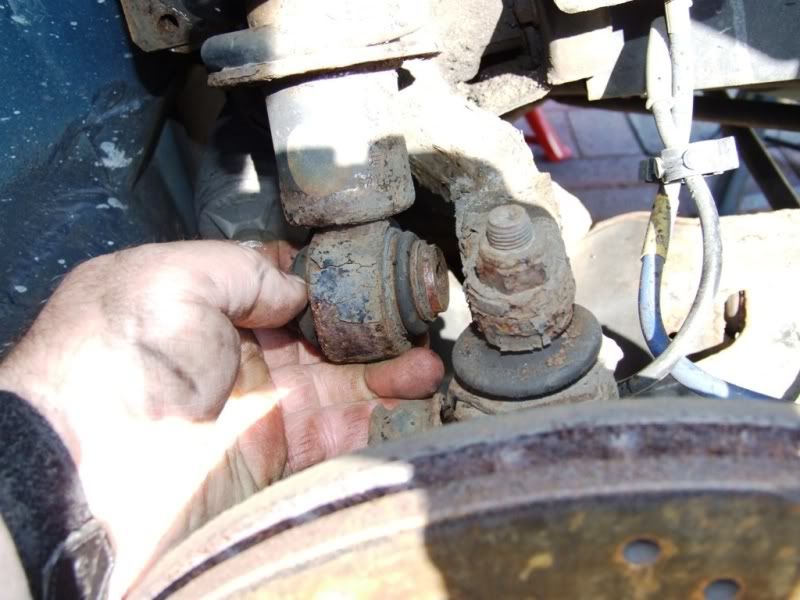
Now apply some copper grease to the NEW lower bolt
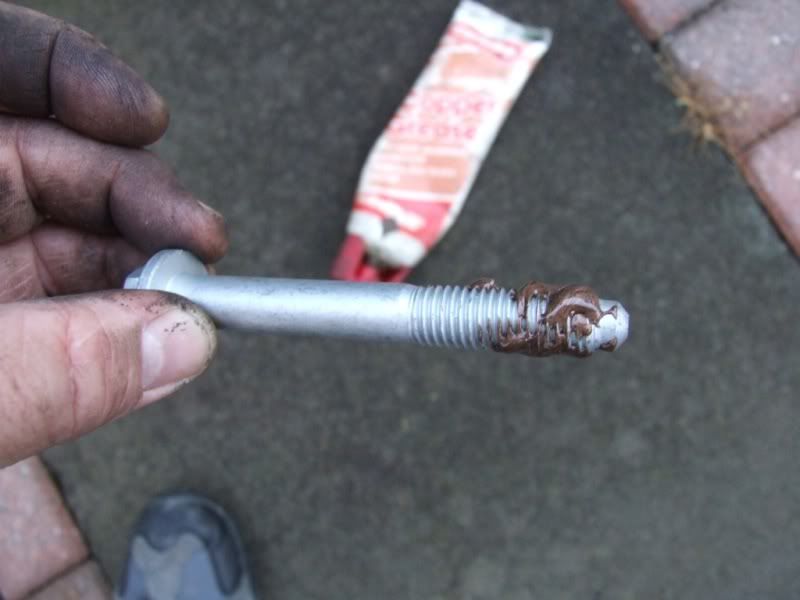
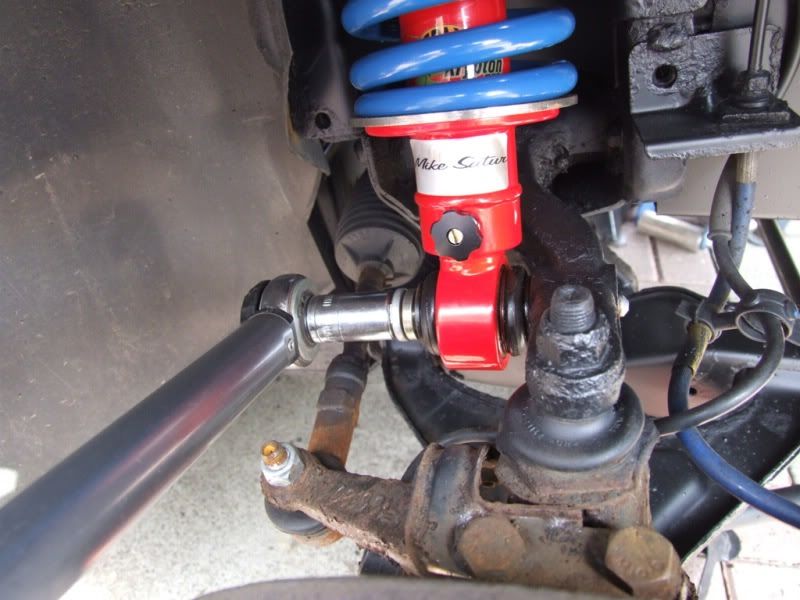
Line up the bottom of the damper to the suspension arm, ensuring that the adjuster screw is pointing outwards (otherwise you won’t be able to adjust it once fitted), and insert the new bolt.
You may need to use a jack to slightly raise the hub so that the hole lines up with the hole in the damper.
Gently tighten the bolt, ensuring that it is going in square and not cross threading.
Now carefully raise the car and move the axle stand under the hub (Not the disc). Gently lower the jack until the suspension is fully compressed on the axle stand. You should always torque up suspension components when the suspension is taking the weight of the car.
Set your torque wrench to 100Nm
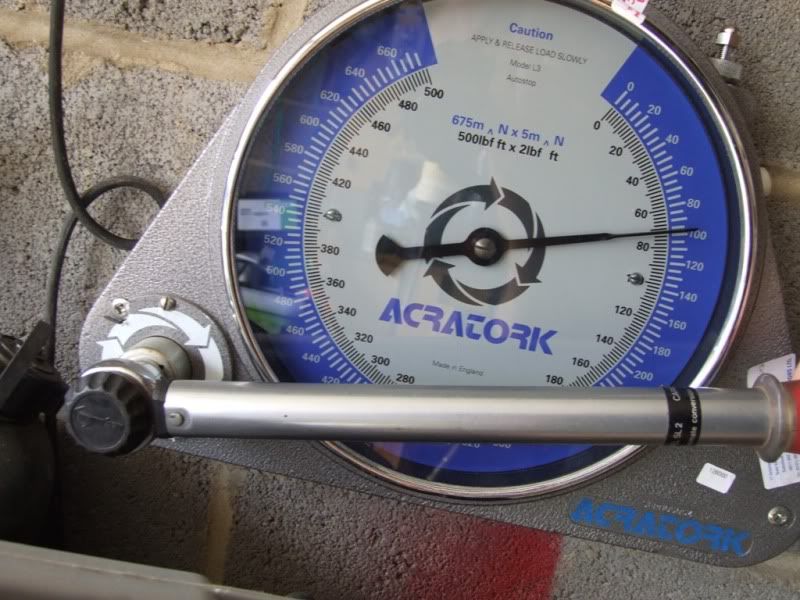
And torque the lower bolt to 100Nm
Now torque the top nut to 45nm

However. You might find that the strut starts turning before you get the full torque. There is no way to hold it and use a standard torque wrench, so you will have to use a spanner on the top of the thread and use a spanner to tighten the nut to your best guess.
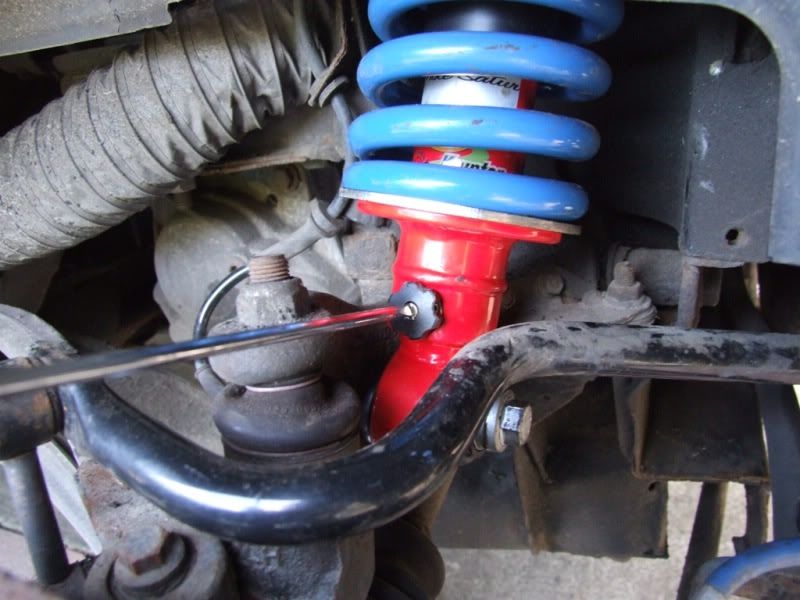
You might want to set the rebound on the shock absorber before fitting the wheel. The consensus is around 12 clicks on the fronts and 17 clicks on the rear. However, this is just a starting point and you need to set it up to your own tastes.
Using a screwdriver, wind the screw fully anti clockwise. Now turn the screw the required number of clicks clockwise.
Now refit the wheel and lower the car on that side.
Fit the other unit using the same procedure.
Now refit the horn and the fuse box. Also make sure you clip the ABS connectors back in place.
We now move onto the rear units.
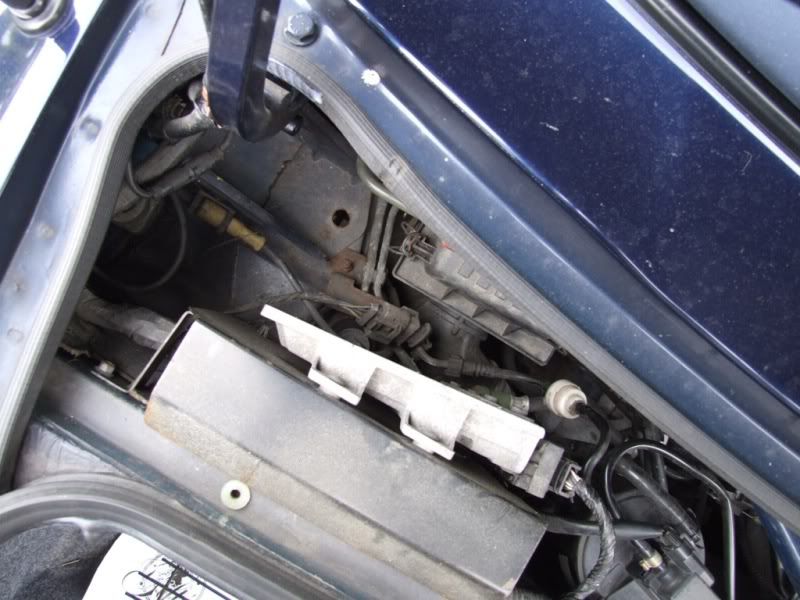
Things get a little bit more complicated here due to access issues.
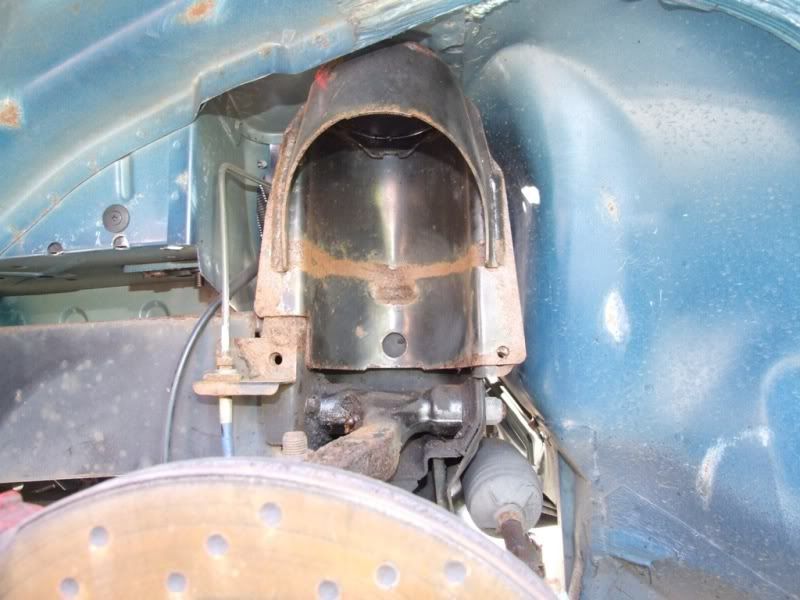
Open the boot and you won’t see the tops of the suspension, mainly because they are hidden below the coolant expansion tank (offside) and the ECU (nearside).
Firstly, remove the top hose from the expansion tank and tuck it away safely.
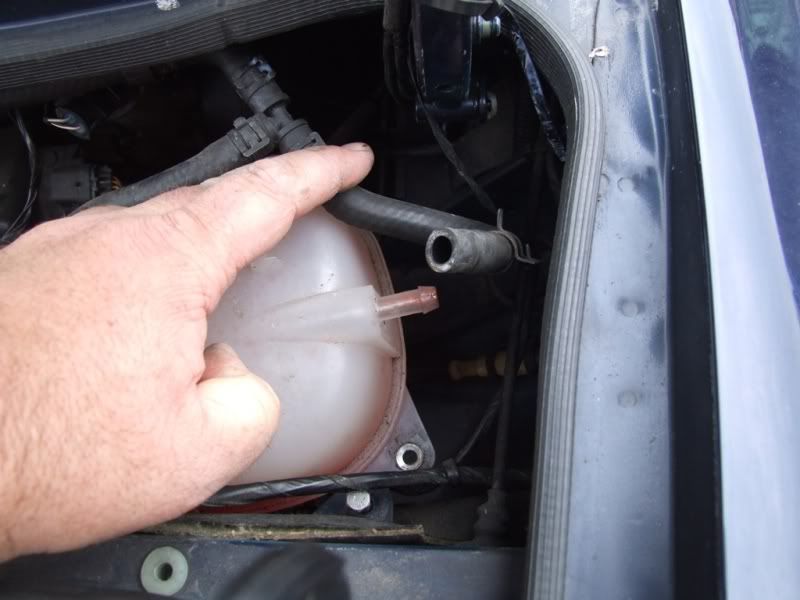
Remove the two bolts holding the expansion tank in place and pull up to release the tank. Move it inward to a safe place but try to keep it level so as not to lose any coolant.

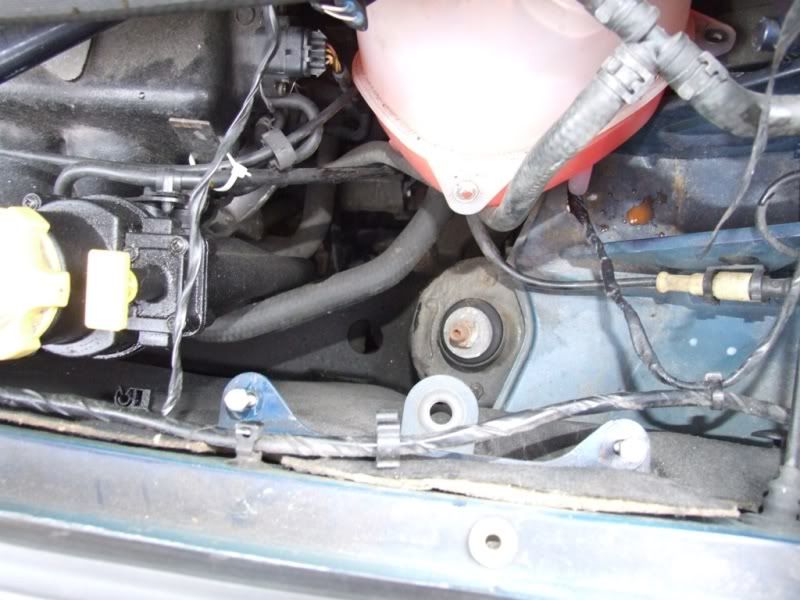
You should now be able to see the top of the offside suspension.
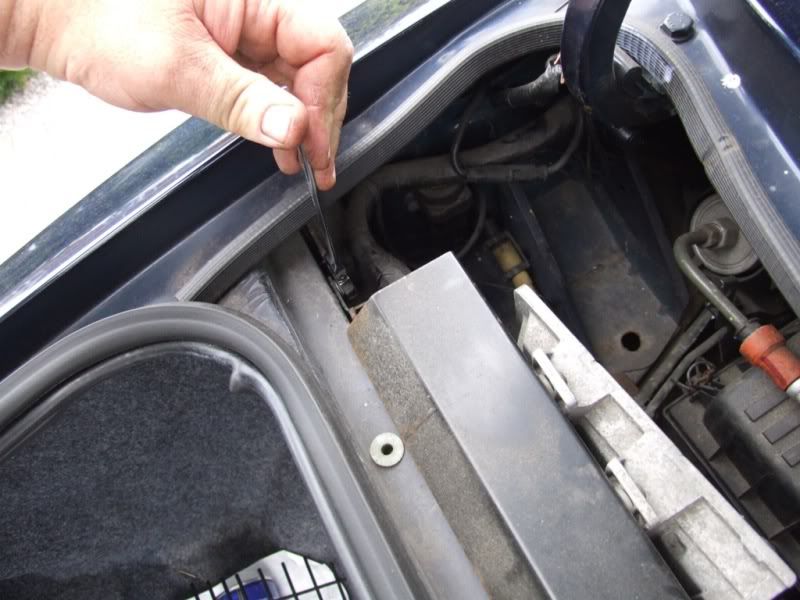
Now move to the nearside. Before carrying on, disconnect the negative connection on the battery.
Remove the top left and right 8mm bolts holding the ECU bracket to the boot wall.
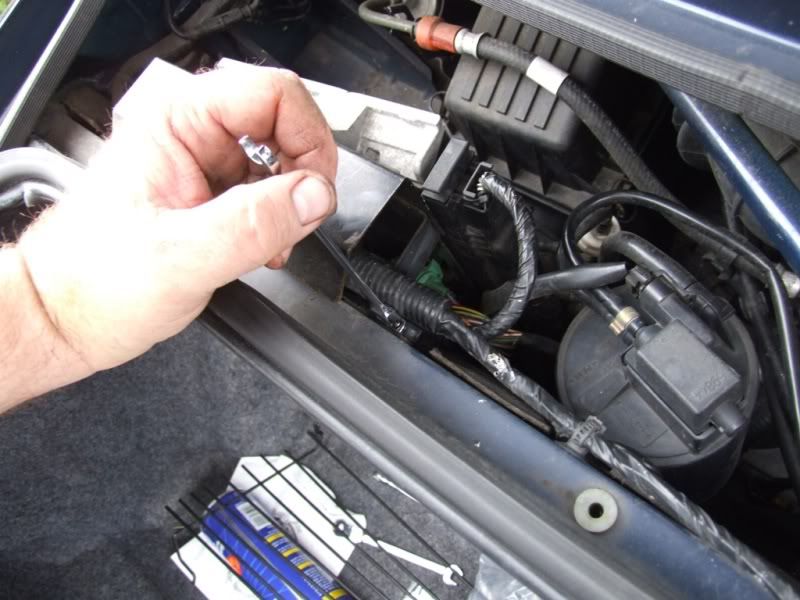
Pull the ECU and bracket upwards to release the bottom from the rubber grommet, shown in the centre of the next pic.
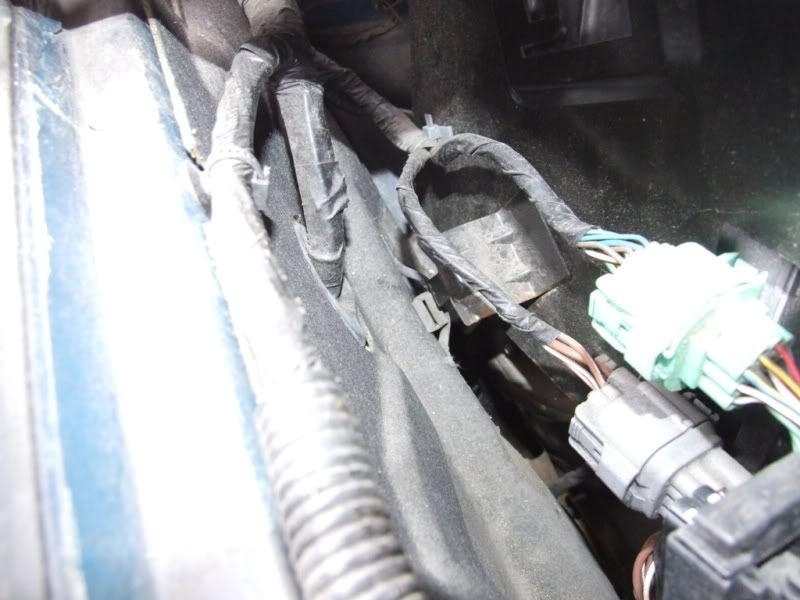
Tilt the bracket inwards towards the engine and you will see 2 connectors clipped to the inside of the bracket. Unclip them so that they fall free.
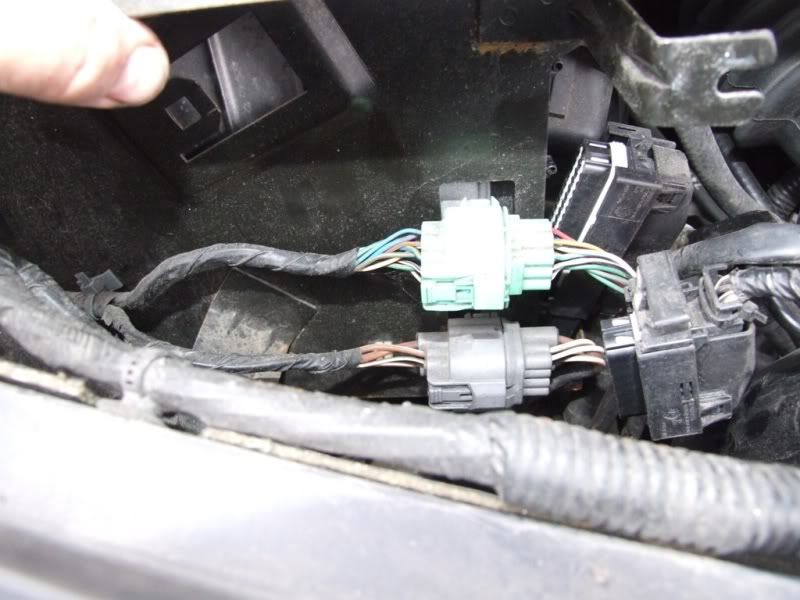
Also, unclip the two main ECU connectors. The connectors have a pull out clip at the top of the top connector and on the bottom of the bottom connector. Grab these and pull and they slide out and release the plug.
You can now remove the ECU and bracket. Store in a safe place, your car doesn’t even know it is a car without this bit.
Also, disconnect and move the ABS sensor connectors on both sides.
Use the wire brush and release oil trick
Although this didn’t work for me and I ended up rounding the 5mm Allen socket off.
So I tried a nut splitter.
And gave up due to lack of access, and ended up drilling and splitting the top nuts with a chisel.

Be careful when using wire brush attachments and drills in the engine area as it would be very easy to damage a cable or coolant hose.
Again, jack up the car and support on axle stands.
The main difference with the rear units is that you cannot remove them while the anti roll bar is in the way.
First, remove the 4 x 10mm bolts from the exhaust heat shield. This will allow you to move it to get access to the roll bar mounts.
Undo the 2 x 13mm nuts that hold the mounts onto the body. You may need the wire brush and release oil again.
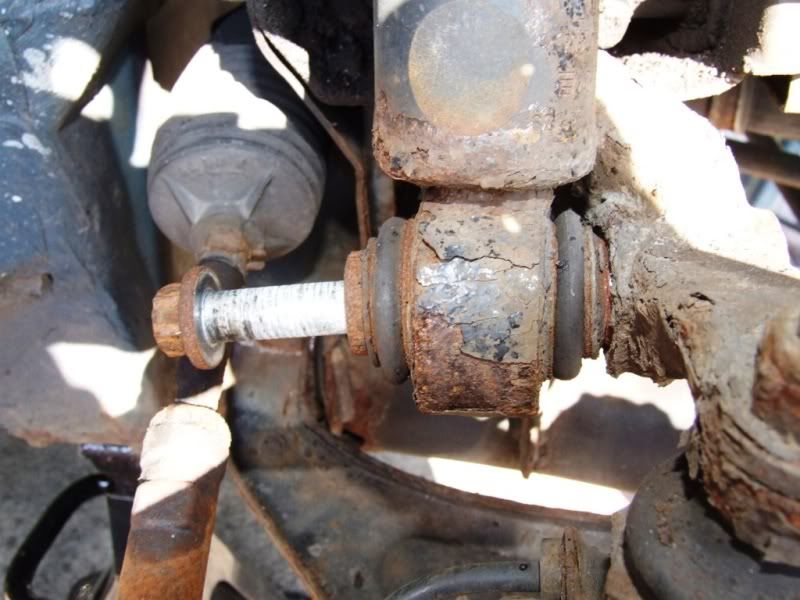
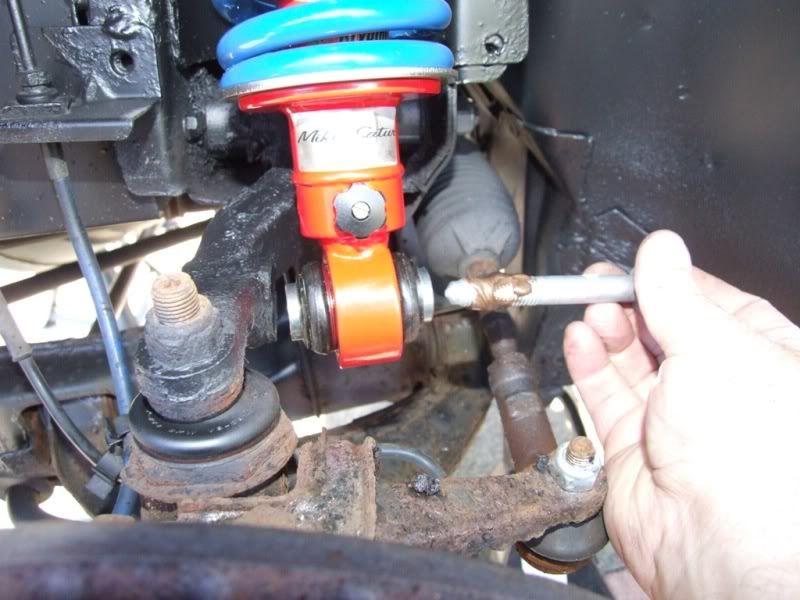
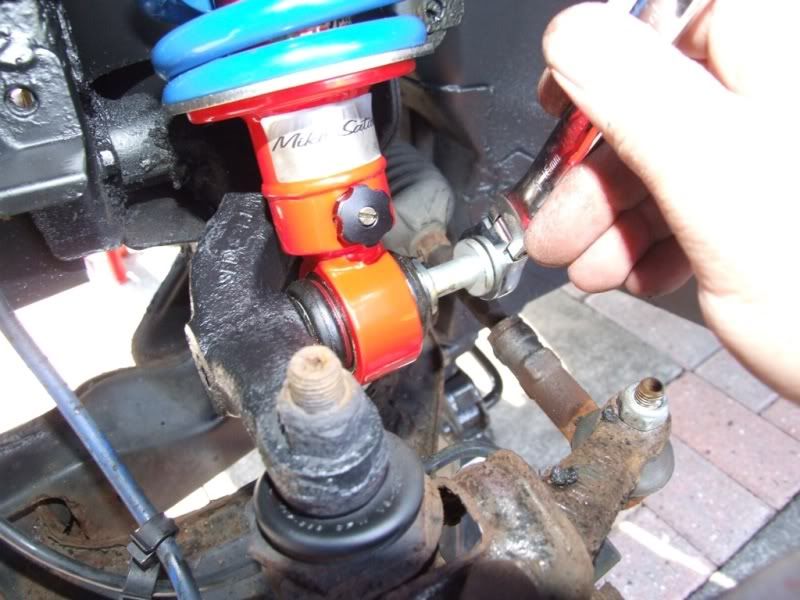
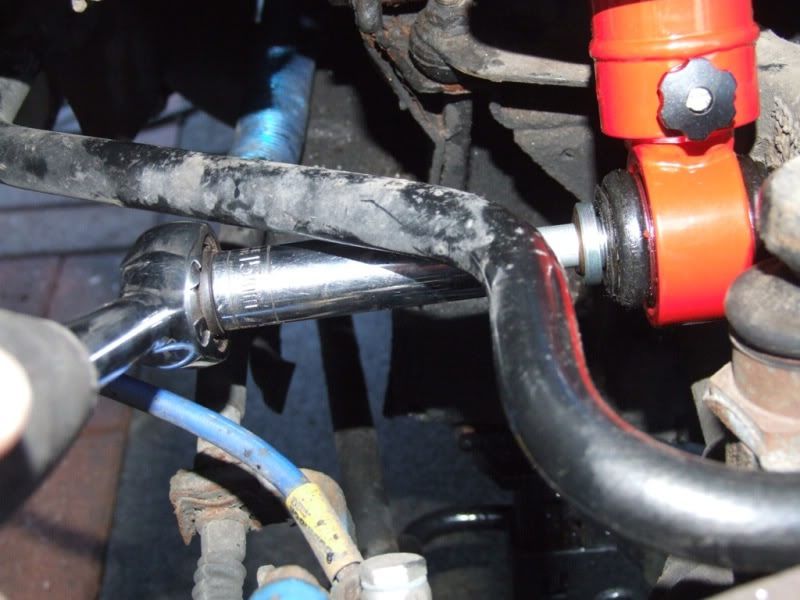
Undo the anti roll bar links on each rear hub.
This will now allow you to move the roll bar out of the way when removing the shock absorbers.
Do the wire brush, releasing oil and tightening/loosening thing on the lower bolt.
And remove the units in the same way as you removed the fronts.
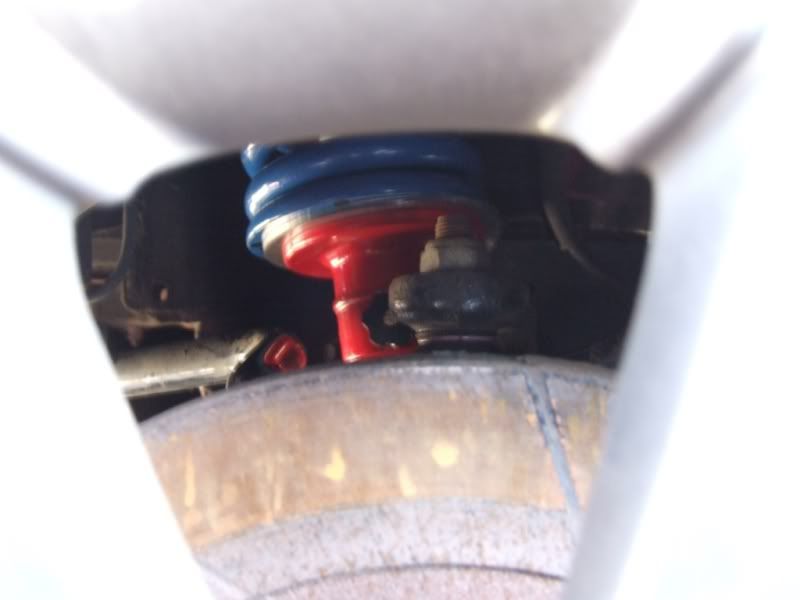
The only difference is that the rubber cup that fits on the top of the spring has a locating pin which goes to the rear of the car, in a hole on the suspension turret. Remember this. You can see it poking through in the next pic, below the top nut

You can also see it on this rebuilt unit ready to go back in.

Stripping down and rebuilding the units is the same as the front suspension.
Now refit the new units.
With the locating pin in the rear locating hole, fit the rubber/poly bush, washer and hand tighten nut to take the weight.
As before, line up the bottom of the strut with the suspension arm, remembering to use the jack to lift the hub aligning the holes, and insert the new copper greased lower bolt. Remember that the adjuster faces outwards.
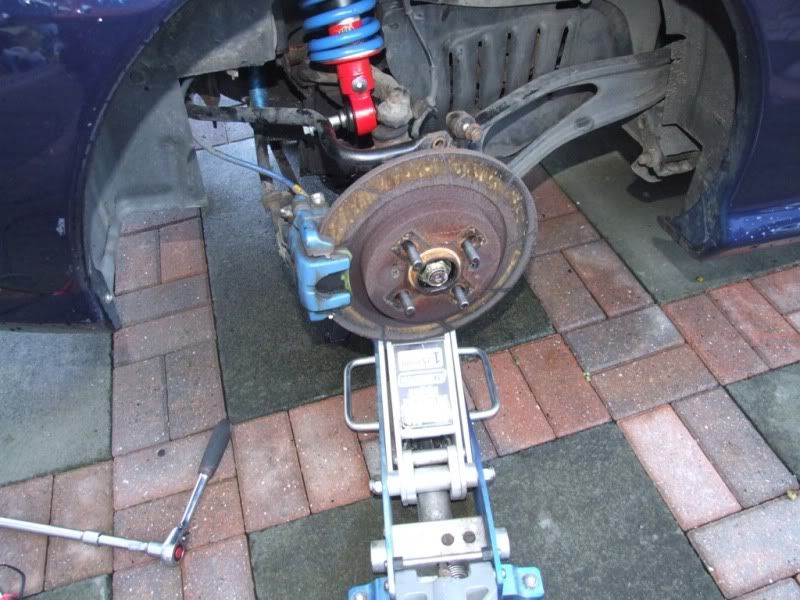
Again, raise the car, put the axle stands under both of the hubs and lower the car until the hubs are taking the full weight.
Torque up the bottom bolt and top nut as per the front units.
Refit the roll bar links and bolt the anti roll bar brackets to the bodywork under the heat shield and torque to the correct settings. 35Nm for the links and 22Nm for the anti roll bar clamp bracket.
Refit the heat shield.
Now refit the ECU and Coolant tank, remembering to reconnect any ABS connectors.
Refit the wheels and lower the car.
Your new suspension is now fitted.

The rebound can be adjusted to suit your taste, so take it for a test drive and fiddle with the settings until you achieve the best ride, just remember that both sides need to be the same. Front and rear can be different and is usually set up with a higher setting to the rear.
If you invest in a long screwdriver you will be able to adjust the settings without removing the wheels as you can see the adjuster through the spokes.
Enjoy your new springs.
The problem I had was a knocking from the front due to a worn shocker bush. I could have changed the bush but the shockers were looking a bit rusty.
Whether you are changing your suspension due to a faulty part or just because you want to upgrade to better or adjustable suspension, here is how I did mine.
Start by clearing out the under bonnet area.
Unbolt the horn and move it clear of the suspension top nut and move the ABS connector out of the way.
Also, unbolt the under bonnet fuse box moving it clear of the nearside top nut. Also unclip and move the ABS connector.
Using a wire brush or wire drill attachment, clean the top nut threads as much as possible to remove any rust etc. This will help when you remove the top nuts.
And spray with penetrating oil.
Next, loosen the wheel nuts and jack up the front of the car until the wheels are clear of the ground. Secure with axle stands and remove the wheels.
Now clean the threads of the bottom bolt
And apply penetrating oil.
Returning back to the under bonnet area, place a 17mm spanner on the top nut and hammer a 5mm Allen key into the top of the suspension strut. Most standard shock absorbers will have an Allen recess in the top, some may have a square top, in which case you need to use another spanner to hold it.
Loosen the top nut, but do not remove at this point.
Hammer a 15mm socket onto the lower bolt
And using a breaker bar and a length of tubing, if you have it, slowly tighten the bolt until you feel it move slightly. Yes, that’s right, tighten it. This breaks the bond with the thread and allows you to loosen the bolt. I have used this method for as long as I can remember and it works 99% of the time.
Once the bolt moves slightly you can use the breaker bar and tube to loosen the bolt. When the bolt is loose enough you can use a ratchet to further undo the bolt.
Do not fully remove the bolt yet.
Remove the top nut and washer. Do not lose the washer as they are difficult to get.
Now fully remove the bottom bolt
And knock the bottom of the shocker sideways to free it from the upper suspension arm.
Beware that the suspension unit may drop now and is quite heavy for its size.
If it doesn’t drop then you may need to tap the top of the unit with a hammer.
Drop the unit down and when the top of the suspension unit clears the tower, pull it out towards you and lift the unit clear.
Repeat at the other side of the car
I had to use the old trick of linking 2 spanners to get enough leverage to remove the nearside top nut.
Once both front units are removed you can start to strip them down as there are components that you need to remove and fit to your new struts.
Remove the large rubber cover off the top of the spring.
Now fit your spring compressors and wind them on to compress the spring. This will take the tension off the retaining nut.
Using the 5mm Allen key and a 14mm spanner, loosen and remove the retaining nut. Do not do this without compressing the spring first as this could cause injury.
Keep the components that you remove in the order you remove them and the correct way up as this will help when fitting them to the new suspension.
Now remove the spacer and rubber bush.
The washer
Cupped washer and spring retainer. Make a note of which way up the cupped washer sits for replacement.
Slowly release the tension off the springs a little at a time from each compressor in turn
until you can remove the compressors safely.
Slide the spring off the shock absorber unit
And you will see the dust cover. Slide the dust cover off, complete with the metal cup that has probably become one with the plastic dust cover. Also remove the rubber bump stop by sliding it up the shaft, remembering which way up it sits.
Now pick up a new suspension unit
And remove the spring
Slide the rubber bump stop onto the threaded shaft, tapered end towards the main body
And then, after cleaning, slide the dust cover and metal cup over the bump stop.
Now grab the new spring and fit the spring compressors. One tip I have learned from doing this, is leave the plastic wrapping on the spring (not shown in this shot) when fitting the compressors. This will protect the spring as the compressors tend to dig in and can remove a bit of the blue protective coating. If you do leave the wrapping on, then pull enough off the top and bottom so that it won’t be trapped between the spring and damper when you come to remove it.
Once the spring has been compressed enough, fit the spring retainer over the top
And fit the cupped washer, making sure you fit it the correct way up.
Next fit the washer piece on top of the cupped washer
The next part is one of two identical rubber bushes. I bought new bushes and I bought uprated poly bushes from Rimmer Brothers http://www.rimmerbros.co.uk/Item--i-RNF100090LPOLY . You need two of these per shock absorber, so if you are doing the whole car then you will need 8 in total.
Fit the rubber/poly bush with the tapered end down over
Now fit the metal spacer tube, which should slide into the bush that you have just fitted.
And fit the retaining nut. If you can, torque to 25Nm
Now you can remove the spring compressors and refit the large rubber cover on the top of the spring. Your new unit is ready.
Do the same with the other front unit so you now have a nice shiny looking pair (Oooer missus)
While the shock absorbers and springs were out I also used the space to treat the rust with some stone chip resistant paint.
Before
After
Now comes the fitting bit.
Carefully lower the bottom of the unit down behind the hub
And feed the top of the unit into the suspension turret
So that the top of the unit feeds through the hole into the under bonnet area.
Fit the rubber/poly bush over the top, with the tapered side down over
Fit the top washer and top nut. Tighten a couple of threads by hand to take the weight of the unit.
Now apply some copper grease to the NEW lower bolt
Line up the bottom of the damper to the suspension arm, ensuring that the adjuster screw is pointing outwards (otherwise you won’t be able to adjust it once fitted), and insert the new bolt.
You may need to use a jack to slightly raise the hub so that the hole lines up with the hole in the damper.
Gently tighten the bolt, ensuring that it is going in square and not cross threading.
Now carefully raise the car and move the axle stand under the hub (Not the disc). Gently lower the jack until the suspension is fully compressed on the axle stand. You should always torque up suspension components when the suspension is taking the weight of the car.
Set your torque wrench to 100Nm
And torque the lower bolt to 100Nm
Now torque the top nut to 45nm
However. You might find that the strut starts turning before you get the full torque. There is no way to hold it and use a standard torque wrench, so you will have to use a spanner on the top of the thread and use a spanner to tighten the nut to your best guess.
You might want to set the rebound on the shock absorber before fitting the wheel. The consensus is around 12 clicks on the fronts and 17 clicks on the rear. However, this is just a starting point and you need to set it up to your own tastes.
Using a screwdriver, wind the screw fully anti clockwise. Now turn the screw the required number of clicks clockwise.
Now refit the wheel and lower the car on that side.
Fit the other unit using the same procedure.
Now refit the horn and the fuse box. Also make sure you clip the ABS connectors back in place.
We now move onto the rear units.
Things get a little bit more complicated here due to access issues.
Open the boot and you won’t see the tops of the suspension, mainly because they are hidden below the coolant expansion tank (offside) and the ECU (nearside).
Firstly, remove the top hose from the expansion tank and tuck it away safely.
Remove the two bolts holding the expansion tank in place and pull up to release the tank. Move it inward to a safe place but try to keep it level so as not to lose any coolant.
You should now be able to see the top of the offside suspension.
Now move to the nearside. Before carrying on, disconnect the negative connection on the battery.
Remove the top left and right 8mm bolts holding the ECU bracket to the boot wall.
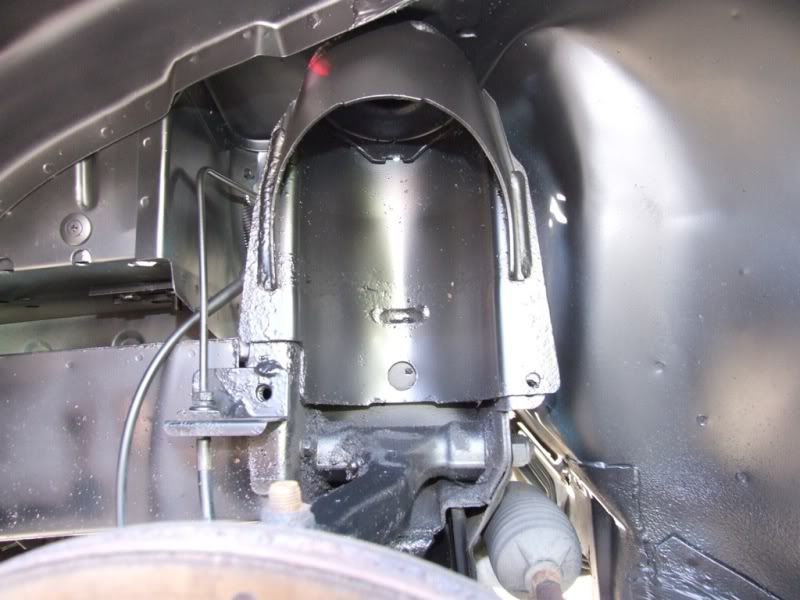
Pull the ECU and bracket upwards to release the bottom from the rubber grommet, shown in the centre of the next pic.
Tilt the bracket inwards towards the engine and you will see 2 connectors clipped to the inside of the bracket. Unclip them so that they fall free.
Also, unclip the two main ECU connectors. The connectors have a pull out clip at the top of the top connector and on the bottom of the bottom connector. Grab these and pull and they slide out and release the plug.
You can now remove the ECU and bracket. Store in a safe place, your car doesn’t even know it is a car without this bit.
Also, disconnect and move the ABS sensor connectors on both sides.
Use the wire brush and release oil trick
Although this didn’t work for me and I ended up rounding the 5mm Allen socket off.
So I tried a nut splitter.
And gave up due to lack of access, and ended up drilling and splitting the top nuts with a chisel.
Be careful when using wire brush attachments and drills in the engine area as it would be very easy to damage a cable or coolant hose.
Again, jack up the car and support on axle stands.
The main difference with the rear units is that you cannot remove them while the anti roll bar is in the way.
First, remove the 4 x 10mm bolts from the exhaust heat shield. This will allow you to move it to get access to the roll bar mounts.
Undo the 2 x 13mm nuts that hold the mounts onto the body. You may need the wire brush and release oil again.
Undo the anti roll bar links on each rear hub.
This will now allow you to move the roll bar out of the way when removing the shock absorbers.
Do the wire brush, releasing oil and tightening/loosening thing on the lower bolt.
And remove the units in the same way as you removed the fronts.
The only difference is that the rubber cup that fits on the top of the spring has a locating pin which goes to the rear of the car, in a hole on the suspension turret. Remember this. You can see it poking through in the next pic, below the top nut
You can also see it on this rebuilt unit ready to go back in.
Stripping down and rebuilding the units is the same as the front suspension.
Now refit the new units.
With the locating pin in the rear locating hole, fit the rubber/poly bush, washer and hand tighten nut to take the weight.
As before, line up the bottom of the strut with the suspension arm, remembering to use the jack to lift the hub aligning the holes, and insert the new copper greased lower bolt. Remember that the adjuster faces outwards.
Again, raise the car, put the axle stands under both of the hubs and lower the car until the hubs are taking the full weight.
Torque up the bottom bolt and top nut as per the front units.
Refit the roll bar links and bolt the anti roll bar brackets to the bodywork under the heat shield and torque to the correct settings. 35Nm for the links and 22Nm for the anti roll bar clamp bracket.
Refit the heat shield.
Now refit the ECU and Coolant tank, remembering to reconnect any ABS connectors.
Refit the wheels and lower the car.
Your new suspension is now fitted.
The rebound can be adjusted to suit your taste, so take it for a test drive and fiddle with the settings until you achieve the best ride, just remember that both sides need to be the same. Front and rear can be different and is usually set up with a higher setting to the rear.
If you invest in a long screwdriver you will be able to adjust the settings without removing the wheels as you can see the adjuster through the spokes.
Enjoy your new springs.
Last Edit:12 years 11 months ago
by cjj
Last edit: 12 years 11 months ago by cjj.
Please Log in or Create an account to join the conversation.
- David Aiketgate
-
 Offline
- David
-

- mgf mk2 freestyle mpi 16" wheels, in Anthracite.
- Posts: 20218
- Thanks: 4407
Replied by David Aiketgate on topic Re: New shock absorber and springs - How to
Posted 12 years 11 months ago #27146
Excellent work, Clive. :broon:
I hadn't realised that the Tf was so different to The F.
Added to the A-Z. :yesnod:
I hadn't realised that the Tf was so different to The F.
Added to the A-Z. :yesnod:
David
:shrug:
Please Log in or Create an account to join the conversation.
Time to create page: 0.534 seconds