Alternator. - How to change
On the way home one day I broke down (well the car anyway). The symptoms were the ABS light came on, then the MIL, then the steering went heavy and my lights started dimming. Checked the voltage and it was down to about 7-8 Volts. No battery warning light and no charging. Nice RAC man lent me his battery pack so that I could drive the rest of the way home.
Well, after carrying out some voltage checks it was 95% certain that it was a knackered alternator. I was going to use the one off the VVC engine that I just bought, but it was different connections and I didn't want to start altering the car wiring.
I removed the old one and exchanged it for a re-manufactured one (Wallet is now best part of £200 lighter). If you are lucky, you might get a new one on e-bay for around £80 or a second hand one.
Here is how I did it.
If there is any doubt in your mind, disconnect the battery. However, on my TF there is an 80 Amp fuse just inside the engine bay, near where the two torsion bars come together. First you have to take off a plastic cover, and then the fuse just pulls out. If you don't do this then you can short out the alternator connection with the chassis causing damage to the car and maybe yourself.

First of all you have take the rear roof and inspection panel off to gain access from the top.
Next, jack up the car so that you can gain access from underneath. Remember to chock the front wheels and use axle stands for safety.

Remove the offside rear wheel and you will see a plastic cover between you and the engine. This is held on with about 3 plastic crosshead screws. Remove these and remove the plastic panel.

This will now give you access to the crankshaft pulley, alternator belt and two of the bolts that you need to undo.

You can also just see the alternator through the subframe

You can also see the offending alternator from above, through the inspection cover. This picture shows the belt removed, but we haven't got that far yet.

To give yourself more room, remove the heat shield from the exhaust. Obviously this will be hot if you have recently run the engine, so be careful. There is a 13mm nut and 2 10mm self tappers (one just out of view.

Loosen and remove the nut from the top securing bolt. Leave the bolt in for now.
Next, loosen the bolt that holds the adjuster bracket to the engine, from the wheel arch.

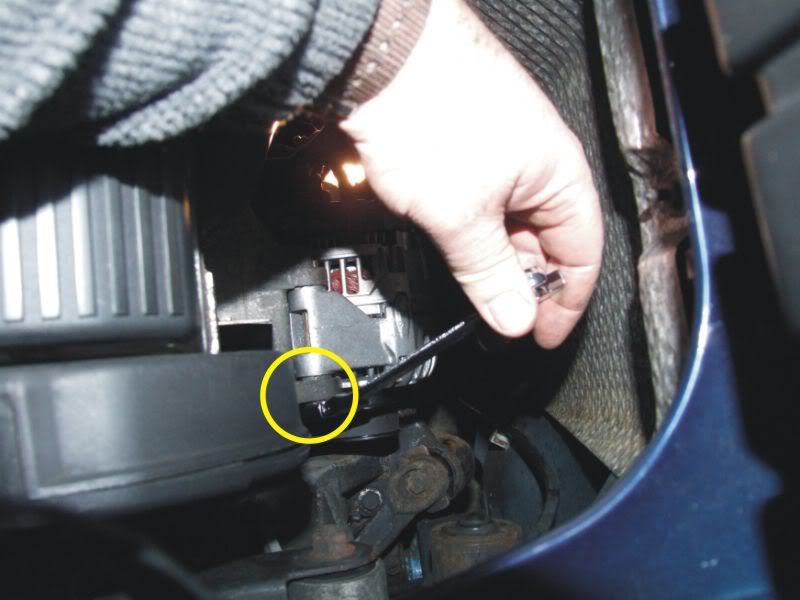
Loosen and remove nut from the lower alternator securing bolt. Do not remove the bolt yet.
The alternator is now loose on the 3 securing bolts. You should now slacken off the 8mm adjusting bolt, shown here on a removed engine (no way to get the camera in on the car). This is best done from above by feel (you cannot see it) or from underneath the car.
Now remove the belt, remove the lower securing bolt from the alternator, and the adjuster bracket should now swivel down, free of the alternator.

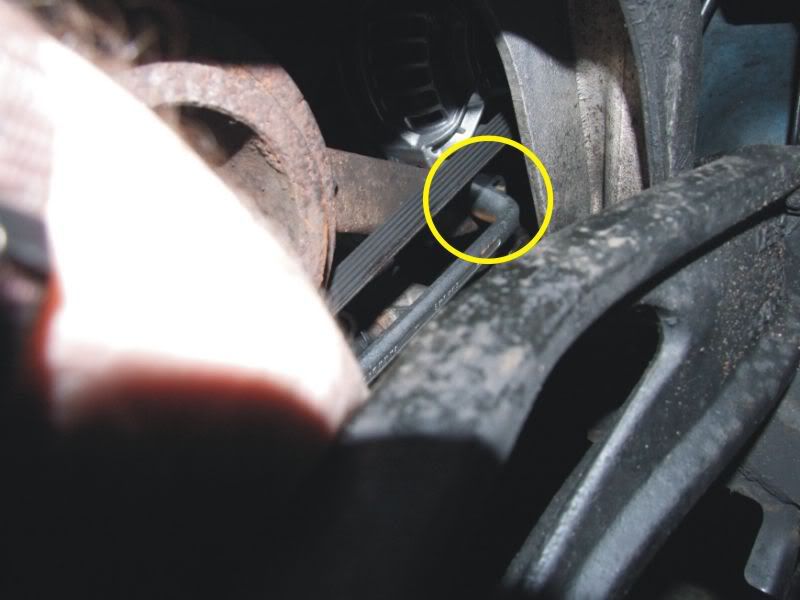
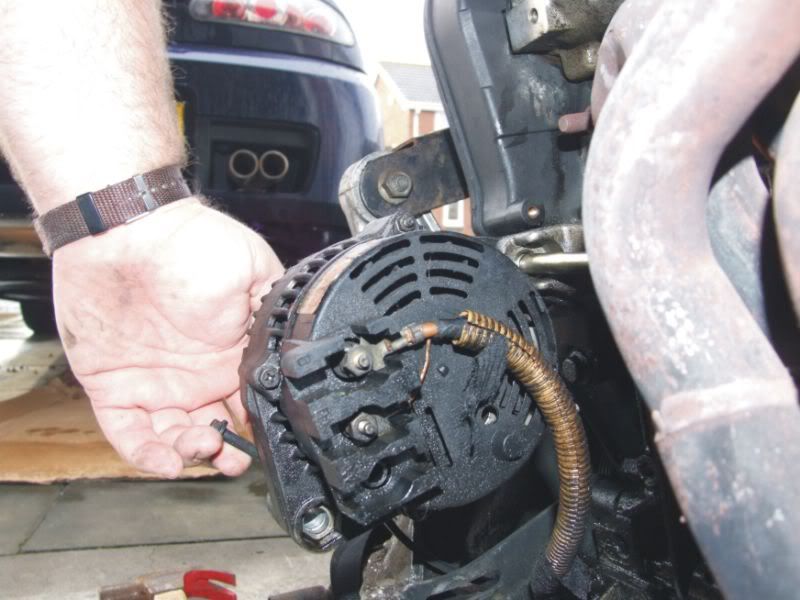
You should now disconnect the main live cable, which is held on by a 13mm nut which is held captive on the cable crimp, so you cannot drop or lose it. Also disengage and remove the plug at the top.

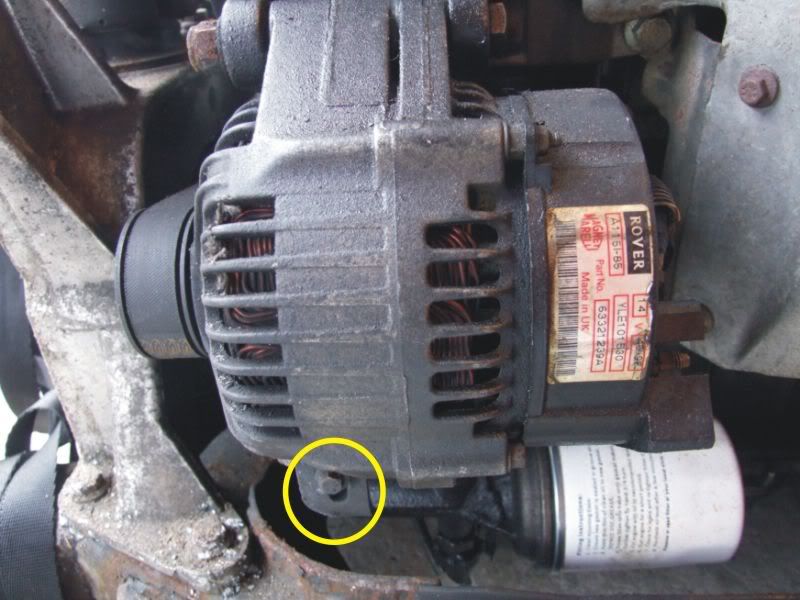
You now need to take the weight of the alternator and withdraw the top securing bolt. Warning...Once you remove this bolt the alternator could drop. In my case the alternator was still wedged in and needed a bit of waggling and levering before it came free. Now remove upwards and out.

Here you can see the loom with the two connections in. There are actually 3 connections as there are 2 in the plug. One is for the battery warning light, the other (I assume) is a live battery feed for excitation of the alternator. The battery warning light circuit is fed from fuse 25 in the fuse panel under the steering wheel. The excitation feed comes from god only knows where, as it isn't even shown on my circuit diagrams.

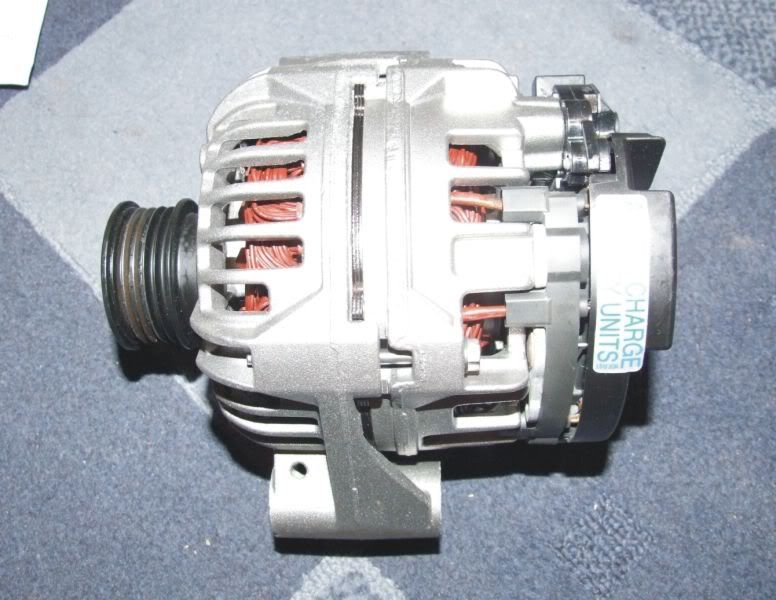
Here is the new alternator (Mmmm, shiny). It did come with a new pulley fitted. A bit annoying as it took me ages to take the old pulley off so that I could exchange the alternator. It didn't come with the 8mm adjuster bolt, so remove that and keep if you are planning on going the exchange route.
Refitting is the reverse of removing. Lower the new alternator in place and refit the upper securing bolt. Screw on the nut but do not fully tighten at this point. Reconnect the electrical connections (a bit of copper grease on the nuts and bolts will help on removal and rust resistance)
Clip the lower bracket back over the 8mm adjuster screw and refit the lower bolt through the alternator, so that it protrudes through the slot in the bracket. Refit the nut, but do not tighten at this stage.

Refit the belt and ensure that it is sitting correctly on both pulleys. Now tighten the 8mm adjuster screw until the correct tension is felt on the belt. I went for about 15mm movement up/down at the longest point. You can also twist the belt to get a feeling of how tight it is. There is probably a correct figure somewhere, but I have done a few belts in my time and tend to go by feel, which is difficult to put in words. Over tightening can cause more problems than under tightening, as you are putting a greater load on the bearings.
Once the belt is at a correct tension you can tighten the 3 alternator securing bolts. The upper bolt
The engine securing bolt
And the bottom alternator securing bolt
Your alternator is now fitted. It may be worth starting the engine at this point and checking that the new belt doesn't squeal when you put the heater on full along with the lights. Now to put the car back together. Don't forget to put the plastic cover back in the wheel arch.

Put the wheel back on, but before putting the rest of the car back together, it might be worth checking that the alternator is charging OK. Don't forget to put the 80 Amp fuse back in the holder. I checked the battery voltage and it was 12.48 Volts. Started the car and.....It works, 14.18 Volts. Woohoo.

Now you can put the rest of the car back together.
I would imagine that this process is the same for most F/TF models, but there will be minor differences. For example, the heat shields are different, I am not sure if the 80 Amp fuse is present in all models, and obviously the alternators are slightly different connections. Here are the connections on the F VVC engine that I have. As you can see it is 2 bolt on connections.
It may be advisable to put some threadlock on the 8mm adjuster bolt, as this has been known to work loose and fall out.
Hope this helps some people.
Usual stuff applies. Although I have tried to think of everything you need, I can't be held responsible if you try this yourself and things go wrong.
Well, after carrying out some voltage checks it was 95% certain that it was a knackered alternator. I was going to use the one off the VVC engine that I just bought, but it was different connections and I didn't want to start altering the car wiring.
I removed the old one and exchanged it for a re-manufactured one (Wallet is now best part of £200 lighter). If you are lucky, you might get a new one on e-bay for around £80 or a second hand one.
Here is how I did it.
If there is any doubt in your mind, disconnect the battery. However, on my TF there is an 80 Amp fuse just inside the engine bay, near where the two torsion bars come together. First you have to take off a plastic cover, and then the fuse just pulls out. If you don't do this then you can short out the alternator connection with the chassis causing damage to the car and maybe yourself.
First of all you have take the rear roof and inspection panel off to gain access from the top.
Next, jack up the car so that you can gain access from underneath. Remember to chock the front wheels and use axle stands for safety.
Remove the offside rear wheel and you will see a plastic cover between you and the engine. This is held on with about 3 plastic crosshead screws. Remove these and remove the plastic panel.
This will now give you access to the crankshaft pulley, alternator belt and two of the bolts that you need to undo.
You can also just see the alternator through the subframe
You can also see the offending alternator from above, through the inspection cover. This picture shows the belt removed, but we haven't got that far yet.
To give yourself more room, remove the heat shield from the exhaust. Obviously this will be hot if you have recently run the engine, so be careful. There is a 13mm nut and 2 10mm self tappers (one just out of view.
Loosen and remove the nut from the top securing bolt. Leave the bolt in for now.
Next, loosen the bolt that holds the adjuster bracket to the engine, from the wheel arch.
Loosen and remove nut from the lower alternator securing bolt. Do not remove the bolt yet.
The alternator is now loose on the 3 securing bolts. You should now slacken off the 8mm adjusting bolt, shown here on a removed engine (no way to get the camera in on the car). This is best done from above by feel (you cannot see it) or from underneath the car.
Now remove the belt, remove the lower securing bolt from the alternator, and the adjuster bracket should now swivel down, free of the alternator.
You should now disconnect the main live cable, which is held on by a 13mm nut which is held captive on the cable crimp, so you cannot drop or lose it. Also disengage and remove the plug at the top.
You now need to take the weight of the alternator and withdraw the top securing bolt. Warning...Once you remove this bolt the alternator could drop. In my case the alternator was still wedged in and needed a bit of waggling and levering before it came free. Now remove upwards and out.
Here you can see the loom with the two connections in. There are actually 3 connections as there are 2 in the plug. One is for the battery warning light, the other (I assume) is a live battery feed for excitation of the alternator. The battery warning light circuit is fed from fuse 25 in the fuse panel under the steering wheel. The excitation feed comes from god only knows where, as it isn't even shown on my circuit diagrams.
Here is the new alternator (Mmmm, shiny). It did come with a new pulley fitted. A bit annoying as it took me ages to take the old pulley off so that I could exchange the alternator. It didn't come with the 8mm adjuster bolt, so remove that and keep if you are planning on going the exchange route.
Refitting is the reverse of removing. Lower the new alternator in place and refit the upper securing bolt. Screw on the nut but do not fully tighten at this point. Reconnect the electrical connections (a bit of copper grease on the nuts and bolts will help on removal and rust resistance)
Clip the lower bracket back over the 8mm adjuster screw and refit the lower bolt through the alternator, so that it protrudes through the slot in the bracket. Refit the nut, but do not tighten at this stage.
Refit the belt and ensure that it is sitting correctly on both pulleys. Now tighten the 8mm adjuster screw until the correct tension is felt on the belt. I went for about 15mm movement up/down at the longest point. You can also twist the belt to get a feeling of how tight it is. There is probably a correct figure somewhere, but I have done a few belts in my time and tend to go by feel, which is difficult to put in words. Over tightening can cause more problems than under tightening, as you are putting a greater load on the bearings.
Once the belt is at a correct tension you can tighten the 3 alternator securing bolts. The upper bolt
The engine securing bolt
And the bottom alternator securing bolt
Your alternator is now fitted. It may be worth starting the engine at this point and checking that the new belt doesn't squeal when you put the heater on full along with the lights. Now to put the car back together. Don't forget to put the plastic cover back in the wheel arch.
Put the wheel back on, but before putting the rest of the car back together, it might be worth checking that the alternator is charging OK. Don't forget to put the 80 Amp fuse back in the holder. I checked the battery voltage and it was 12.48 Volts. Started the car and.....It works, 14.18 Volts. Woohoo.
Now you can put the rest of the car back together.
I would imagine that this process is the same for most F/TF models, but there will be minor differences. For example, the heat shields are different, I am not sure if the 80 Amp fuse is present in all models, and obviously the alternators are slightly different connections. Here are the connections on the F VVC engine that I have. As you can see it is 2 bolt on connections.
It may be advisable to put some threadlock on the 8mm adjuster bolt, as this has been known to work loose and fall out.
Hope this helps some people.
Usual stuff applies. Although I have tried to think of everything you need, I can't be held responsible if you try this yourself and things go wrong.
Last Edit:15 years 8 months ago
by cjj
Last edit: 15 years 8 months ago by David Aiketgate.
Please Log in or Create an account to join the conversation.
I have a mgf centre 4-2-1 manifold and had to take this off also as one of the bolts would not come out past it
BILSTIEN DAMPERS, 4-2-1 MANIFOLD, HEAD WORK BY SABRE.
by helsbyman
Please Log in or Create an account to join the conversation.
Can you replace the voltage regulator, Diode bushes part of alternator with taking alternator off
http://www.dmgrs.co.uk/products/rover-75-mg-zt-cdti-alternator-regulator-and-brush-kit-fits-yle000260-and-yle102500
See link
http://www.dmgrs.co.uk/products/rover-75-mg-zt-cdti-alternator-regulator-and-brush-kit-fits-yle000260-and-yle102500
See link
Last Edit:12 years 5 months ago
by howstar
Last edit: 12 years 5 months ago by howstar.
Please Log in or Create an account to join the conversation.
Time to create page: 0.389 seconds