
Topic
02 TF 160 rear end refurbishment 10 years 5 months ago #133085

 We had a very enjoyable summer in it, but all the time I was researching improvements.


 Out came the cleaning materials, and 20 minutes of unplanned valeting later, it looked like it still needed another clean. This was shaping up to be another great day.
 86Rv(OBSOvyQQUPQ~~60_1.JPG?set_id=8800005007)
Monday 28th October
I have the week off as it’s half term, and we had arrange to visit relatives. My uncle worked for AP Lockheed, and all the companies it became until his retirement about 8 years ago. He has a Herald Vittesse, a 1946 Riley 1 1/2 RME, and a garage full of tools, which he has been gradually donating to me on long term loan. Of course we got talking, and he lends me a 1m long pole to go over my breaker bar.

Tuesday 29th October
Time to attack that near side hub nut again! Pole goes over breaker bar, heaving and grunting is followed by another crack, with me face planting the floor shortly after. If the wife had been watching she’d have been doubled up in fits of laughter.
This was the result


But I was determined to achieve something, so the car went up on axel stands and I removed the exhaust, and cat. This took the rest of the day as the bolts at the cat to back box end had rusted so much that they had become one with the cat and no nut shaped objects were anywhere to be seen.
So I decided to grind the studs on the back box side off and then drift the remainder of the bolts out.

This was successful, but I think I have bent the flange on the cat. Looks like an item is moving from the “wish list” to “needed” list then.
You can see how badly corroded the nuts were in this picture

At the other end (cat to down pipe) the top two bolts came undone ok, but the bottom one was had well and truly corroded on. Out came the angle grinder again.
Once the exhaust was off I tackled the heat shield, the bolts were again totally seized so I sawed the ends of in a vain attempt to make removal easier, but both just snapped off.
As access was now good I also removed the ARB
The corrosion doesn’t look too bad here

Wednesday 30th October
Decorating the spare room.
Thursday 31st October
I started to step through CJJs guide. what a difference it makes when someone has done the hard work already

Made one change in the procedure; undid the coolant hoses at rear-end rather than the front as they need to be done anyway.
Found 1 correction:-
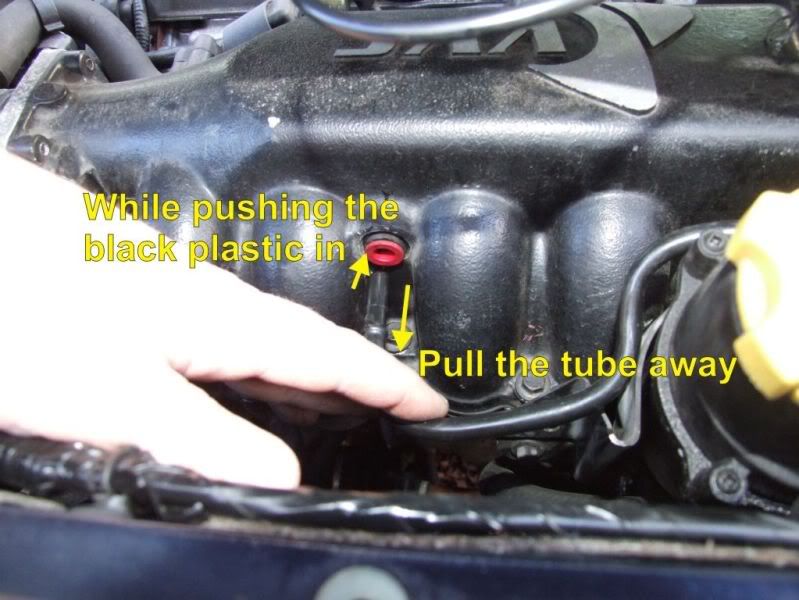
You push the red plastic in!
And a difference; The 80Amp fuse has a cover

which has to be removed by sliding it up

You are then able to undo the screw which secures it in position

Note: wherever it’s practical I put fastenings (screws, bolts, etc) back where they come from so I don’t end up with too much “where did that come from?” head scratching. All others go into labelled resalable bags.
And finally as I had the B&G coolant alarm I removed it’s connection to the reversing light above the gear box.
Once I got to the point with the paving stone I decided that was a good place to stop.
Friday 1st November
Completed CJJ’s steps up to the wood work lesson, and skipped forward the other connections CJJ found as he was lifting the car over the sub frame as a wasn’t going to be undoing the sub-frame until that hub nut was released.
I noticed this sensor, which is forward (when looking from the rear of the car) of the expansion bottle.


Anyone know what it’s for?

Just as I was packing up the postie arrived with that longer break bar I ordered. Better late than never!
Lots of grunting and swearing later, the nut was still firmly in place, an old trolley jack handle I was using was now shaped like a banana, and I didn’t want to risk breaking the new tool or myself.

Are these drive shaft threads handed? No mention in CJJs guide for replacing the hubs or in my F/TF workshop manual. Time to reach out to the T-Bar folks for some help. David replied that they are just damn tight.
Had a look on e-bay, and found these

w!eBKMOF(w(Hw~~_1.JPG?set_id=8800005007)
and the company is only 30 miles away.
Saturday 2nd November
Called PJ Allsorts, both items in stock, and can be collected from them.
Also decided I need one of these for bleeding the brakes, once the job is done.
Got back home around 2pm having done some other shopping chores. Then put another coat of paint on in the spare room.
4pm time to break out the new toys.
The socket was a very tight fit as the outer edge was fouling, but at least the breaker bar did not bending. 5 minutes of heaving and swearing later and another old trolley jack handle was bent like a banana as was a wheel stud.

I decided to put the wheels on and drop the car back down of the axel stands.
Damn, the socket was also too wide to fit through the centre of the wheel.
Glad I checked that before completing the drop down from the axel stands.
Time to give it up as a lost cause?

Never!
I wandered around the garage wondering what I could use as a stronger brace, and spotted the broken breaker bar. Offered it up, but in conjunction with the ¾” 32mm socket it was too thick.
Ok, might as well try the new ½” breaker bar again, what did I have to loose?
Heave, grunt, bend, crack.
Shit I bust something again….
No
Noo
Nooooo
The nuts come undone.

Yes!
Time for

I packed up and went in.
I’m back at work Monday so the next instalment will be next Sunday at the earliest.


 . To complete removal I tried using my trolley jack to push the taper back into the arm, but even when I had applied enough force to lift the car slightly off the axel stand, turning the nut simply rotated the ball joint


")


