Sign In   Register

Topic

Modifying the 48mm Throttle Body 12 years 10 months ago #24624

  • PQD44's Avatar Topic Author
  • PQD44
  • Offline
  • Master MGer
  • Master MGer
  • It's only the first 100 years that are difficult
  • Posts: 4386
  • Thanks: 1266
The Problem?

In order to help the engine breath and increase air flow to improve torque and bhp it has been shown that it is advantageous to replace the standard 48mm throttle body with a 52mm one as fitted to Trophy 160.
The pre 2001 MGF were fitted with an SU plastic throttle body which has had a reputation for sticking due to a distorted body when hot generally caused by over tightening of a jubilee clip on the air filter side.
Later model used a Dellorto alloy throttle body.

52mm throttle bodies are expensive, ranging second hand ~ £70 - £100 and new around £140+. :(

How do I know which one is fitted to my car
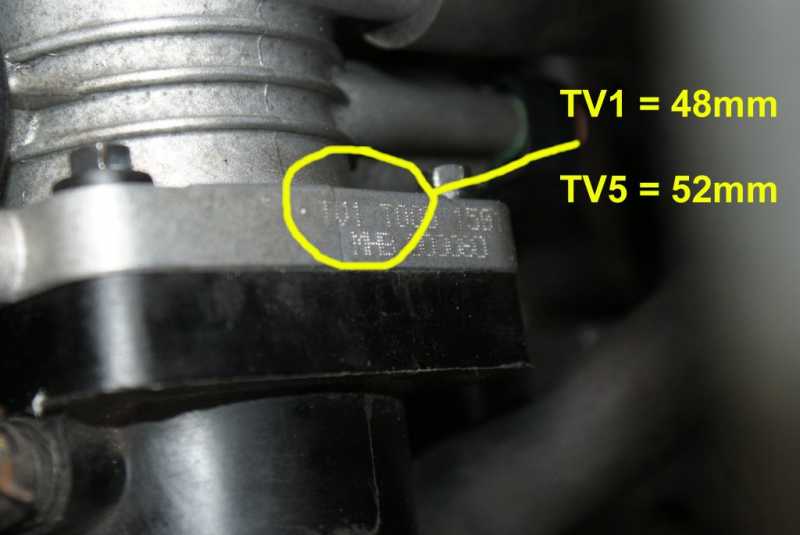
? Have a look between the air filter and the engine, the one in this photo is an alloy Dellorto throttle body. To the left is the large pipe leading to my K&N 57i filter, this is where you would normally find the standard air filter


If the throttle body is black plastic it is the SU 48mm. If it is alloy then on the upper edge you will find a code engraved on it with one of two codes


TV1 indicates a 48mm and TV5 indicates a 52mm throttle body.

More information on this subject can be found Here

Tools needed:
8mm socket on an extension, 8mm spanner, screw drivers, file, emery paper, solder, ceramic tile or other non metallic heat resistant flat surface

The Fix

You can modify your 48mm throttle body free of charge and the work is quite easy to do and can be completed in less than one hour. The results are an improvement over the standard 48mm version and the modification to the 48mm Dellorto detailed here is a popular modification made by Lotus Elise owners.

The modification involves the removal of the wedge attachment and filling the fixing holes. This wedge is fixed to the butterfly in order to soften the throttle response, to make the engine response more subdued at low revs. This wedge does however greatly restrict the air flow.


Depending on which throttle body you have follow the appropriate insttructions

The how to for the SU plastic throttle body can be found Here .
This is an excellent thread with lots of additional information and so I feel there is little point repeating it in this thread.
Note:The modification of the plastic throttle body is shown with quite a bit of work on the actual body as well as the butterfly. It is up to you how much you want to modify the body, but the vast majority of the gains will be achieved by just modifying the butterfly

Dellorto Alloy Throttle Body
After opening the boot and removing the wire cover the modification of the Dellorto throttle body starts with the removal of the unit which is attached to the air filter by a jubilee clip and to the plenum by 4, 8mm bolts.

The two bolts nearest the rear of the car are quite simple to reach with a socket on an extension and wrench, however the other two I found needed to be loosened with a spanner. Once loosened they can then be unscrewed by hand.


All that remains to complete removal is to disconnect the two rubber hoses, the throttle sensor plug and the throttle cable, which is held by the end of it by a T piece which needs sliding out.

If you require a pictorial guide to this refer to this article


With the throttle body removed you can now remove the metal wedge


Next you need to unscrew the two screws holding the butterfly to the spindle


To release the butterfly rotate the spindle 90 degrees, the butterfly disc will now just slide out


The disc now needs to be prepared for soldering by cleaning in and around the mounting holes which are no longer needed.

I used a blow torch to heat the disc but you could hold the disc in pliers and heat it over a gas cooker. The disc needs to be hot enough so that solder will readily melt and so fill the holes.
To do this place the heated disc on a tile or other non metallic flat surface and then touch the inside of the holes with the solder allowing it to melt and fill the holes.


Once cooled the area around the filled holes may be sanded smooth.
The following user(s) said Thank You: gotenks1321, Leigh Ping, tui

Please Log in to join the conversation.

Last edit: Post by PQD44.

Re:fitting the throttle body 12 years 10 months ago #24625

  • PQD44's Avatar Topic Author
  • PQD44
  • Offline
  • Master MGer
  • Master MGer
  • It's only the first 100 years that are difficult
  • Posts: 4386
  • Thanks: 1266
Re-assembly is now just a case of rotating the spindle, inserting the disc and fixing with the two screws. Your throttle body should now look like this


which is a vast improvement in air flow compared to what you started with or the SU plastic bodied throttle


Refitting the throttle body is simply the reverse of removal.

Just make sure you reconnect the throttle cable first then fix the four bolts and finally the two rubber hoses not forgetting the throttle position sensor plug like I did first time ;) wondering why the car was sitting at 1800 revs in idle.

After moving things around or replacing a throttle body you need recalibrate the throttle position sensor.

To do this follow this simple procedure;

1. With the engine off, insert the key and turn to position 2, all the instrument check lights on, without starting the engine.

2. Press and release the accelerator pedal 5 times, using all of the accelerator pedal travel.
This will let the ECU calibrate the throttle position.

3.Turn the ignition off, remove the key and wait for the ECU to power down saving the new settings. This normally requires about 20 secs.

4. Start the car in the normal way. The throttle should now be reset.


Go for a drive, but do remember to let the oil temp get up before revving over 3000 rpm, now enjoy the difference, more torque at the low end and a more responsive throttle. With my K&N 57i I could also hear a difference. :cheer:
Attachments:
The following user(s) said Thank You: psymon, David Aiketgate, Leigh Ping, CliffH

Please Log in to join the conversation.

Last edit: Post by PQD44. Reason: improve clarity

Re: Modifying the 48mm Throttle Body 12 years 10 months ago #24627

An excellent modification, Paul! :thumbsup:

Something to add to the list! :yesnod:

You could have also knife-edged the leading edge of the butterfly, to increase air flow. :yesnod:
David
:shrug:

Please Log in to join the conversation.

Re: Modifying the 48mm Throttle Body 12 years 10 months ago #24633

Looks like it should make a good bit of difference. Am I the only one who would be worried about the solder falling out though? :ohmy:

Please Log in to join the conversation.

Re: Modifying the 48mm Throttle Body 12 years 10 months ago #24636

Looks like it should make a good bit of difference. Am I the only one who would be worried about the solder falling out though? :ohmy:

I thought about that, but the thread in the hole should keep it secure. :yesnod:
David
:shrug:

Please Log in to join the conversation.

Re: Modifying the 48mm Throttle Body 12 years 10 months ago #24637

Looks like it should make a good bit of difference. Am I the only one who would be worried about the solder falling out though? :ohmy:

I thought about that, but the thread in the hole should keep it secure. :yesnod:


Ah yes, of course. I was thinking he'd smoothed the hole for some reason when he's just cleaned it up :silly:

I'm going to have to go and look at my 52mm now whilst I've got the filter off to see if it's the same setup.

Please Log in to join the conversation.

Last edit: Post by gotenks1321.

Re: Modifying the 48mm Throttle Body 12 years 10 months ago #24642

Looks like it should make a good bit of difference. Am I the only one who would be worried about the solder falling out though? :ohmy:

I thought about that, but the thread in the hole should keep it secure. :yesnod:


Ah yes, of course. I was thinking he'd smoothed the hole for some reason when he's just cleaned it up :silly:

I'm going to have to go and look at my 52mm now whilst I've got the filter off to see if it's the same setup.

Tbh, I was surprised that there was a wedge on there, I don't think I've ever seen it before.:shrug:
David
:shrug:

Please Log in to join the conversation.

Re: Modifying the 48mm Throttle Body 12 years 10 months ago #24657

  • PQD44's Avatar Topic Author
  • PQD44
  • Offline
  • Master MGer
  • Master MGer
  • It's only the first 100 years that are difficult
  • Posts: 4386
  • Thanks: 1266
The wedge was originally there to make the throttle response more subdued, making the car more drivable by anyone around the supermarket car parks (not late at night doing doughnuts :lol: ).

Regarding the solder.

I chamfered the holes on both sides and heated the disc until it was hot enough to melt the solder with ease. Thus the shape of the solder is a sort of I (capital I) in profile so it cannot fall out and as long as the area is clean and the disc hot enough you will get a permanent bond.

Regarding feathering the leading edge, yes you can do that but be careful not to damage the sealing edge otherwise when the throttle should be closed you could get air entering. I reckon the improvements gained by removing the wedge are very large compared to the small extra gain from feathering the edge.
The following user(s) said Thank You: Peterpiper, Leigh Ping

Please Log in to join the conversation.

Last edit: Post by PQD44.

Re:fitting the throttle body 12 years 1 week ago #46581


Refitting the throttle body is simply the reverse of removal.

Just make sure you reconnect the throttle cable first then fix the four bolts and finally the two rubber hoses not forgetting the throttle position sensor plug like I did first time ;) wondering why the car was sitting at 1800 revs in idle.

After moving things around or replacing a throttle body you need recalibrate the throttle position sensor.

To do this follow this simple procedure;

1. With the engine off, insert the key and turn to position 2, all the instrument check lights on, without starting the engine.

2. Press and release the accelerator pedal 5 times, using all of the accelerator pedal travel.
This will let the ECU calibrate the throttle position.

3.Turn the ignition off, remove the key and wait for the ECU to power down saving the new settings. This normally requires about 20 secs.

4. Start the car in the normal way. The throttle should now be reset.


Go for a drive, but do remember to let the oil temp get up before revving over 3000 rpm, now enjoy the difference, more torque at the low end and a more responsive throttle. With my K&N 57i I could also hear a difference. :cheer:


So this is what I have to do, and all I have to do, if I replace my 48mm body with a 52mm body?

Please Log in to join the conversation.

Re:fitting the throttle body 12 years 1 week ago #46582

:yesnod:
David
:shrug:

Please Log in to join the conversation.

Re:fitting the throttle body 12 years 6 days ago #46939

PAUL, my 1996 MGF has an alloy throttle body on it, which was replacing the plastic one. very, very difficult to read the codes printed on the top , tried rubbing it but made it worse, as far as i can see the code is TV6 unable to read the other numbers even with a high intensity light. I have a loupe, see if that works :slapme:

Please Log in to join the conversation.

Re: Modifying the 48mm Throttle Body 12 years 6 days ago #46949

  • PQD44's Avatar Topic Author
  • PQD44
  • Offline
  • Master MGer
  • Master MGer
  • It's only the first 100 years that are difficult
  • Posts: 4386
  • Thanks: 1266


If it looks like a 6 then it's probably a 5 and someone has done you a favour and replaced the original with a 52mm throttle body. The way to be sure is to just measure it.
The other numbers are not needed to identify the size.

Please Log in to join the conversation.

Last edit: Post by PQD44.
Time to create page: 0.120 seconds
© 2024 The-T-Bar.com All Rights Reserved. Hosted By SEBS IT